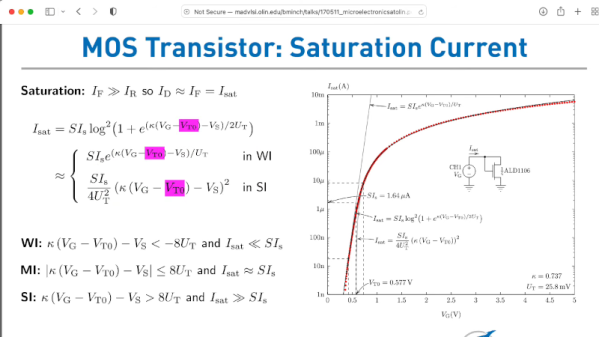
We all know that fake chips are a risk when it comes to buying parts on eBay or from Chinese markets such as AliExpress. It’s a simple enough scam, take a cheap chip and mark it as an expensive one, pocket the difference. It’s happened in several different forms, with everything from completely different devices through cheaper equivalents to incredibly, chips purpose fabricated to emulate better-known ones. We have a chance to see such a scam in action via [LinuxJedi], with a 6502 that wasn’t quite as it seemed.
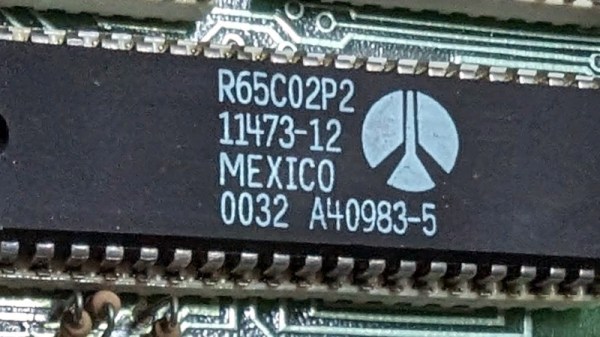
The chip in question was a Rockwell 65C02 destined for an Acorn Atom, and when installed it failed to deliver the expected power consumption saving. Unsurprisingly when tested it turned out to be a fake, in this case a run-of-the-mill 6502 with new markings. The interesting part for Hackaday readers comes in the physical clues. The too-bright markings started to dissolve with a bit of acetone. A deeper investigation revealed the date and wafer codes did not agree with the branding. A new chip was secured which also turned out to be a fake, though in this case a real 65C02 rated for a lower clock speed than marked.
It’s evident that in-demand retro chips are likely to be an ever-greater minefield of fakes as time passes, and the number of survivors dwindles. It’s as well to be aware then and learn from any fakes like these posted online. It’s not the first fake chip we’ve brought you.