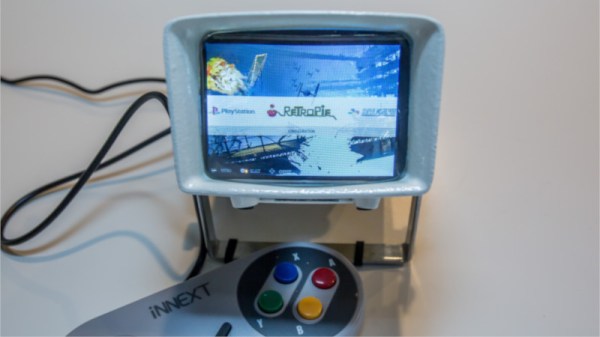
35mm still photography is still hanging on out in the wild, with its hardcore fans ensuring it never quite dies out despite the onward march of digital imaging. Slides are an even more obsolete technology, forgotten long ago when the quality of color negative films improved. The related paraphernalia from the era of the photographic slide continues to clutter up attics and garages the world over. [Martin Burlus] was in possession of some retro slide viewers, and found they made an excellent basis for a RetroPie build.
The build relies on stock standard fundamentals – a Pi Zero runs the show, combined with a USB hub and a power supply. [Martin] then chose to build this all inside the case of the slide viewer, combined with a 2.8″ PiTFT display. This neatly slots directly on to the Pi Zero’s 40-pin header, and comes complete with a touch screen. It’s the perfect size to slide into most slide viewers, though some models required removal of the tact buttons.
Audio systems in Linux are terrible. You’ve never known true pain until you’ve tried to set up a recording or broadcasting workstation running Linux. I did, twenty years ago, and nothing has changed since. This wasn’t really a problem when Linux was either used in server spaces or some nerd’s battle station, but now we have small single board computers that everyone uses and wants to turn into a modular synth. Welcome to paintown, because the Linux audio stack is terrible.
For the past ten years, [Dynobot] has been working on improving audio in Linux. This is a decade of reading manuals from IBM and Oracle, and a deep knowledge of how to adjust settings so audio actually works. All of this work is now combined into a single script that improves everything. This means the priority of the Audio group is changed, the thread priority is better, the latency is better, and for anyone who wants to set up a local streaming service, the network latency is better. It’s not everything, and there’s no mention of recording multitrack audio, but we’ll accept the baby steps here.
There are two relevant Github repositories for this, the first containing audio adjustments for Debian-based systems, including the Raspberry Pi. This should work on any single board computer running Debian, and has been tested on all the Raspberry Pis, the Allo Sparky, ASUS Tinkerboard, and the Odroid C2. There’s also a version for TinyCore-based Linux systems that improves the priority of the audio threads, changes the thread scheduling from ‘whatever’ to FIFO, and improves the latency. If you’re running Linux, and you’re doing something with audio, this is what you need.
Visitors to the Wizarding World of Harry Potter at Universal Studios are able to cast “spells” by waving special interactive wands in the air. Hackers like us understand that there must be some unknown machinations happening behind the scenes to detect how the wands are moving, but for the kids wielding them, it might as well be real magic. So when his son asked to have a Harry Potter themed birthday party, [Adam Thole] decided to try recreating the system used at Universal Studios in his own home.
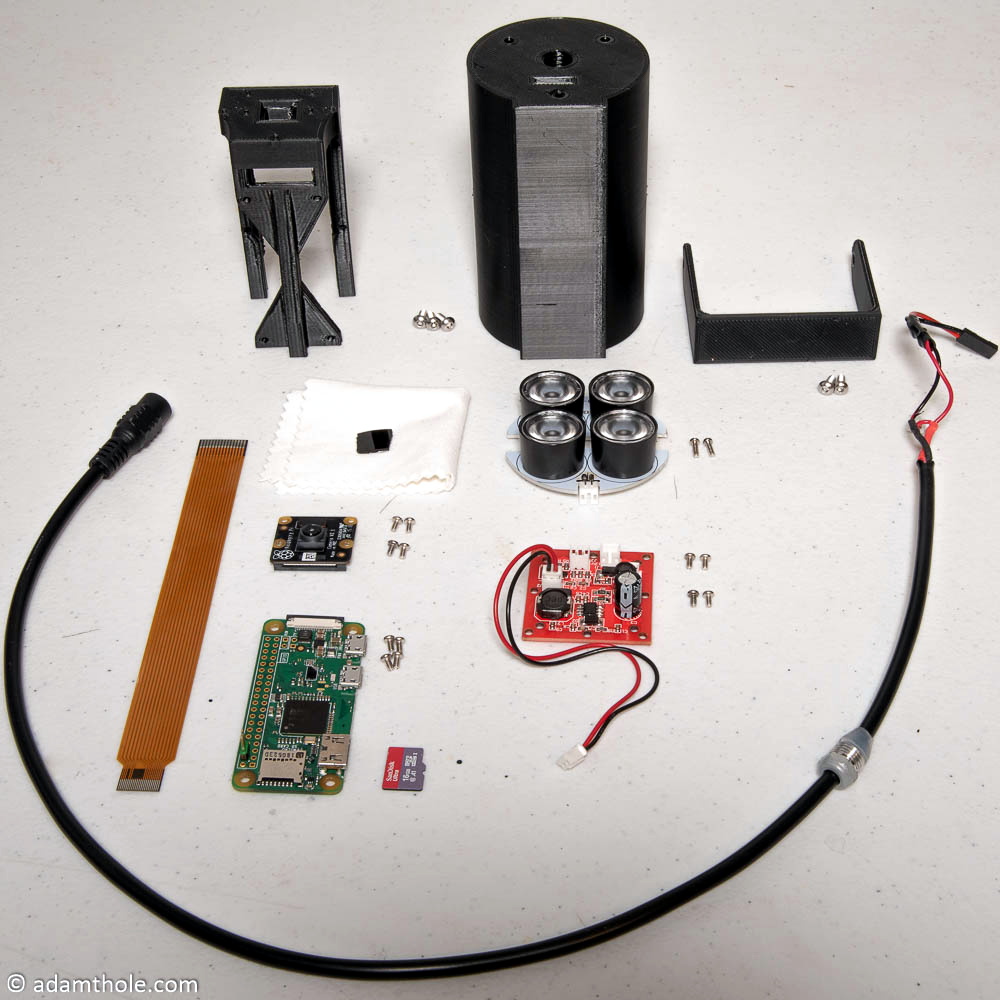
Components used in the IR streaming camera
The basic idea is that each wand has a reflector in the tip, which coupled with strong IR illumination makes them glow on camera. This allows for easy gesture recognition using computer vision techniques, all without any active components in the wand itself.
[Adam] notes that you can actually buy the official interactive wands from the Universal Studios online store, and they’d even work with his system, but at $50 USD each they were too expensive to distribute to the guests at the birthday party. His solution was to simply 3D print the wands and put a bit of white prismatic reflective tape on the ends.
With the wands out of the way, he turned his attention to the IR imaging side of the system. His final design is a very impressive 3D printed unit which includes four IR illuminators, a Raspberry Pi Zero with the NoIR camera module. [Adam] notes that his software setup specifically locks the camera at 41 FPS, as that triggers it to use a reduced field of view by essentially “zooming in” on the image. If you don’t request a FPS higher than 40, the camera will deliver a wider image which didn’t have any advantage in this particular project.
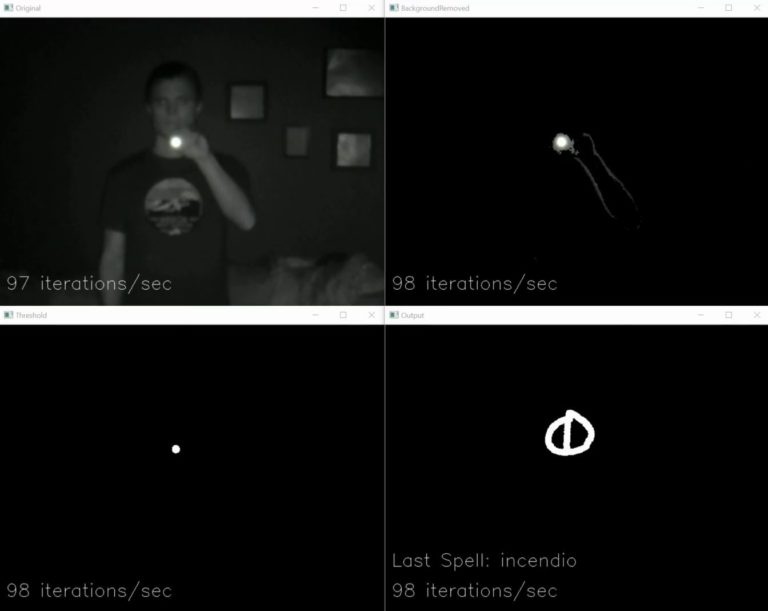
The last part of the project was taking the video stream from his IR camera and processing it to detect the bright glow of a wand’s tip. For each frame of the video the background is first removed and then any remaining pixel that doesn’t exceed a set brightness level if ignored. The end result is an isolated point of light representing the tip of the wand, which can be fed into Open CV’s optical flow function to show [Adam] what shape the user was trying to make. From there, his software just needs to match the shape with one of the stock “spells”, and execute the appropriate function (such as changing the color of the lights in the room) with Home Assistant.
Overall, it’s an exceptionally well designed system considering the goal was simply to entertain a group of children for a few hours. We almost feel bad for the other parents in the neighborhood; it’s going to take more than a piñata to impress these kids after [Adam] had them conjuring the Dark Arts at his son’s party.
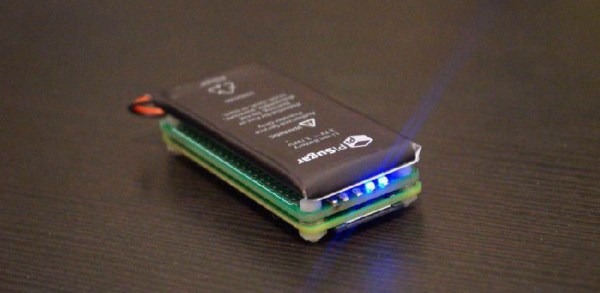
Since the Pi Zero was released, there have been many attempts to add a power bank. Cell phone batteries are about the same size as a Pi Zero, after all, and adding a USB charging port and soldering a few wires to a Pi is easy. The PiSugar is perhaps the cutest battery pack we’ve seen for the Pi Zero, and it comes in a variety of Hats compatible with the Pi, capable of becoming a small display, a keyboard, or any other thing where a small, portable Linux machine is useful.
The core of this build is a small circuit board the size of a Pi Zero. Attached to this board is a 900mAh battery, and the entire assembly is attached to the Pi Zero with a set of two spring clips that match up with with a pair of pads on the back of the Pi. Screw both of these boards together, and you have a perfect, cableless solution to adding power to a Pi Zero.
But the PiSugar doesn’t stop there. There are also cases, for a 1.3 inch LCD top, a 2.13 inch ePaper display, an OLED display, a camera, a 4G module, and something that just presents the pins from the Pi GPIO header. This is an entire platform, and if you print these parts in white plastic, they look like tiny little sugar cubes filled to the brim with electronics and Linux goodness.
Yes, you’ve seen 3D printed Pi cases before, but nothing in the way of an entire platform that gives you a Pi Zero in an extensible platform that can fit in your pocket and looks like sweet, sweet cubes of sucrose.
The fragility of SD cards is the weak link in the Raspberry Pi ecosystem. Most of us seem to have at least one Pi tucked away somewhere, running a Magic Mirror, driving security cameras, or even taking care of a media library. But chances are, that Pi is writing lots and lots of log files. Logging is good — it helps when tracking down issues — but uncontrolled logging can lead to problems down the road with the Pi’s SD card.
[Erich Styger] has a neat way to avoid SD card logging issues on Raspberry Pi, he calls it a solution to reduce “thrashing” of the SD card. The problem is that flash memory segments wear out after a fairly low number of erase cycles, and the SD card’s wear-leveling algorithm will eventually cordon off enough of the card to cause file system issues. His “Log2Ram” is a simple Unix shell script that sets up a mount point for logging in RAM rather than on the SD card.
The idea is that any application or service sending log entries to /var/log will actually be writing them to virtual log files, which won’t rack up any activity on the SD card. Every hour, a cron job sweeps the virtual logs out to the SD card, greatly reducing its wear. There’s still a chance to lose logging data before it’s swept to disk, but if you have relatively stable system it’s a small price to pay for the long-term health of a Pi that’s out of sight and out of mind.
One thing we really like about [Erich]’s project is that it’s a great example of shell scripting and Linux admin concepts. If you need more information on such things, check out [Al Williams’] Linux-Fu series. It goes back quite a way, so settle in for some good binge reading.
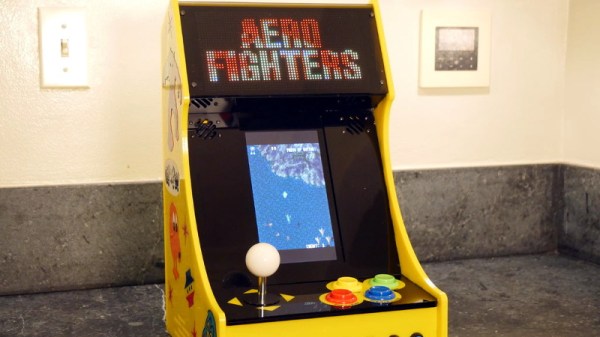
We’ve seen a lot of arcade machine builds here on Hackaday. Seriously, a lot. Even more so since the Raspberry Pi took over the world and made it so you didn’t have to cannibalize an old laptop to build one anymore. It’s one of those projects with huge appeal: either you’re somebody who’s built their own arcade, or you’re somebody who wishes they had. But even after seeing all these builds, we occasionally come across a specimen that deserves special recognition.
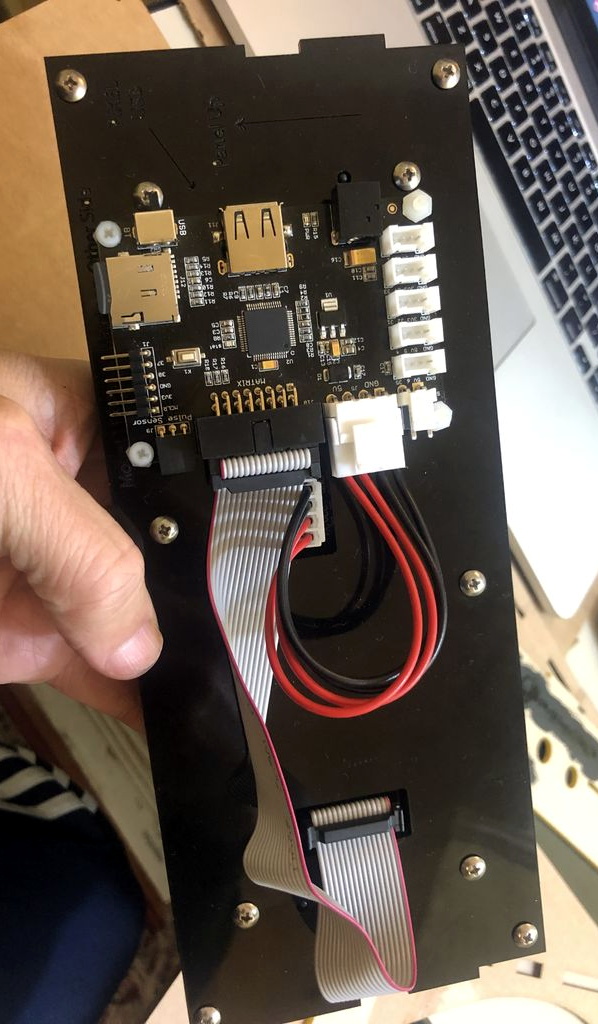
LED display controller
[Al Linke] recently wrote in to tell us about his arcade build, which we think you’ll agree is worth a closer look. The core build is actually a modification of a previously published design, but what makes this one unique is the addition of a programmable LED matrix in the top that actually shows the logo and artwork for whatever game you’re currently playing. This display really helps sell the overall look, and instantly makes the experience that much more authentic. Sure you don’t need the marquee of your home arcade machine to show era-appropriate artwork…but we know you want it to.
So how does one interface their Raspberry Pi with this beautiful 64×32 LED marquee display? Well it just so happens that [Al] is in the business of making cool LED displays, and even has a couple successful Kickstarter campaigns under his belt to prove it. He’s developed a board that lets you easily connect up to low-cost HUB75 LED panels such as the one used in the arcade. It’s been a few years since we’ve last seen a project that tackled these specific LED displays, and it’s encouraging to see how far things have come since then.
Even if you’re somehow not in love with the LED marquee, this build really does stand on its own as a fantastic example of a desktop arcade machine. [Al] went to great length to document his build, including putting together several videos during different phases of construction. If you’re curious about the start of the art for home arcade builds, this project would be a pretty good one to use as a barometer.
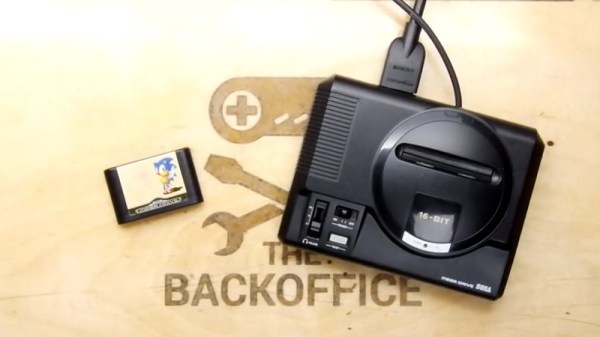
Miniature game consoles are all the rage right now. Many of the big names in gaming are releasing their own official “mini” versions of their classic machines, but naturally we see plenty of DIY builds around these parts as well. Generally they’re enclosed in a 3D printed model of whatever system they’re looking to emulate, but as you might expect that involves a lot of sanding and painting to achieve a professional look.
But for SEGA Genesis (or Mega Drive as it was known outside the US) fans, there’s a new option. A company by the name of Retro Electro Models has released a high-fidelity scale model of SEGA’s classic console, so naturally somebody hacked it to hold a Raspberry Pi. Wanting to do the scale detailing of the model justice, [Andrew Armstrong] went the extra mile to get the power button on the front of the console working, and even added support for swapping games via RFID tags.
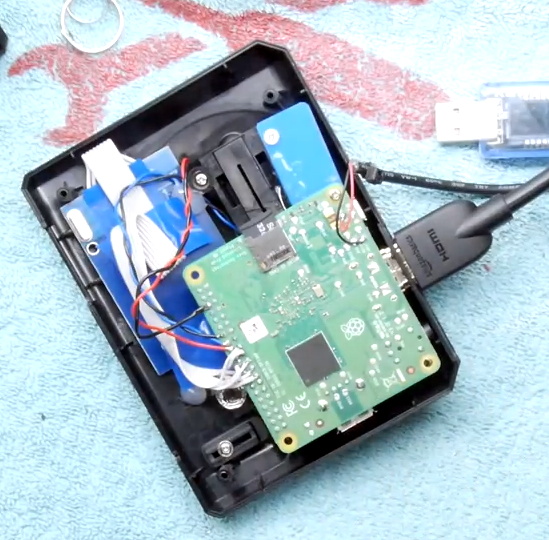
[Andrew] uses the Raspberry Pi 3 A+ which ended up being the perfect size to fit inside the model. Fitting the Pi Zero would have been even easier, but it lacks the horsepower of its bigger siblings. The RFID reader is connected to the Pi over SPI, and the reed switch used to detect when the power switch has been moved is wired directly to the GPIO pins. The system is powered by a USB cable soldered directly to Pi’s PCB and ran out a small hole in the back of the case.
For input, [Andrew] is using a small wireless keyboard that includes a touch pad and gaming controls. Unfortunately, it has a proprietary receiver which had to be integrated into the system. In a particularly nice touch, he used snipped off component leads to “wire” the receiver’s PCB directly to the pins of the Pi’s USB port. Not only does it look cool, but provides a rigid enough connection that he didn’t even need to glue it down to keep it from rattling around inside the case. Definitely a tip to keep in the back of your mind.
The software side of this project is about what you’d expect for an emulation console, though with the added trickery of loading games based on their RFID tag. At this point [Andrew] only has a single “cartridge” for the system, so he simply drops the tags into the cartridge slot of the console to load up a new title. It doesn’t look like Retro Electro Models is selling loose cartridges (which makes sense, all things considered), so there might still be a job for your 3D printer yet if you want to have a library of scale cartridges to go with your console.