If you have about 10 hours to kill, you can use [Edje Electronics’s] instructions to install TensorFlow on a Raspberry Pi 3. In all fairness, the amount of time you’ll have to babysit is about an hour. The rest of the time is spent building things and you don’t need to watch it going. You can see a video on the steps required below.
You need the Pi with at least a 16 GB SD card and a USB drive with at least 1 GB of free space. This not only holds the software, but allows you to create a swap file so the Pi will have enough virtual memory to build everything required.
Readers of a certain vintage will remember the glee of building your own levels for DOOM. There was something magical about carefully crafting a level and then dialing up your friends for a death match session on the new map. Now computers scientists are getting in on that fun in a new way. Researchers from Politecnico di Milano are using artificial intelligence to create new levels for the classic DOOM shooter (PDF whitepaper).
While procedural level generation has been around for decades, recent advances in machine learning to generate game content (usually levels) are different because they don’t use a human-defined algorithm. Instead, they generate new content by using existing, human-generated levels as a model. In effect they learn from what great game designers have already done and apply those lesson to new level generation. The screenshot shown above is an example of an AI generated level and the gameplay can be seen in the video below.
The idea of an AI generating levels is simple in concept but difficult in execution. The researchers used Generative Adversarial Networks (GANs) to analyze existing DOOM maps and then generate new maps similar to the originals. GANs are a type of neural network which learns from training data and then generates similar data. They considered two types of GANs when generating new levels: one that just used the appearance of the training maps, and another that used both the appearance and metrics such as the number of rooms, perimeter length, etc. If you’d like a better understanding of GANs, [Steven Dufresne] covered it in his guide to the evolving world of neural networks.
While both networks used in this project produce good levels, the one that included other metrics resulted in higher quality levels. However, while the AI-generated levels appeared similar at a high level to human-generated levels, many of the little details that humans tend to include were omitted. This is partially due to a lack of good metrics to describe levels and AI-generated data.
Example DOOM maps generated by AI. Each row is one map, and each image is one aspect of the map (floor, height, things, and walls, from left to right)
We can only guess that these researcher’s next step is to use similar techniques to create an entire game (levels, characters, and music) via AI. After all, how hard can it be?? Joking aside, we would love to see you take this concept and run with it. We’re dying to play through some gnarly levels whipped up by the AI from Hackaday readers!
We love to hack IKEA products, marvel at Raspberry Pi creations, and bask in the glow of video projection. [Nord Projects] combined these favorite things of ours into Lantern, a name as minimalist as the IKEA lamp it uses. But the result is nearly magic.
The key component in this build is a compact laser-illuminated video projector whose image is always in focus. Lantern’s primary user interface is moving the lamp around to switch between different channels of information projected on different surfaces. It would be a hassle if the user had to refocus after every move, but the focus-free laser projector eliminates that friction.
A user physically changing the lamp’s orientation is detected by Lantern’s software via an accelerometer. Certain channels project an information overlay on top of a real world object. Rather than expecting its human user to perform precise alignment, Lantern gets feedback from a Raspberry Pi camera to position the overlay.
Speaking of software, Lantern as presented by [Nord Projects] is a showcase project under Google’s Android Things umbrella that we’ve mentioned before. But there is nothing tying the hardware directly to Google. Since the project is open source with information on Hackster.io and GitHub, the choice is yours. Build one with Google as they did, or write your own software to tie into a different infrastructure (MQTT?), or a standalone unit with no connectivity at all.
It was World War II and scientists belonging to the Manhattan Project worked on calculations for the atomic bomb. Meanwhile, in one of the buildings, future Nobel Prize winning theoretical physicist Richard Feynman was cracking the combination lock on a safe because doing so intrigued him. That’s as good a broad summary of Feynman as any: scientific integrity with curiosity driving both his work and his fun.
If you’ve heard of him in passing it may be because of his involvement on the Space Shuttle Challenger disaster commission or maybe you’ve learned something from one of his many lectures preserved on YouTube. But did you know he also played with electronics as a kid, and almost became an electrical engineer?
He was the type of person whom you might sum up by saying that he had an interesting life. The problem is, you have to wonder how he fit it all into one lifetime, let alone one article. We’ll just have to let our own curiosity pick and choose what to say about this curious character.
The hardware badge for the Hackaday Belgrade conference is a Retro Computer that you wear around your neck. I have one in my hands and it’s truly a work of art. It’s beautiful, it’s fun to play with, and it will be an epic platform for a glorious weekend of badge hacking! Check out the first look video, then join me below as I drill down into the details.
Get your ticket now for Hackaday Belgrade, our premier European hardware conference at the end of this month. It’s a day filled with talks, works, food, fun, and of course everyone through the door gets one of these incredible badges. The best part is the community that turns out for this event and that includes the Hacker Village that takes hold in the evening. We’ll be hacking the badges until the wee hours of the morning alongside hardware demos, presentations, lightning talks, and live IDM and DJ sets.
It’s a story as old as time: hacker sees cool tool, hacker recoils in horror at the price of said tool, hacker builds their own version for a fraction of the price. It’s the kind of story that we love here at Hackaday, and has been the impetus for countless projects we’ve covered. One could probably argue that, if hackers had more disposable income, we’d have a much harder time finding content to deliver to our beloved readers.
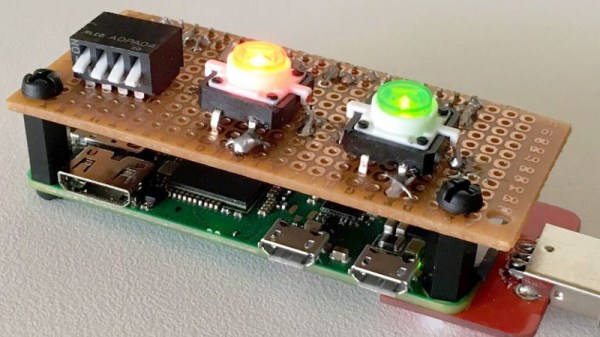
[ Alex Jensen] writes in to tell us of his own tale of sticker shock induced hacking, where he builds his own version of the Hak5 Bash Bunny. His version might be lacking a bit in the visual flair department, but despite coming in at a fraction of the cost, it does manage to pack in an impressive array of features.
This pentesting multitool can act as a USB keyboard, a mass storage device, and even an RNDIS Ethernet adapter. All in an effort to fool the computer you plug it into to let you do something you shouldn’t. Like its commercial inspiration, it features an easy to use scripting system to allow new attacks to be crafted on the fly with nothing more than a text editor. A rudimentary user interface is provided by four DIP switches and light up tactile buttons. These allow you to select which attacks run without needing to hook the device up to a computer first, and the LED lights can give you status information on what the device is doing.
[Alex] utilized some code from existing projects, namely PiBunny and rspiducky, but much of the functionality is of his own design. Detailed instructions are provided on how you can build your own version of this handy hacker gadget without breaking the bank.
Right now, if you happen to be in Noth America, chances are pretty good that there’s at least one little face staring at you. Look around and you’ll spy it, probably about 15 inches up from the floor on a nearby wall. It’s the ubiquitous wall outlet, with three holes arranged in a way that can’t help but stimulate the facial recognition firmware of our mammalian brain.
No matter where you go you’ll find those outlets and similar ones, all engineered for specific tasks. But why do they look the way they do? And what’s going on electrically and mechanically behind that familiar plastic face? It’s a topic we’ve touched on before with Jenny List’s take on international mains standards. Now it’s time to take a look inside the common North American wall socket, and how it got that way.