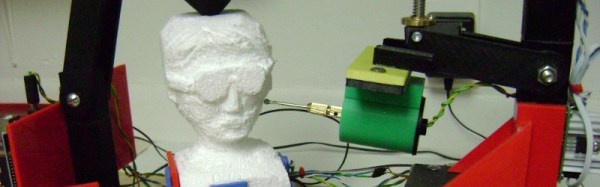
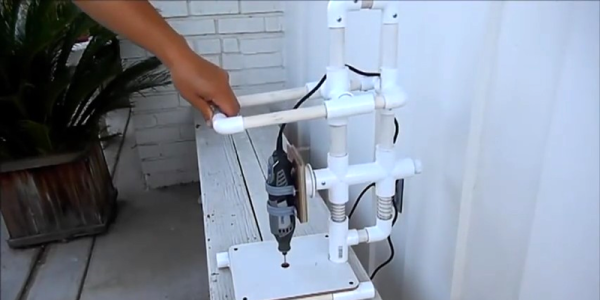
There’s an old adage that when performing a live demo, previously working hacks will mysteriously go awry. In this case, the hardware demo was doomed before it ever arrived at the conference.
PinJig is an interesting take on though-hole soldering. As its name indicates, it’s a jig which holds through-hole components in place as the board is flipped on its side (or even upside down). This is accomplished by 2000 steel pins which are locked in place after being nestled around all of the board’s components. Unfortunately, carrying this prototype onto an international flight didn’t work out. [Niall Barrett] told us that on his way from Ireland to Bay Area Maker Faire he was required to ditch the 3-inch steel pins that make up the jig, or not get on the plane.
We’ve covered [Vijay] refreshable braille display before. Reader, [zakqwy] pointed us to an interesting event that occured in the discussion of its Hackaday.io project page.
[Vijay] was inspired by the work of [Paul D’souza], who he met at Makerfaire Bangalore. [Paul] came up with a way to make a refreshable braille display using small pager motors. [Vijay] saw the light, and also felt that he could make the vibrating motor display in such a way that anyone could make it for themselves at a low cost.
Of course, [Paul], had patented his work, and in this case rightly so. As jaded as we have become with insane patent trolls, our expectation on receiving the tip was that [Paul] had sued [Vijay] out of house and home and kicked his dog while he was at it. A short google search shows that [Paul] is no patent troll, and is a leader in his field. He has done a lot to help the visually impaired with his research and inventions.
Instead we were greeted by a completely different conversation. [Paul] politely mentioned that his lawyer informed him that in order to protect his IP he needed to let [Vijay] know exactly how the information could be used. No cease and desist, in fact he encouraged [Vijay] to continue his open research as long as he made it clear that the methods described could not be used to make a marketable product without infringing on [Paul]’s patents. They’d need to get in touch with [Paul] and work something out before doing such.
[Vijay] responded very well to this information. His original goal was to produce a cheap braille display that could be made and sold by anyone. However, he did use [Paul]’s work as a basis for his variation. Since [Paul]’s commercial interests relied on his patent, there was a clear conflict, and it became obvious to [Vijay] that if he wanted to meet his goal he’d have to pick a new direction. So, he released his old designs as Creative Commons, since the CERN license he was using was invalidated by [Paul]’s patent. He made it very clear that anyone basing their work off those designs would have to get in touch with [Paul]. Undaunted by this, and still passionate about the project, [Vijay] has decided to start from scratch and see if he can invent an entirely new, unprotected mechanism.
Yes, the patent system is actually encouraging innovation by documenting prior work while protecting commercial and time investments of beneficial inventors. Well. That’s unexpected.
Kudos to [Paul] for encouraging the exploration of home hackers rather than playing the part of the evil patent owner we’ve all come to expect from these stories. Also [Vijay], for acting maturely to [Paul]’s polite request and not ceasing his work.
One of the most ingenious developments in test and measuring tools over the last few years is the Mooshimeter. That’s a wireless, two-channel multimeter that can measure voltage and current simultaneously. If you’ve ever wanted to look at the voltage drop and power output on a souped up electrified go-kart, the Mooshimeter is the tool for you.
A cheap, wireless multimeter was only the fevered dream of a madman a decade ago. We didn’t have smartphones with Bluetooth back then, so any remote display would cost much more than the multimeter itself. Now this test and measurement over Bluetooth is bleeding over into the rest of the electronics workbench with the Aeroscope, a wireless Bluetooth oscilloscope.
[Alexander] and [Jonathan], the devs for the Aeroscope got the idea for this device while debugging a mobile robot. The robot would work on the bench, but in the field the problem would reappear. The idea for a wireless troubleshooting tool was born out of necessity.
The specs for the Aeroscope are about equal to the quite capable ‘My First Oscilloscope’ Rigol DS1052E. Analog bandwidth is 100MHz, sample rate is 500 Msamples/second, and the memory depth is 10k points. Resolution per division is 20mV to 10V, and the Aeroscope “Deluxe Package” that includes a few leads, tip, clip, USB cable, and case is about the same price as the Rigol 1052E. The difference, of course, is that the Aeroscope is a single channel, and wireless. That’s fairly impressive for two guys who aren’t a team of Rigol engineers.
As is the case with all Bluetooth test and measurement devices, the proof is in the app. Right now, the Aeroscope only supports iOS 9 devices, but according to the crowdfunding campaign, Android support is coming. Since the device is Open Source, you can always bang something out in Python if you really need to.
While this is a crowdfunding campaign, it’s hosted on Crowd Supply. Crowd Supply isn’t Indiegogo or Kickstarter; there are people at Crowd Supply vetting projects. The campaign still has a month to go, but the first few pledges are putting the Aeroscope right on track to a successful campaign.
You may have a few questions regarding [ThisOldTony]’s effort. First, unless you’re familiar with machine tooling, you may wonder what exactly a boring head is. The video below makes it plain, but the short answer is that it’s a tool to make holes. A boring head spins a boring bar with a cutting tool, and the head can be offset to spin the bar through an adjustable diameter. They’re great for making large holes of precise diameters – skip to around 25:30 to see it in action.
The other question might be: why does he spend so much time and effort building something he can just buy off the shelf? If you have to ask that question, we think you may be missing the point. [Tony] seems mainly interested in building tools; using them to make non-tool things is merely a happy accident. We totally respect that, and besides, just look at the quality of the tool he makes. We find his videos very entertaining, too – he’s got a great sense of humor and the video production quality is top-notch. Just watch out for banana peels and space-time continuum issues.
We love tools, and we really love tools that are custom made with this level of craftsmanship. For more quality toolmaking, check out this guitar-fretting jig or this belt grinder.
What’s green and black and used all over the shop? It’s [Make It Extreme]’s newest build, a scratch-built belt grinder. And as usual, the build video gets us in the mood to cut metal.
We’ll go out on a limb here and state that the lathe, and not the belt grinder, is the essential metalworking tool. That’s pretty clear from this build – the running gear is machined entirely on a lathe. But as central as the lathe is to machinery making, belt grinders like this one have to rate right up there in terms of shop utility.
You can sharpen with them, quickly remove stock, clean up welds, form chamfers, and remove rust and corrosion. They’re great all-around tools, and with the quick-release idler feature that this one has, fast belt changes for different jobs make it even more flexible. We’d like to see more adjustability in the work table – the ability to angle the table relative to the belt is very handy – but in all this is a great build and a nice tool to have.
On top of it all, watching the [Make It Extreme] builds – like this sandblaster, spot welder, or belt sander – is like high-speed shop class. There’s a lot to learn, although we have to admit that welding in shorts and a T-shirt gives us the willies.
Sooner or later, we’ve all got to deal with torque measurement. Most of us will never need to go beyond the satisfying click of a micrometer-style torque wrench or the grating buzz of a cordless drill-driver as the clutch releases. But at some point you may actually need to measure torque, in which case this guide to torque sensors might be just the thing.
[Taylor Schweizer]’s four-part series on torque is pretty comprehensive. The link above is to the actual build of his DIY torque transducer, but the preceding three installments are well worth the read too. [Taylor] describes himself as an e-waste connoisseur and tantalizes us with the possibility that his build will be with salvaged parts, but in the end a $20 bag of strain gauges and an LM358 were the quickest way to his proof of concept. The strain gauges were super-glued to a socket extension, hot glue was liberally applied for insulation and strain relief, and the whole thing wired up to a Teensy for data capture. A quick script and dump of the data to Excel and you’ve got a way to visualize torque.
An LCD display for real-time measurements is in the works, as are improvements to the instrumentation amp – for which [Taylor] might want to refer to [Bil Herd]’s or [Brandon Dunson]’s recent posts on the subject.
The handheld screw driver is a wonderful tool. We’re often tempted to reach for its beefier replacement, the power drill/driver. But the manually operated screw driver has an extremely direct feedback mechanism; the only person to blame when the screw strips or is over-torqued is you. This is a near-perfect tool and when you pull the right screwdriver from the stone you will truly be the ruler of the fastener universe.
A Bit of Screw Driver History:
The kind of fun you can have with really cheap bits.
In order to buy a good set of screw drivers, it is important to understand the pros and cons of the geometry behind it. With a bit of understanding, it’s possible to look at a screw driver and tell if it was built to turn screws or if it was built to sell cheap.
Screw heads were initially all slotted. This isn’t 100 percent historically accurate, but when it comes to understanding why the set at the big box store contains the drivers it does, it helps. (There were a lot of square headed screws back in the day, we still use them, but not as much.)
Believe it or not the “Robertson” screw came out before the Phillips. Robertson just hated money and didn’t want to license his patents. So it’s only now that they’re in common use again.
Flat head screws could be made with a slitting saw, hack saw, or file. The flat-head screw, at the time, was the cheapest to make and had pretty good torque transfer capabilities. It also needed hand alignment, a careful operator, and would almost certainly strip out and destroy itself when used with a power tool.
These shortcomings along with the arrival of the industrial age brought along many inventions from necessity, the most popular being the Phillips screw head. There were a lot of simultaneous invention going on, and it’s not clear who the first to invent was, or who stole what from who. However, the Philips screw let people on assembly lines turn a screw by hand or with a power tool and succeed most of the time. It had some huge downsides, for example, it would cam out really easily. This was not an original design intent, but the Phillips company said, “to hell with it!” and marketed it as a feature to prevent over-torquing anyway.
The traditional flathead and the Phillips won over pretty much everyone everywhere. Globally, there were some variations on the concept. For example, the Japanese use JST standard or Posidriv screws instead of Philips. These do not cam out and let the user destroy a screw if they desire. Which might show a cultural difference in thinking. That aside, it means that most of the screws intended for a user to turn with a screw driver are going to be flat-headed or Philips regardless of how awful flat headed screws or Philips screws are.