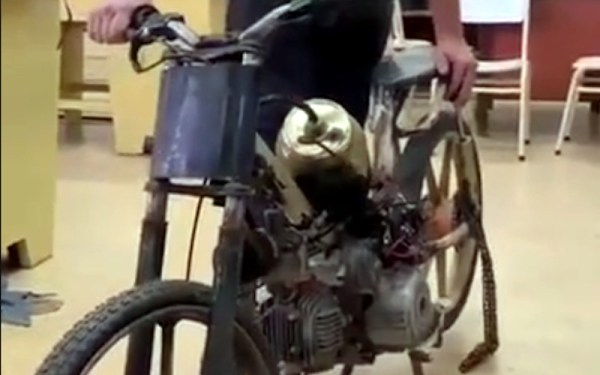
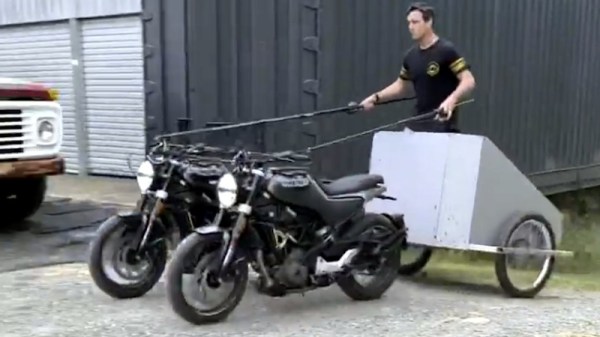
Huge 3D-Printed LEGO Go Kart Makes You The Minifig

The LEGO Technic line is definitely the hacker’s flavor of LEGO. It brings a treasure trove of engineering uses that make axles, gears, pulleys, and motors a thing. The only problem is that it’s the inanimate minifigures having all of the fun. But not if [Matt Denton] has something to say about it. He’s building a huge 3D-printed go-kart with pieces scaled up 8.43 times the size of their LEGO equivalents. That’s large enough for an adult to fit!

You may remember seeing [Matt’s] previous attempt at something like this about three years back, but that was only around half the size of this one. He printed a blue kart for his nephew, but it didn’t quite scale up enough even for a child to ride. This one is impressively large, but that raises some interesting fabrication issues

The long beams that make up the frame of the vehicle and the axle piece (the black rods with an X-shaped profile) used for the steering column are far too long to print in one go. So the axle was printed in two parts with a square channel down the center that hides a single run of square tubing. But the beams are much more interesting. Printed in two parts, there’s a dovetail-shaped connector piece that holds the top joint together, and a hidden bolt for the bottom. Glue is also used along the joint to bolster the holding power of the mechanical fasteners.

In general, the weight and friction on this scaled up version need many considerations. [Matt] explains where he’s made design decisions — like perpendicular axle connectors that have proper bearings — to include mostly-hidden metal parts and fasteners to ensure the plastic doesn’t fail. The thing looks awesome, but just wait until you see the assembly process. It’s sooooo satisfying to watch the modular parts snap into place. The project’s still in progress and before he’s done he plans to add an electric motor to make the kart go.

Even if you’re not scaling a model up to full size, giant is a guaranteed recipe for fun. Case in point, [Matt’s] enlarged LEGO fork lift is a delight.

Continue reading “Huge 3D-Printed LEGO Go Kart Makes You The Minifig”

A Broken Inductor As A Bike Chain Sensor

If you have ever broken the ferrite core of an inductor, you’ll probably sympathize with [Oliver Mattos]. He accidentally stood on a ferrite-cored component, breaking it and rendering it useless. But utility is in the eye of the beholder, and instead of throwing it away he’s repurposed it as a chain sensor for his electric bicycle.

The broken inductor was positioned on the rear frame of the machine such that the chain passed through the area where the broken half of its core would once have been. As each link passes through the magnetic field it causes the inductance to change, and from this the speed, direction, and tension of the chain can be read.

Adding a 180 nF capacitor in parallel with the inductor creates a tuned circuit, and measuring the inductance is as straightforward as firing a single pulse at it and measuring the time it takes to go negative. Chain speed can be read by sensing the change in inductance as each link passes, tension by sensing the change in inductance as the chain is closer or further away, and direction by whether the chain is slack or not. It’s an ingenious and simple solution to measuring a bicycle chain, and we like it.

A lot of bicycle measurement systems have passed our way over the years, but it’s fair to say they have been more concerned with displays than sensors.

’54 Motorcycle Saved By Electric Conversion

While it’s nice to be able to fully restore something vintage to its original glory, this is not always possible. There might not be replacement parts available, the economics of restoring it may not make sense, or the damage to parts of it might be too severe. [onyxmember] aka [Minimember Customs] was in this position with an old ’54 Puch Allstate motorcycle frame that he found with no engine, rusty fuel tank, and some other problems, so he did the next best thing to a full restoration. He converted it to electric.

This build uses as much of the original motorcycle frame as possible and [onyxmember] made the choice not to weld anything extra to it. The fuel tank was cut open and as much rust was cleaned from it as possible to make room for the motor controller and other electronics. A hub motor was laced to the rear wheel, and a modern horn and headlight were retrofitted into the original headlight casing. Besides the switches, throttle, and voltmeter, everything else looks original except, of course, the enormous 72V battery hanging off the frame where the engine used to be.

At a power consumption of somewhere between three and five kilowatts, [onyxmember] reports that this bike likely gets somewhere in the range of 55 mph, although he can’t know for sure because it doesn’t have a speedometer. It’s the best use of an old motorcycle frame we can think of, and we also like the ratrod look, but you don’t necessarily need to modify a classic bike for this. A regular dirt bike frame will do just fine.

Continue reading “’54 Motorcycle Saved By Electric Conversion”

A Tidy Little OBD Display For Your Car

It’s likely that many readers will have an OBD dongle through which they can peer into the inner workings of their car, but the chances are that most of us will have restricted our curiosity to the Bluetooth or USB interface it was supplied with. Not [Frederico Souza Sant’ana] though, because he’s modified his OBD dongle to expose the serial lines between its ELM327 OBD chip and its Bluetooth chip. These go to an Arduino, which powers a small information display to supplement the car’s dashboard. This can display a range of readings as can be seen in the video below the break, he has it monitoring the battery, the various temperatures in the engine bay, and the ignition parameters.

All the software and hardware details can be found in a GitHub repository. In hardware terms it’s a surprisingly simple unit, but it serves to remind us that OBD sniffer dongles are more versatile than we might at first imagine, and good for a bit more than hooking up our smartphones via Bluetooth. If OBD is something you’d like to visit in more depth, in the past we’ve featured an open-source OBD interface, and a retrospective look at the protocol.

Continue reading “A Tidy Little OBD Display For Your Car”

Navigating Self-Driving Cars By Looking At What’s Underneath The Road

When you put a human driver behind the wheel, they will use primarily their eyes to navigate. Both to stay on the road and to use any navigation aids, such as maps and digital navigation assistants. For self-driving cars, tackling the latter is relatively easy, as the system would use the same information in a similar way: when to to change lanes, and when to take a left or right. The former task is a lot harder, with situational awareness even a challenge for human drivers.

In order to maintain this awareness, self-driving and driver-assistance systems use a combination of cameras, LIDAR, and other sensors. These can track stationary and moving objects and keep track of the lines and edges of the road. This allows the car to precisely follow the road and, at least in theory, not run into obstacles or other vehicles. But if the weather gets bad enough, such as when the road is covered with snow, these systems can have trouble coping.

Looking for ways to improve the performance of autonomous driving systems in poor visibility, engineers are currently experimenting with ground-penetrating radar. While it’s likely to be awhile before we start to see this hardware on production vehicles, the concept already shows promise. It turns out that if you can’t see whats on the road ahead of you, looking underneath it might be the next best thing. Continue reading “Navigating Self-Driving Cars By Looking At What’s Underneath The Road”

An Open Source Shipboard Computer System

We’re not sure how many of you out there own a boat large enough to get its own integrated computer network, but it doesn’t really matter. Even if you can’t use this project personally, it’s impossible not to be impressed with the work [mgrouch] has put into the “Bareboat Necessities” project. From the construction of the hardware to the phenomenal documentation, there’s plenty that even landlubbers can learn from this project.

In its fully realized form, the onboard computer system includes several components that work together to provide a wealth of valuable information to the operator.

Inside the Boat Computer module

What [mgrouch] calls the “Boat Computer” contains a Raspberry Pi 4, a dAISy AIS receiver, an RTL-SDR, a GPS receiver, serial adapters, and the myriad of wires required to get them all talking to each other inside a weatherproof enclosure. As you might expect, this involves running all the connections through watertight panel mounts.

Combined with a suite of open source software tools, the “Boat Computer” is capable of interfacing with NMEA sensors and hardware, receive weather information directly from NOAA satellites, track ships, and of course plot your current position on a digital chart. The computer itself is designed to stay safely below deck, while the operator interacts with it through an Argonaut M7 waterproofed HDMI touch screen located in the cockpit.

For some people, that might be enough. But for those who want to do big, [mgrouch] further details the “Boat Gateway” device. This unit contains an LTE-equipped WiFi router running OpenWrt and all the external antennas required to turn the boat into a floating hotspot. Of course it also has RJ45 jacks to connect up to the other components of the onboard system, and it even includes an M5Stack Core with LAN module so it can display a select subset of sensor readings and navigational data.

If you’d like to do something similar on a slightly smaller scale, we’ve seen sailing computers that pushed all the data to a wearable display or even a repurposed eReader.

Pop A Wheelie With Your Electric Skateboard, The Hacker Way

Using a bit of tech to make up for a lack of skill is a time-honoured tradition, otherwise known as cheating among those who acquired the skill the hard way. Learning to wheelie manual a skateboard is usually paid for in bruises, but [blezalex] got around that by letting his electric skateboard handle the balancing act.

At first glance the board looks and rides like an average DIY electric skateboard, with an off-the-shelf  a dual hub motor truck, VESC speed controllers and a wireless throttle. The party trick appears when the front wheel is popped off the ground, which activates the secret self-balancing mode. At this point a STM32F401 dev board and MPU-6050 IMU take over control of the motors, which is in turn controlled by leaning forward or backwards, like a hoverboard. The remote throttle turns into a dead man switch, which cuts power to the motors when released.

[blezalex] says he has had less that an hour of skateboard time in his life before getting on this one, which is a good testament of just how well it works. The biggest challenge was in getting the board to turn while on two wheels, which was solved by sensing side-to-side tilt of the board with the IMU and applying proportional differential torque to the wheels. With a bit of practice it’s also possible to smoothly shift between riding modes while moving.

We think this is a really elegant cheat, now we need to build one of our own. Fortunately the STM32 firmware and instructions are all up on GitHub. Building your own electric skateboard has become really simple with the availability of off-the-shelf components. We’ve also seen a bicycle with a wheelie cheat device to prevent you falling on your back