Repairing A BPS-305 30V Bench Power Supply

When [Tahmid Mahbub] recently reached for his ‘Lavolta’ BPS-305 bench supply, he was dismayed to find that despite it being a 30V, 5A-rated unit, the supply refused to output more than 15V. To be fair, he wasn’t sure that he had ever tried to push it beyond 15V in the years that he had owned it, but it had better live up to its specs. Ergo out came the screwdriver to open the power supply to see what had broken, and hopefully to fix it.

After some more probing around, he discovered that the unit had many more issues, including a highly unstable output voltage and output current measurement was completely wrong. Fortunately this bench power supply turns out to be very much like any number of similar 30V, 5A units, with repair videos and schematics available.

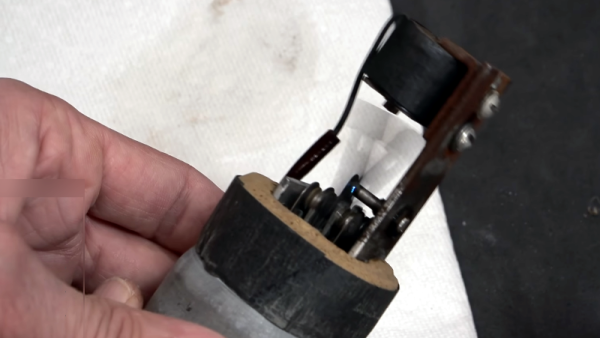
While [Tahmid] doesn’t detail his troubleshooting process, he does mention the culprits: two broken potentiometers (VR104 and VR102). VR104 is a 5 kOhm pot in the output voltage feedback circuit and VR102 (500 Ohm) sets the maximum output current. With no 500 Ohm pot at hand, a 5 kOhm one was combined with a 470 Ohm resistor to still allow for trimming. Also adjusted were the voltage and current trimpots for the front display as they were quite a bit off. Following some testing on the reassembled unit, this power supply is now back in service, for the cost of two potentiometers and a bit of time.

Power Supply With Benchtop Features Fits In Your Pocket

[CentyLab]’s PocketPD isn’t just adorably tiny — it also boasts some pretty useful features. It offers a lightweight way to get a precisely adjustable output of 0 to 20 V at up to 5 A with banana jack output, integrating a rotary encoder and OLED display for ease of use.

PocketPD leverages USB-C Power Delivery (PD), a technology with capabilities our own [Arya Voronova] has summarized nicely. In particular, PocketPD makes use of the Programmable Power Supply (PPS) functionality to precisely set and control voltage and current. Doing this does require a compatible USB-C charger or power bank, but that’s not too big of an ask these days.

Even if an attached charger doesn’t support PPS, PocketPD can still be useful. The device interrogates the attached charger on every bootup, and displays available options. By default PocketPD selects the first available 5 V output mode with chargers that don’t support PPS.

The latest hardware version is still in development and the GitHub repository has all the firmware, which is aimed at making it easy to modify or customize. Interested in some hardware? There’s a pre-launch crowdfunding campaign you can watch.

Power Supply PCB Redesign

We’ve often heard you should do everything twice. The first time is to learn what you need to do, and the second time is to do it right. We bet [Ian Carey] would agree after taking his old linear power supply PCB and changing it to a switching regulator design. You can see more about the project in the video below.

The first power-up revealed a problem with the 3.3V output. We’ve often thought it is harder to troubleshoot a new design than it is to repair something that is known to have worked at one time.

Continue reading “Power Supply PCB Redesign”

A Power Supply With Ultra High Resolution Current Measurement Built In

Need to do some real fine power consumption measurements? [Gero Müller] was in that exact situation, and wasn’t happy with the expensive off-the-shelf tools for doing the job. Thus, he built his own. Meet nanoTracer.

nanoTracer measures small current draws in very high resolution.

The concept of the device is simple. It’s a power supply that measures current on a nanoampere scale, and on microsecond intervals. It can deliver from 0 to 5.125 volts in 256 steps, and up to 100 mA of current. It has a sampling bandwidth of 1 MHz, at 2 million samples per second, with effective dynamic range from 100 mA all the way down to 100 nA. For capturing microscopic changes in current draw, that’s invaluable. The device also features a UART for talking to an attached project directly, and additional pins for taking further ADC measurements where needed.

Right now, it’s at an early prototype stage, and [Gero] tells us the software is “very basic” right now. Still, it’s easy to see how this device would be very useful to anyone working to optimize power consumption on low-power projects. One wonders if there are some applications in power-based side-channel attacks, too.

We’re hoping to learn more about nanoTracer from [Gero] soon—how it was built, how it works, and what it’s really like to use. Perhaps one day down the line, the design might even become available for others that could use such a nifty tool. There’s no mucking about when you get down to nanoamps, after all. If you’ve cooked up something similar in your own lab, don’t hesitate to let us know!

Photo of a Nice-Power supply

Quick & Capable WiFi For Your Nice-Power Supply

Rejoice, those of us who have purchased a Nice-Power lab PSU from an Eastern source. Yes, the name might sound like a re-brand of a generic product, maybe you will even see this exact PSU on a shelf at a physical store near you, under a more local brand name and with a fair markup. Nevermind the circumstances, the most important part is that [Georgi Dobrishinov] found a way to add an ESP8266 to the PSU by tapping its internal UART control interface, and wrote a web UI for all your Internet-of-Lab-PSUs needs, called the PowerLinkESP project.

All you need is a Wemos D1 development board, or any other ESP8266 board that has UART pins exposed and handles 5 V input. [Georgi] brings everything else, from pictures showing you where to plug it in and where to tap 5 V, to extensive instructions on how to compile and upload the code, using just the Arduino IDE. Oh, and he tops it off with STLs for a 3D printed case, lest your Wemos D1 board flop around inside.

With [Georgi]’s software, you can monitor your PSU with interactive charts for all readings, export charts in both PNG and CSV, and access a good few features. Your ESP8266’s network uplink is also highly configurable, from an STA mode for a static lab config, to an AP mode for any on-the-go monitoring from your phone, and it even switches between them automatically! The firmware makes your PSU all that more practical, to the point that if you’re about to build an interface for your PSU, you should pay attention to [Georgi]’s work.

Lab PSUs with WiFi integration are worth looking into, just check out our review of this one; smart features are so nice to have, we hackers straight up rewrite PSU firmware to get there if we have to. Oh, and if you ever feel like standardizing your work so that it can interface to a whole world of measurement equipment, look no further than SCPI, something that’s easier to add to your project than you might expect, even with as little as Python and a Pi.

1950s Switching Power Supply Does It Mechanically

When you hear about a switching power supply, you think of a system that uses an inductor and a switch to redistribute energy from the input to the output. But the original switching power supply was the vibrator supply, which was common in automotive applications back in the middle part of the last century. [Mr. Carlson] has a 1950s-era example of one of these, and he invites us to watch him repair it in the video below.

Most of the vibrator supplies we’ve seen have been built into car radios, but this one is in a box by itself. The theory is simple. A DC voltage enters the vibrator, which is essentially a relay that has a normally-closed contact in series with its coil. When current flows, the relay operates, breaking the contact. With no magnetic field, the springy contact returns to its original position, allowing the whole cycle to repeat.

Continue reading “1950s Switching Power Supply Does It Mechanically”

Fail Of The Week: A Potentially Lethal Tattoo Removal Laser Power Supply

Caveat emptor is good advice in general, but in the wilds of eBay, being careful with what you buy could be life-saving. To wit, we present [Les Wright]’s teardown and very ginger power-up of an eBay tattoo-removal laser power supply.

Given that [Les] spent all of around $100 on this widowmaker, we’re pretty sure he knew what he was getting himself into. But he likely wasn’t quite prepared for the scale of the sketchiness this thing would exhibit. The deficiencies are almost too many to number, starting with the enclosure, which is not only made completely of plastic but assembled from individual sheets of flat plastic stock that show signs of being glued together by hand. Even the cooling water tank inside the case is pieced together this way, which probably led to the leaks that corroded the PCBs. Another assembly gem is the pair of screws the big energy storage capacitor is jammed under, presumably to hold it in place — because nothing says quality like a BOM that can’t spring for a couple of cable ties. Click through the break to read more and see the video.

Continue reading “Fail Of The Week: A Potentially Lethal Tattoo Removal Laser Power Supply”