Fun-Size Tesla Might Be The World’s Smallest

We get all kinds of tips about “the world’s something-est” widget, which normally end up attracting the debunkers in droves. So normally, we shy away from making superlative claims about a project, no matter how they bill themselves. But we’re comfortable that this is the world’s smallest Tesla, at least if we have to stretch the definition of Tesla a bit.

This clown-car version of the Tesla Model S that [Austin] built is based around a Radio Flyer replica of the electric sedan. The $600 battery-powered original doesn’t deliver exactly the same neck-snapping acceleration of its full-size cousin, so he stripped off the nicely detailed plastic body and put that onto a heavily modified go-cart chassis. The tiny wheelbase left little in the way of legroom, but with the seat mounted far enough back into the wheelie-inducing zone, it was possible for [Austin] to squeeze in. He chose to pay homage to Tesla’s battery pack design and built 16 modules with fourteen 18650 cells in each, a still-substantial battery for such a small vehicle. Hydraulic brakes were also added, a wise decision since the 4800 Watt BLDC is a little snappier than the stock motor, to say the least. The video below shows the build, as well as a dangerous test ride where the speed read 72 at one point; we’re not sure if that’s MPH or km/h, but either way, it’s terrifying. The drifts were pretty sick too.

It seems [Austin] has the need for speed, and for drifting.  We’ve seen his water-cooled electric drift trike before, as well as his ridiculously overpowered crazy cart.

Continue reading “Fun-Size Tesla Might Be The World’s Smallest”

A Slightly Bent ESP8266 Sensor Platform

The ability to get professionally manufactured PCBs, at least small ones, for dirt cheap has had a huge impact on the sort of projects we see around these parts. It’s getting to the point where experimenting with PCB enclosures is not only a way to make your next project stand out, but an economical choice.

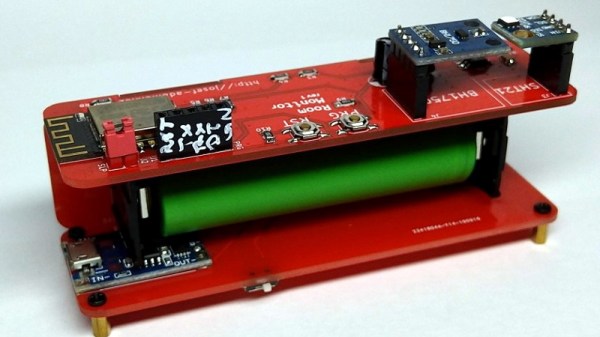
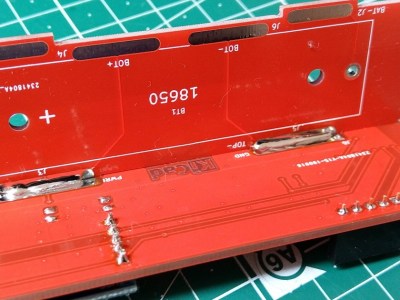
Which is how this ESP8266 sensor gadget from [Josef Adamčík] got its unique “folded over” look. The top panel is where the microcontroller and headers for various sensors live, the bottom panel is home to the TP4056 USB charging module, and the center panel provides mechanical support as well as holds the single 18650 cell. Rather than close the whole thing up with a fourth panel, he decided to leave it open so the battery can easily be removed. Plus, of course, it looks cooler this way.

Could [Josef] have fit all his electronics on a single 100 x 100 PCB and then put the whole thing into a 3D printed enclosure? Well, sure. But that’s been done to death at this point, and besides, he was looking for an excuse to get more comfortable doing PCB design. We think it also makes for a considerably more visual appealing final product than simply taking the “normal” way out.

Currently [Josef] has an SHT21 humidity/temperature sensor and a BH1750 light sensor slotted into the headers on the top side of the device, but they could just as easily be swapped out with something else if you wanted to do something a bit more exciting. We notice that homebrew air quality monitors are becoming increasingly popular.

Building bespoke enclosures from PCBs is a fantastic trick that frankly we’d love to see more of. It’s somewhat of an artform in itself, but if you’re willing to put the effort in to do it right the results can be truly phenomenal.

Advancing The State Of Cyberdeck Technology

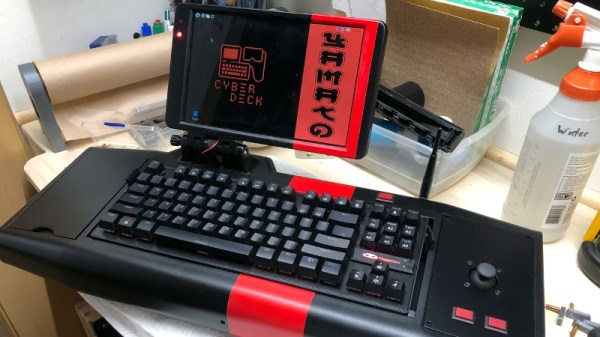
It’s somewhat rare to be able to witness the birth and subsequent evolution of a technology, at least on a short enough time scale to appreciate it, but right now we’re lucky enough to see it happening within the burgeoning community of cyberdeck builders. We’ve seen an absolute explosion of cyberdeck projects in the last year or so, but this latest entry from [Tinfoil_Haberdashery] truly pushes the state of the art forward. Short of actually transmitting your consciousness into the Matrix, we’re not sure how much closer you could get to William Gibson’s original vision.

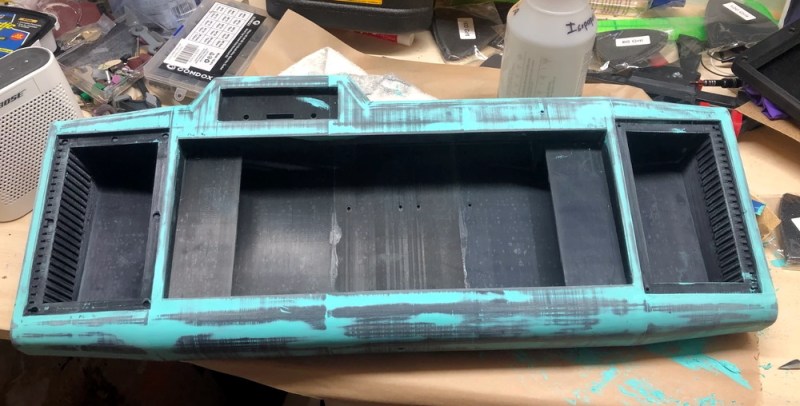
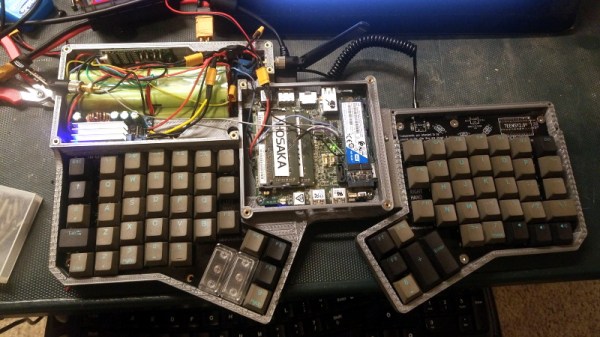
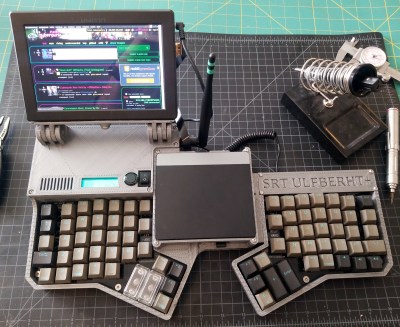
The design is based around a split ergonomic keyboard, with an Intel NUC in the center and a 1920×1200 IPS panel on a tilting mount off to one side. Since the display started its life as a DSLR monitor it doesn’t have a touch panel, but those who’ve yet to master a mouse-free workflow will be happy to know there’s a touch pad built into the lid of the NUC. Thanks to a clever dovetail joint, the deck also separates in half if you want to put some more space between your hands, or just to make the whole thing slightly less intimidating while carrying it on your back through the Sprawl.

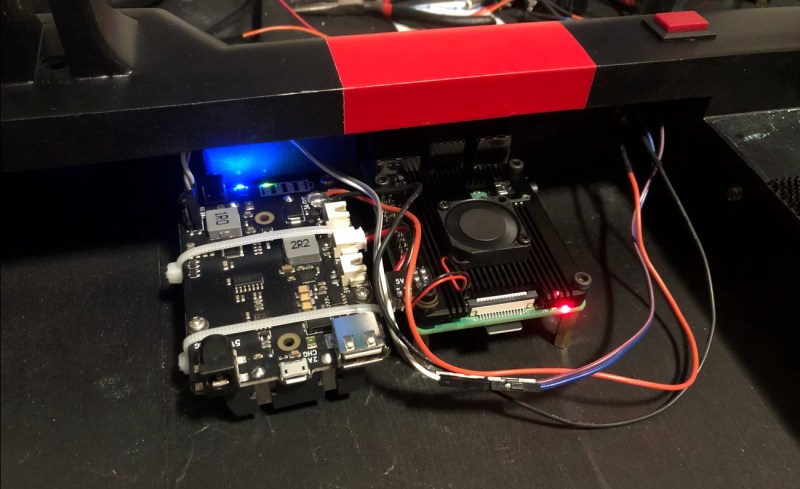
Power is provided by a custom 18650 battery pack running at 18 V that [Tinfoil_Haberdashery] (naturally) assembled with a homemade spot welder. He’s included both buck and boost converters so the cyberdeck can be powered with a wide array of voltages should he find himself in need of some juice in the field. To maximize battery life he’s also worked in a relay to cut power to the monitor when the NUC is sleeping, and there’s a physical master switch that can completely disconnect everything for long periods of inactivity.

The very first cyberdeck featured on Hackaday was built by [Tinfoil_Haberdashery], and we’re glad to see he’s not resting on his laurels. While that first deck was certainly impressive in its own right, this build takes inspiration from the incredible work we’ve seen from other hardware hackers and raises the bar on what’s possible from this dedicated community.

A Modular System For Building Heavy Duty 18650 Battery Packs

With 18650 cells as cheap and plentiful as they are, you’d think building your own custom battery packs would be simple. Unfortunately, soldering the cells is tricky, and not everyone is willing to invest in a spot welding setup just to put the tabs on them. Of course that’s only half the battle, you’ll still want some battery protection and management onboard to protect the cells.

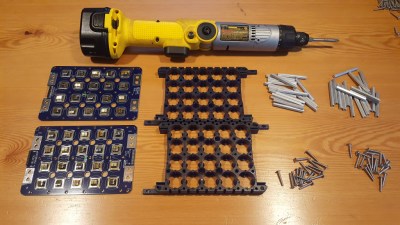
The lack of a good open source system for pulling all this together is why [Timothy Economu] created DKblock. Developed over the last three years, his open source system allows users to assemble large 18650 battery packs for electric vehicles or home energy storage, complete with integrated intelligent management and protection systems. Perhaps best of all there’s no welding required, the packs simply get bolted together.

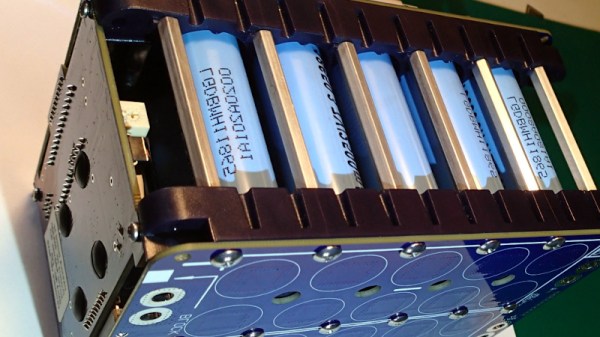
Each block of batteries is assembled using screws and standoffs in conjunction with ABS plastic cell holders. A PCB is placed on each side of the stack, and with tabs not unlike what you’d see in a traditional battery compartment, all the cells get connected without having to solder or weld anything to them. This allows for the rapid assembly of battery packs from 7.2 VDC all the way up to 150 VDC , and means individual cells can easily be checked and replaced in the future should the need arise.

For monitoring the cells, a “Block Manager” board is installed on each block, which communicates wirelessly to a “Pack Supervisor” board that monitors the overall health of the system. Obviously, such a robust system is probably a bit overkill if you’re just looking to build a pack for your quadcopter, but if you’re looking to build a DIY Powerwall or juice up a custom electric vehicle, this could be the battery management system you’ve been looking for.

Upgrades Give Crazy Cart XL A Few More X’s

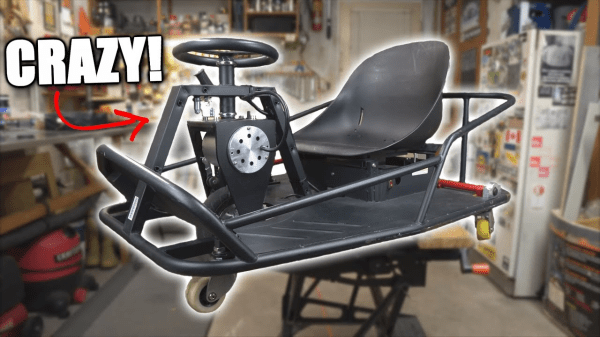
Why should kids have all the newfangled fun? They shouldn’t! Quarter-life crises are on the rise, and those who can are spoiling their inner child with adult-sized Heelys and electric Mario Karts that can drift. [austiwawa] finally got his hands on a used Crazy Cart XL, and while it’s incredibly fun, the puny 500W motor doesn’t quite satisfy his need for speed. A 3x power upgrade should do the trick.

The new 1600W motor is considerably bigger, so [austiwawa] had to grind off part of the front fork to make it fit. He designed a replacement motor support plate and had it cut from quarter-inch steel. Of course, you can’t just drop in a crazy new motor like that and go — you need a battery and controller to match. A couple of attempts and a new spot welder later, [austiwawa] built a 48V battery pack out of 18650s. The cart actually weighs less now, which should make the ride extra insane. Put a helmet on FFS and drift past the break to the build video and demo. Then watch him tear up the mean streets parking lots of Canada and take the kart off some sweet jumps.

We love a good fun-mobile around here, be it scratch-built or hacked OEM. This wasn’t even [austiwawa]’s first rodeo — check out his water-cooled electric drift trike.

Continue reading “Upgrades Give Crazy Cart XL A Few More X’s”

A Power Bank For Soldering On The Go

If you have a portable gadget, the chances are you’ve probably used power banks before. What few could have predicted when these portable battery packs first started cropping up is that they would one day be used to power soldering irons. Dissatisfied with the options currently available on the market, [Franci] writes in with his own power bank specifically designed for use with his TS80 portable soldering iron.

The electronics side of this build is simple and easy to replicate, with 4 18650 Li-ion cells standard to most high-capacity power banks and an off-the-shelf Fast Charge module serving as the brains of the operation. The beauty of this project however lies in the design of the actual case, completely custom-made from scratch to be 3d printed.

Unlike most power banks, where the outputs stick out to the side and leave the connectors prone to being bumped and damaged, [Franci] engineered his case so the ports are stacked on top and facing inwards. That way, USB plugs are contained within the footprint of the power bank’s body, and therefore protected from bending or snapping off in the socket. He also gracefully provides all instructions needed to make your own, including a wiring guide and a reminder about safety when dealing with battery packs.

If you’re unfamiliar with the TS80 soldering iron, we’ve featured the younger sibling of the TS100 in a previous post. And if you think this power bank is too simple for you, don’t worry, we’ve got you covered.

An Exhaustive Guide To Building 18650 Packs

Most of us know the basics of building packs of lithium-ion batteries. We’re familiar with cell balancing and the need for protection circuitry, and we understand the intricacies of the various serial and parallel configurations. It’s still a process that can be daunting for the first-time pack-builder though, because the other thing that most of us know about lithium ion batteries is that getting things wrong can cause fires. Rule zero of hackerspaces is “Don’t be on fire”, so what’s to be done? Fortunately [Adam Bender] is on hand with an extremely comprehensive two-part guide to designing and building lithium-ion battery packs from cylindrical 18650 cells.

In one sense we think the two-parter is in the wrong order. Part two takes us through all the technical details and theory, from lithium-ion chemistry to battery management systems and spot-welding nickel busbars, while part one shows us the construction of his battery pack. There are also a couple of videos, which we’ve placed below the break. It’s still not a job for the faint-hearted, but we’d say he’s produced about as professional and safe a pack as possible.

If spot welding worries you then it might be possible to build a pack without it. But it’s always worth considering: would you be better served buying one?

Continue reading “An Exhaustive Guide To Building 18650 Packs”