Hackaday Superconference: Estefannie’s Daft Punk Helmet

There’s no single formula for success, but if we’ve learned anything over the years of covering cons, contests, and hackathons, it’s that, just like in geology, pressure can create diamonds. Give yourself an impossible deadline with high stakes, and chances are good that something interesting will result. That’s what Estefannie from the YouTube channel “Estefannie Explains It All” did when Bay Area Maker Faire was rolling around last year, and she stopped by the 2018 Hackaday Superconference to talk about the interactive Daft Punk helmet that came out of it.

It’s a rapid-fire tour of Estefannie’s remarkably polished replica of the helmet worn by Guy-Manuel de Homem-Christo, one half of the French electronic music duo Daft Punk. Her quick talk, video of which is below, gives an overview of its features, but we miss the interesting backstory. For that, the second video serves as a kickoff to a whirlwind month of hacking that literally started from nothing.

You’ll Learn it Along the Way

Before deciding to make the helmet, Estefannie had zero experience in the usual tools of the trade. With only 28 days to complete everything, she had to: convert her living room into a workshop; learn how to 3D print; print 58 separate helmet parts, including a mold for thermoforming the visor; teach herself how to thermoform after building the tools to do so; assemble and finish all the parts; and finally, install the electronics that are the hallmark of Daft Punk’s headgear.
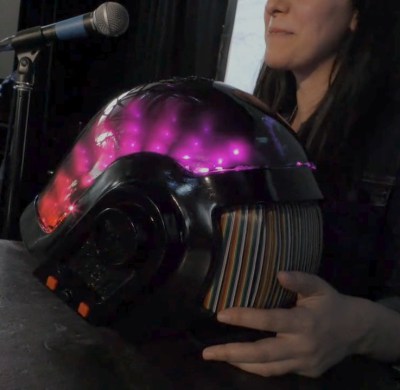
The three videos in her series are worth watching to see what she put herself through. Estefannie’s learning curve was considerable, and there were times when nothing seemed to work. The thermoforming was particularly troublesome — first too much heat, then not enough, then not enough vacuum (pretty common hurdles from other thermoforming projects we’ve seen). But the finished visor was nearly perfect, even if it took two attempts to tint.

We have to say that at first, some of her wounds seemed self-inflicted, especially seeing the amount of work she put into the helmet’s finish. But she wanted it to be perfect, and the extra care in filling, sanding, priming, and painting the printed parts really paid off in the end. It was down to the wire when BAMF rolled around, with last minute assembly left to the morning of the Faire in the hotel room, but that always seems to be the way with these kinds of projects.

In the end, the helmet came out great, and we’re glad the run-up to the Superconference wasn’t nearly as stressful for Estefannie — or so we assume. And now that she has all these great new skills and tools, we’re looking forward to her next build.

Continue reading “Hackaday Superconference: Estefannie’s Daft Punk Helmet”

3D Printing An Entire Rocket

If you’re ever flying into LAX and have the left side window seat, just a few minutes before landing, look out the window. You’ll see a small airport just below you and what appears at first glance to be a smokestack. That’s not a smokestack, though: that’s a rocket, and that’s where SpaceX is building all their rockets. Already SpaceX has revolutionized the aerospace industry, but just down the street there’s another company that’s pushing the manufacturing of rocket engines a bit further. Relativity Space is building rockets. They’re 3D printing rocket engines, and they’re designing what could be the first rocket engine made on Mars.

Bryce Salmi is an avionics hardware engineer at Relatively Space, and he made it out to the 2018 Hackaday Superconference to tell us all about manufacturing rockets. It’s an entirely new approach to manufacturing rockets and rocket engines with a clean-slate design that could eventually be manufactured on Mars.

Continue reading “3D Printing An Entire Rocket”

No Moving Parts: Phased Array Antennas Move While Standing Still

If you watch old science fiction or military movies — or if you were alive back in the 1960s — you probably know the cliche for a radar antenna is a spinning dish. Although the very first radar antennas were made from wire, as radar sets moved higher in frequency, antennas got smaller and rotating them meant you could “look” in different directions. When most people got their TV with an antenna, rotating those were pretty common, too. But these days you don’t see many moving antennas. Why? Because antennas these days move electrically rather than physically using multiple antennas in a phased array. These electronically scanned phased array antennas are the subject of Hunter Scott’s talk at 2018’s Supercon. Didn’t make it? No problem,  you can watch the video below.

While this seems like new technology, it actually dates back to 1905. Karl Braun fed the output of a transmitter to three monopoles set up as a triangle. One antenna had a 90 degree phase shift. The two in-phase antennas caused a stronger signal in one direction, while the out-of-phase antenna canceled most of the signal and the resulting aggregate was a unidirectional beam. By changing the antenna fed with the delay, the beam could rotate in three 120 degree steps.

Today phased arrays are in all sorts of radio equipment from broadcast radio transmitters to WiFi routers and 5G phones. The technique even has uses in optics and acoustics.

Continue reading “No Moving Parts: Phased Array Antennas Move While Standing Still”

Adventures In Automating A Candle Factory

Have you ever considered the manufacture of candles? Not necessarily manufacturing them yourself, but how they are manufactured in a small-scale industrial setting? It’s something that has been of great concern to Michael Schuldt as he grappled with the task of automating a simple manual candle production process.

It’s not just an interesting subject, but the topic of manufacturing automation is something we can all learn from. This was the subject of his Adventures in Manufacturing Automation talk at the recent Hackaday Superconference which you’ll find below the break. Let’s dive in and see what this is all about!

Continue reading “Adventures In Automating A Candle Factory”

Towards Low Cost Biomedical Imaging

Medical imaging is one of the very best applications of technology — it allows us to peer inside of the human body without actually performing surgery. It’s non-destructive testing to the extreme, and one of the more interesting projects we’ve seen over the past year uses AC currents and an infinite grid of resistors to image the inside of a living organism. It’s called Spectra and it is the brainchild of [Jean Rintoul]. Her talk at the Hackaday Superconference is all about low cost and open source biomedical imaging.

We’ve seen some interesting medical imaging hacks in the Hackaday Prize over the years. There have been vein finders and even a CT scanner, but when it comes to biomedical imaging, the Spectra project is something different. Right now, it’s just good enough to image organs while they’re still inside your body, and there’s still a lot of potential to do more. Let’s take a closer look a how this works.

Continue reading “Towards Low Cost Biomedical Imaging”

Designing Tiny Motors Right Into The Robot’s Circuit Board

Motors are not overly complex, but this one is downright simple. Carl Bujega has been working on a motor design that heavily relies on the capabilities of the printed circuit board (PCB) fabrication processes. His talk at the 2018 Hackaday Superconference covers how he built a brushless DC motor and speed controller into a PCB. You can watch the newly published video after the break.

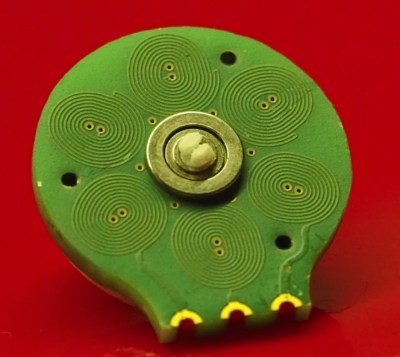
There are two main parts of an electric motor; the stator is stationary while the rotor spins on bearings. Electromagnetic forces are used to cause that spinning action. In this case, Carl has built the electromagnets as coils on a 4-layer circuit board (six coils on each layer). When electrified, a magnetic field is generated that pushes against the rare-earth magnets housed in the rotor.

A couple of things are really interesting here. First, those coils are usually made of “magnet wire” (enamel covered wire that is very thin) wrapped around an iron core. Using the circuit board instead saves both physical space, and the time and expense of wrapping coils of wire in the traditional way. Second, Carl has been designing with manufacture in mind; you can see in the image show that his motor design is dead-simple to assemble by inserting a 3mm bearing in the PCB, inserting magnets into the plastic rotor and snapping it into place. The end goal is to make robot actuators that are part of the circuit board itself.

The genesis of this idea came from Carl’s interest in drone design, in fact, he jumped right into a drone startup immediately after finishing his EE. The company didn’t last, but his thirst for interesting designs is ongoing. When looking at reducing the total parts necessary to build a quadcopter he happened on the idea of PCB-based coils and he’s followed it to this motor design, and beyond to some very interesting flexible-PCB robot design work which you can check out on his Hackaday.io page, YouTube, and Twitter.

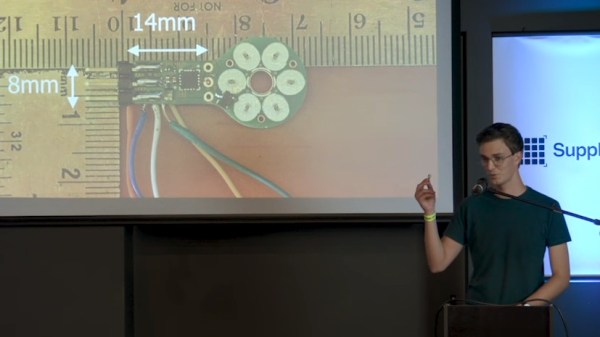
There are of course some trade-offs to this. The motor is low torque since it uses an air core and not an iron core. And he’s had trouble implementing a sensor-less Electronic Speed Controller (ESC) as the back-EMF from the coils appears to be too weak. Not to fret, he added a hall sensor and has succeeded in designing an ESC that measures just 14mm by 8mm. In fact, he’s holding up the ESC and motor in the image at the top of this article!

Continue reading “Designing Tiny Motors Right Into The Robot’s Circuit Board”

The Art Of Vacuum Tube Fabrication

Vacuum tubes fueled a technological revolution. They made the amplification of signals a reality for transatlantic telephone cables (and transcontinental ones too), they performed logic for early computers, and they delivered that warm fuzzy sound for high fidelity audio. But they were labor intensive to produce, and fragile, so semiconductors came along and replaced tubes in almost every application. But of course tubes are still with us and some tube applications are still critical — you’ll find them used in high-power RF and there are even satellites that depend on klystrons. So there are still experts in tube fabrication around, and Charles Alexanian is one of them. His newly-published talk at the 2018 Hackaday Supercon (found below) is a whirlwind tour of what goes into building a vacuum tube.

The process of building your own vacuum tube isn’t hard, but it’s not a walk in the park. The difficulty comes in the sheer number of processes, and the tricks of the trade found at every step. Charles’ methaphor is that if you build one tube at a time each step is like learning to ride a bicycle again, but if you build many you get into the swing of it and things go a lot better. His talk is a brief overview of everything, but if you want to drill down he also wrote an excellent article that goes further in depth.

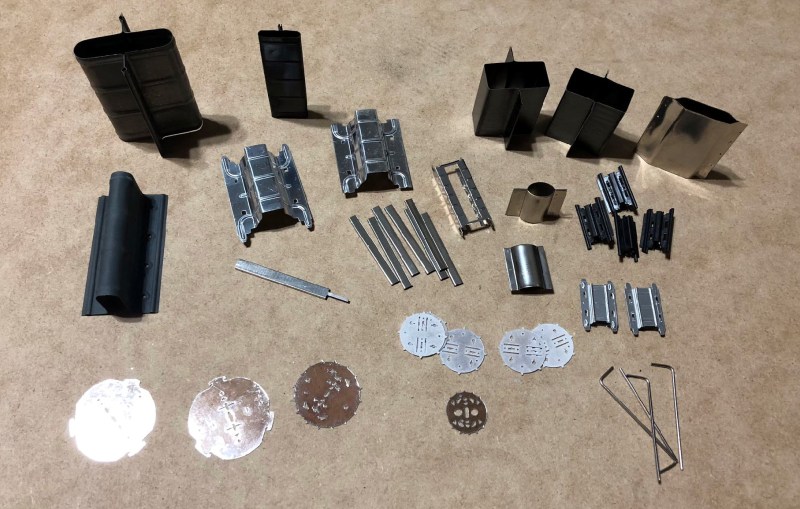
In the working components of each tube are the precision parts: the grid (or grids). For the tube to function well these must be accurately produced which can be done with photolithography, but Charles usually uses a winding process involving a lathe. After winding, the grid is stretched to straighten the nickel wire, then cut to length. Other components such as the plate are stamped using an arbor press and simple forms he fabricates for the purpose.

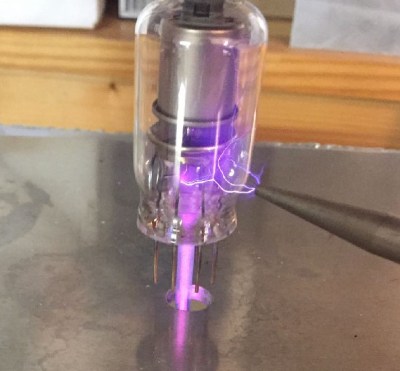
Tube being tested for leaks

Two glass components are used, the dome itself, and feedthrough stems that have a wire for each lead passing through a glass disc. The components are spot welded to the inside portion of the feedthrough stem, then the glass is fused together, again using a lathe. It heads over to a pumping station to evacuate the air from the tube, and is finally tested for leaks using a handheld Tesla coil (see, we knew those weren’t just toys).

Charles proposed his Supercon appearance as a chance to fabricate tubes on-site. We loved the idea, but the amount of gear needed is somewhat prohibitive (annealing ovens, vacuum cabinets, torches for sealing, and the need for 220v, plus space for it all). That’s too bad since we were really hoping to see the Jolly Wrencher in Nixie-tube form — incidentally, Charles says Nixes are simple to make compared to amplifiers and switches. He also mentions that the majority of your time is spent “washing” parts to remove impurities. Fair enough, that part sounds boring, but we hope to endure it at some point in the future because vacuum tube fabrication demos feel very much like a Hackaday event!

Continue reading “The Art Of Vacuum Tube Fabrication”