Design Cities In A Snap With Buildify

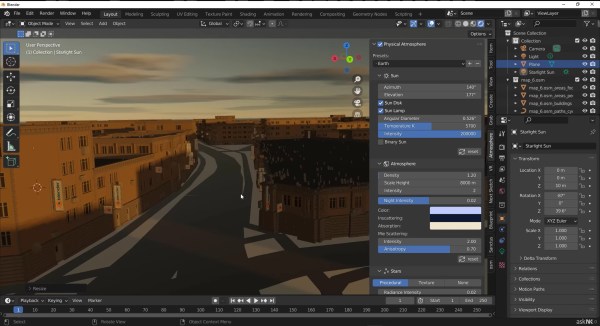
Designing 3D environments is hard, but it doesn’t have to be. A week ago, if you decided to design an entire city in Blender, say for a game or animation, you probably would have downloaded some asset pack full of building shapes and textures and painstakingly placed them over the course of days, modifying the models and making new ones as needed. Now, you would just need to download Buildify, feed it an asset pack, and watch the magic happen.

Buildify, made by [Pavel Oliva], is one of the most impressive bits of Blender content we’ve seen in a long time. It lets you generate entire cities by drawing the outlines of buildings. You can grab walls and resize individual structures, and the walls, windows, doors, textures, and everything else will automatically rearrange as needed. You can even select a region on Open Street Maps and watch as Buildify recreates the area in Blender using your chosen asset pack (maybe a KiCad PCB design could be used as the source material too?). It’s really something incredible to see, and you’ve just got to watch the video below to understand just how useful this tool can be.

The pay-what-you-want .blend file that you can grab off of [Pavel]’s website doesn’t include all the beautiful assets you can see in the video, but instead generates simple grey block buildings. He made one of the packs used in the video, and will be releasing it online for free soon. In the meantime, he links to other ones you can buy, or you can get really ambitious and create your own. We know it won’t be long until we’re seeing animations and games with Buildify-generated cities.

Continue reading “Design Cities In A Snap With Buildify”

Make Your Own Tabletop Game Organizers With Online Tool

There is a vibrant cottage industry built around selling accessories to improve the storage and organization of tabletop games, but the more DIY-minded will definitely appreciate [Steve Genoud]’s deckinabox tool, which can create either 3D-printable designs, or ones more suited to folded paper or cardstock. Making your own organizer can be as satisfying as it is economical, and [Steve]’s tool aims to make customization simple and easy.

The tool can also generate models for folded paper or cardstock.

The interface for customizing the 3D-printable token tray, for example, begins with a simple filleted receptacle which one can split into additional regions by adding horizontal or vertical separators. The default is to split a given region down the middle, but every dimension can of course be specified.  Things like filleting of edges (for easier token scooping) and other details are all handled automatically. A handy 3D view gives a live render of the design after every change.

[Steve] has a blog post that goes into some added detail about how the tool was made, and it makes heavy use of replicad, [Steve]’s own library for generating browser-based 3D models in code. Intrigued by the idea of generating 3D models programmatically, and want to use it to make your own models? Don’t forget to also check out OpenSCAD; chances are it’s both easier to use and more capable than one might think.

3D Printed Mars Rover Smiles For The Camera

You’d be forgiven for thinking these pictures of NASA’s Perseverance Mars rover were renderings of the real deal on the Red Planet, if it wasn’t for the golf ball tucked in for scale, anyway. What you’re actually looking at is a 3D printed model made by [Alex Givens] that he brought out to the desert for a photo shoot by his friend [Josh Jalil].

[Alex] printed the parts for the model on the Ender 5 Pro, while [Josh] snapped the shots using a Canon EOS 90D. The realism of the final shots serves as a testament to how well they’ve honed their respective tools, but credit for the 3D model itself has to go to the good folks over at NASA.

The highly detailed Perseverance model came from the space agency’s extensive “3D Resources” collection, which has models for an incredible array of present and historical spacecraft. They’ve also got models for a number of interesting astronomical objects, just in case you’re in the market for a 3D printed asteroid or two.

We know, this isn’t exactly a hack in the traditional sense. But it’s a fantastic reminder of a great resource from NASA, as well as a practical demonstration of how high quality photographs can really bring a project to life.

Digital Preservation For Old Batteries

The times they are a-changin’. It used to be that no household was complete without a drawer filled with an assortment of different sizes and types of batteries, but today more and more of our gadgets are using integrated rechargeable cells. Whether or not that’s necessarily an improvement is probably up for debate, but the fact of the matter is that some of these old batteries are becoming harder to find as time goes on.

Which is why [Stephen Arsenault] wants to preserve as many of them as possible. Not in some kind of physical battery museum (though that does sound like the sort of place we’d like to visit), but digitally in the form of 3D models and spec sheets. The idea being that if you find yourself in need of an oddball, say the PRAM battery for a Macintosh SE/30, you could devise your own stand-in with a printed shell.

The rather brilliantly named Battery Backups project currently takes the form of a Thingiverse Group, which allows other alkaline aficionados to submit their own digitized cells. The cells that [Stephen] has modeled so far include not only the STL files for 3D printing, but the CAD source files in several different flavors so you can import them into your tool of choice.

Like the efforts to digitally preserve vintage input devices, it’s not immediately clear how many others out there are willing to spend their afternoons modeling up antiquated batteries. But then again, we’ve long since learned not to underestimate the obscure interests of the hacker community.

3D Printable Kinematic Couplings, Ready To Use

Time may bring change, but kinematic couplings don’t. This handy kinematic couplings resource by [nickw] was for a design contest a few years ago, but what’s great is that it includes ready-to-use models intended for 3D printing, complete with a bill of materials (and McMaster-Carr part numbers) for hardware. The short document is well written and illustrated with assembly diagrams and concise, practical theory. The accompanying 3D models are ready to be copied and pasted anywhere one might find them useful.

What are kinematic couplings? They are a way to ensure that two parts physically connect, detach, and re-connect in a precise and repeatable way. The download has ready-to-use designs for both a Kelvin and Maxwell system kinematic coupling, and a more advanced design for an optomechanical mount like one would find in a laser system.

The download from Pinshape requires a free account, but the models and document are licensed under CC – Attribution and ready to use in designs (so long as the attribution part of the license is satisfied, of course.) Embedded below is a short video demonstrating the coupling using the Maxwell system. The Kelvin system is similar.

Continue reading “3D Printable Kinematic Couplings, Ready To Use”

Recreating Early Apple Mice For The Modern Era

At a time when practical graphical user interfaces were only just becoming a reality on desktop computers, Apple took a leap of faith and released one of the first commercially available mice back in 1983. It was criticized as being little more than a toy back then, but we all know how that particular story ends.

While the Apple G5431 isn’t that first mouse, it’s not too far removed. So much so that [Stephen Arsenault] believed it was worthy of historic preservation. Whether you want to print out a new case to replace a damaged original or try your hand at updating the classic design with modern electronics, his CAD model of this early computer peripheral is available under the Creative Commons license for anyone who wants it.

The model is exceptionally well detailed.

[Stephen] tells us that he was inspired to take on this project after he saw new manufactured cases for the G5431 popping up online, including a variant made out of translucent plastic. Realizing that a product from 1986 is old enough that Apple (probably) isn’t worried about people cloning it, he set out to produce this definitive digital version of the original case components for community use.

With these 3D models available, [Stephen] hopes that others will be inspired to try and modify the iconic design of the G5431. Perhaps by creating a Bluetooth version, or adding the ability to right-click. Considering we’ve already seen custom PCBs for mice, it’s hardly a stretch. We’d love to see somebody take him up on the offer, but even if not, the digital preservation of computer history is always welcome.

A Word Clock You Don’t Have To Actually Build To Enjoy

The great thing about word clocks is that while they all follow the same principle of spelling out the time for you, they come in so many shapes, sizes, and other variations, you have plenty of options to build one yourself. No matter if your craft of choice involves woodworking, laser cutting, PCB design, or nothing physical at all. For [Yasa], it was learning 3D modeling combined with a little trip down memory lane that led him to create a fully functional word clock as a rendered animation in Blender.

Inspired by the picture of a commercially available word clock, [Yasa] remembered the fun he had back in 2012 when he made a Turkish version for the Pebble watch, and decided to recreate that picture in Blender. But simply copying an image is of course a bit boring, so he turned it into an actual, functioning clock by essentially emulating a matrix of individually addressable LEDs using a custom texture he maps the current time to it. And since the original image had the clock positioned by a window, he figured he should have the sun move along with the time as well, to give it an even more realistic feel.

Of course, having the sun situation in real-time all year round would be a bit difficult to render, so [Yasa] choose to base the scene on the sun during spring equinox in his hometown Stockholm instead. You can see the actual clock showing your local time (or whichever time / time zone you set your device to) on his website, and his write-up is definitely a fun read you should check out if you’re interested in all the details or 3D modeling in general — or just to have a look at a time lapse of the clock itself. As he states, the general concept could be also used to model other word clocks, so who knows, maybe we will see this acrylic version or a PCB version of it in the future.