I have been meaning to play around with MQTT for some time now, and finally decided to take the plunge one evening last week. I had three cheap home temperature and humidity sensors, and was bothered that they often didn’t agree. Surprisingly, while the analog one had a calibration adjustment in the back, I have no idea how to calibrate the two digital ones. I took this as a sign that it was time to learn MQTT and be able to install my own, accurate sensors. Of course, I began by ordering the cheapest sensors I could find, but I can always upgrade later on.
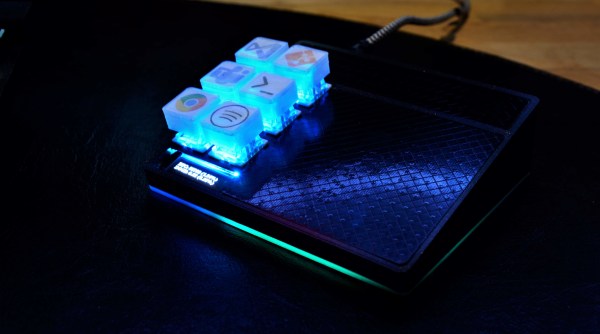
With many folks continuing to work from home for far longer than they ever thought, it’s no surprise that we’re seeing the rise of small DIY devices to make that video call or virtual presentation a little easier. [Dustin Watts] was interested in the functionality of the Elgato Stream Deck — a macro keyboard where each key is its own screen. But that kind of fancy hardware comes with a formidable price tag. So he built his own, and made it open source!
His first iteration — FreeTouchDeck — was built using commonly available modules but has since evolved into the ESP32 Touchdown which does it all with a single PCB. It’s a highly-customizable touchscreen macro keyboard which provide easy access shortcuts and macros for quick actions. Need a quick mute button, want to switch camera views on OBS, or maybe you want smarter shortcut keys for your CAD of choice. This will can get you there.
There a few key differences from the first version (FreeTouchDeck). The ESP32 dev board was ditched for a tidy PCB the directly integrates the module. This one has a capacitive touch controller (FT6236) rather than a resistive one as the capacitive screens deliver a far nicer user experience. A built-in battery and charger circuit (which the FreeTouchDesk didn’t have) allows for the extra bit of flexibility to stream from anywhere (within wireless range of course). Multiple case designs are available in STL form that allows it to be placed on a wall or desk with ease.
Datasheets, gerbers, kicad files, BOMs, and example firmware is provided on GitHub. The software is easily configurable so it can be set up to do any sort of macro, key combination, or action. This isn’t just limited to emulating a Bluetooth keyboard as there are examples showing how to connect to Home Assistant. All in all, this is a wonderful example of continued iteration on a project.
We just got our hands on some engineering pre-samples of the ESP32-C3 chip and modules, and there’s a lot to like about this chip. The question is what should you compare this to; is it more an ESP32 or an ESP8266? The new “C3” variant has a single 160 MHz RISC-V core that out-performs the ESP8266, and at the same time includes most of the peripheral set of an ESP32. While RAM often ends up scarce on an ESP8266 with around 40 kB or so, the ESP32-C3 sports 400 kB of RAM, and manages to keep it all running while burning less power. Like the ESP32, it has Bluetooth LE 5.0 in addition to WiFi.
Espressif’s website says multiple times that it’s going to be “cost-effective”, which is secret code for cheap. Rumors are that there will be eight-pin ESP-O1 modules hitting the streets priced as low as $1. We usually require more pins, but if medium-sized ESP32-C3 modules are priced near the ESP8266-12-style modules, we can’t see any reason to buy the latter; for us it will literally be an ESP8266 killer.
On the other hand, it lacks the dual cores of the ESP32, and simply doesn’t have as many GPIO pins. If you’re a die-hard ESP32 abuser, you’ll doubtless find some features missing, like the ultra-low-power coprocessor or the DACs. But it does share a lot of the ESP32 standouts: the LEDC (PWM) peripheral and the unique parallel I2S come to mind. Moreover, it shares the ESP-IDF framework with the ESP32, so despite running on an entirely different CPU architecture, a lot of code will run without change on both chips just by tweaking the build environment with a one-liner.
One of these things is not like the other
If you were confused by the chip’s name, like we were, a week or so playing with the new chip will make it all clear. The ESP32-C3 is a lot more like a reduced version of the ESP32 than it is like an improvement over the ESP8266, even though it’s probably destined to play the latter role in our projects. If you count in the new ESP32-S3 that brings in USB, the ESP32 family is bigger than just one chip. Although it does seem odd to lump the RISC-V and Tensilica CPUs together, at the end of the day it’s the peripherals more than the CPUs that differentiate microcontrollers, and on that front the C3 is firmly in the ESP32 family.
Our takeaway: the ESP32-C3 is going to replace the ESP8266 in our projects, but it won’t replace the ESP32 which simply has more of everything when we need it. The shared codebase and peripheral architecture makes it easier to switch between the two when we don’t need the full-blown ESP32. In that spirit, we welcome the newcomer to the family.
But naturally, we’ve got a lot more to say about it. Specifically, we were interested in exactly what the RISC-V core brought to the table, and ran the module through power and speed comparisons with the ESP32 and ESP8266 — and it beats them both by a small margin in our benchmarks. We’ve also become a lot closer friends with the ESP-IDF SDK that all of the ESP32 family chips use, and love how far it has come in the last year or so. It’s not as newbie-friendly as ESP-Arduino, for sure, but it’s a ton more powerful, and we’re totally happy to leave the ESP8266 SDK behind us.
As home automation starts to live up to its glossy sci-fi promise there remains a deficiency when it comes to interfacing between the newer computerised components and legacy items from a previous age. A frequent example that appears in projects on Hackaday is the reading of utility meters, and in that arena [jomjol] has a very neat solution involving an ESP32 camera module and a software neural network to identify meter readings directly.
The ESP and camera sit at the top of a 3D-printed housing that fits over the meter. The clever trick comes as each photo’s orientation is determined, and not only is OCR used to read digits but also figures are derived from small dial meters and other indicators on the meter face. It’s a very well-thought-out system, with a web-based configuration tool that allows full customisation of the readable zones and how they should be treated.
This project makes full use of the ESP32’s capabilities, and the attention to detail that has gone into making it usable is particularly impressive. It certainly raises the bar against previous OCR meter reading projects.
As [Luuk Esselbrugge] explains in a recent blog post, his 2002 Volvo S60 had an optional GPS navigation system and backup camera that used a motorized display that would rise out of the dashboard when needed. His particular car didn’t come with the hardware installed, but after getting his hands on a display module and doing some research, he figured out how he could drive it with the Raspberry Pi and a couple of microcontrollers.
Given the age of the display, you probably won’t be surprised to hear that it uses composite video. Not exactly high resolution, but in the demonstration after the break, we have to admit it looks more than up to the task. [Luuk] is running Android Auto on the Raspberry Pi 3 through the openauto project, which gives him a nice big display and access to all the navigation and media applications you’d expect. The display doesn’t support touch, but thanks to an ESP32 plugged into the CAN bus, he’s able to control the software by reading the buttons built into the Volvo’s steering wheel.
Composite video sources are switched with a simple relay.
To actually raise and lower the display, [Luuk] found you just need to fire a few bytes down the 1,200 baud serial bus that’s built into the display’s wiring harness. The ESP32 handles this duty as well, at least partly because it’s already plugged into the CAN bus and can tell when the vehicle is in reverse. This lets it bring up the screen to show the video feed from the newly installed backup camera in the event that the Pi hadn’t already asked to raise the display. Incidentally plugging in the phone normally triggers the system to wake up and raise the screen, and disconnecting it will command the screen to lower back into the stowed position.
The attentive reader or Volvo aficionado may be wondering how [Luuk] got the audio working. Since his car’s sound system doesn’t feature an auxiliary input, he’s using an Arduino to spoof the existence of a CD changer, which allows him to inject an audio signal into one of the pins on the back of the radio. Eventually he wants to move this task over to the ESP32, but he says a big change like that will have to wait until warmer weather.
This isn’t the first time we’ve seen the Raspberry Pi used to add enhanced features to a somewhat older vehicle. While some bemoan the increased complexity of modern vehicles, it seems some hackers can’t get enough of it.
Though kids today have an incredible knack for figuring out modern phones and tablets, there’s still something to be said for offering a simple physical user interface for little hands. To that end, [Martin Hierholzer] has put together a whimsical jukebox that his two year old daughter can use to listen to her favorite songs. With just a few simple buttons, no display to read, and the ability to stop and start songs using RFID tags embedded into 3D printed figures, it’s a perfect interface for tiny humans just getting the hang of interacting with technology.
While the Raspberry Pi might have been the more obvious choice to base this project around, [Martin] decided to go the ESP32 route for improved energy efficiency. The popular microcontroller is more than powerful enough to play MP3s, and its integrated WiFi connectivity allows the player to download new tracks from the network occasionally. He added a micro SD slot to provide some mass storage, a PCM5102 I2S DAC with a PAM8403 amplifier to handle the audio side of things, and a MFRC522 RFID receiver that can pick up tags placed on the top of the player. Power is provided by parts salvaged from a USB battery bank, and everything is housed on a custom PCB.
The relatively low power requirements of the ESP32 means the jukebox can keep the party going for many hours (perhaps even days) when in active use. When the RFID token is removed and there are no songs to play, some clever coding kicks the chip into low-power mode to greatly extend the player’s standby time. [Martin] says it can sleep for months without having to be recharged, and considering some of the impressive feats of battery-sipping we’ve previously seen from the ESP32, we don’t doubt it.
Even if you don’t have any young music lovers at home, the documentation [Martin] has put together for this project is absolutely worth a look. Whether its how he configures the server side to push songs and firmware updates to the player, how he wrangled the ESP32’s Ultra-Low Power coprocessor (ULP), or the woodworking tips used to produce the charming enclosure, you’re sure to pick up a trick or two.
[WJCarpenter]’s gas water heater uses a small pilot light that needs to stay burning permanently to ignite the main burners as required. Four or five times a year, the pilot light goes out and needs to be manually lit. This involves an expedition from the upstairs bathroom to the basement, always in the early morning, after having spent a few fruitless minutes waiting for hot water. Having grown tired of this exercise, [WJCarpenter] built Water Watcher, a pilot light monitoring system with some ESPs and a light sensor.
Water Watcher consists of an ESP8266 connected to a light sensor taped to the inspection window of the water heater. It reports the status of the pilot light over MQTT to an ESP32-based M5 Atom Matrix in the main bedroom, which displays it using a 5×5 RGB matrix, as demonstrated after the break. Both ESPs run ESPHome, so programming is as easy as giving it a YAML config file. [WJCarpenter] tested a few different light sensors, until he found the TSL2591, which is sensitive to the right wavelengths and has enough dynamic range for watching a pilot light.
This might not be a complicated hack, but we do not doubt that it reduces frustration a bit on those fateful mornings. Be sure to check out the Water Watcher project page, it’s an entertaining read! Continue reading “Keeping An Eye On The Water Heater Pilot Light”→