Adding Variometer Functionality To A GPS

Flying a glider, or similarly piloting a paraglider or hang glider, can all be pathways into aviation with a lower barrier of entry than powered flight. Sacrificing one’s engine does generate a few complexities, but can be rewarding as the pilot searches for various means of increasing altitude like ridge soaring or thermaling. You’ll need a special instrument called a variometer to know just how much altitude you’re gaining though, like this one which is built into commercially-available handheld GPS units.

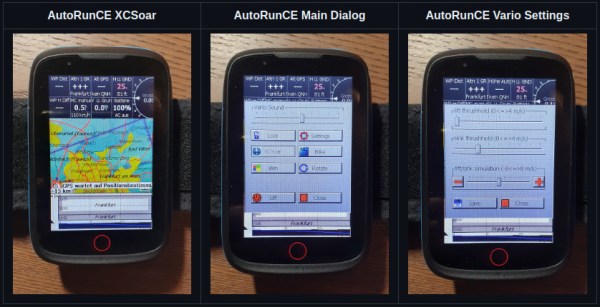
These GPS units are normally intended for use on terra firma only, but [Oganisyan] has figured out a clever way to add this flight instrumentation to these units to help when operating a paraglider. An ATmega328 paired with a pressure sensor is added to the inside of the GPS units and communicates with an available serial interface within the units. To complete the modification, a patched firmware must be installed which adds the variometer function to the display. This upgrade is compatible with a handful of GPS units as well such as the BikePilot2+ or Falk Tiger.

For those who already own one of these GPS units, this could be a cost-effective way of obtaining a variometer, especially since commercially-available variometers tailored for this sort of application can cost around $200 to $500. It is an activity sensitive to cost, though, as it offers a much more affordable option for taking to the skies than any powered craft could, with an exception made for this powered paraglider which offers the ability for powered take off and flight extension using electric-powered props.

Thanks to [MartinO] for the tip!

Arduino Variometer In A Mint Tin

While humans have done a pretty good job of figuring out how to fly with various mechanical contrivances, the fact remains that our natural senses aren’t really well suited to being off the ground. For example, unless you have a visual reference point, determining which way is up is quite a bit harder than you might think. Which is why pilots rely on instruments such as the variometer, that determines the current rate of climb and descent, to guide them when their eyes can’t be trusted.

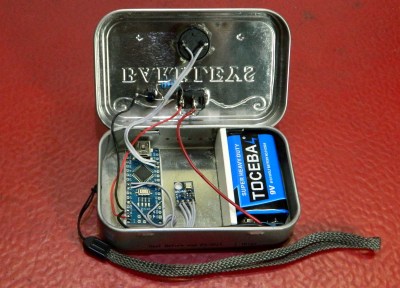
It’s also a very handy thing to have when paragliding, which is why [mircemk] decided to build a hand-held version using the Arduino Nano and a BMP180 pressure sensor. Since you don’t want to be staring at a little screen in mid-air, the device conveys changes in altitude with audio tones. A rising tone means you’re moving upwards, while a lower tone indicates downward travel. In the video below, you can see that it only takes a meter or two of vertical movement before the device picks up on the change.

Looking for a simple yet rugged enclosure for the device, [mircemk] found a metal mint tin that would hold the microcontroller, sensor, buzzer, and the 9 V battery that powers it all. We know what you’re thinking, but don’t worry; holes have been popped in the sides to make sure there’s no pressure difference inside the tin. There’s plenty of room to replace the alkaline battery with a rechargeable pack and associated charge controller, but we imagine there’s a certain security in tossing in a fresh new primary cell before slipping the surly bonds of Earth.

If you’re in interested DIY instrumentation for a glider or other aircraft that actually has a proper cockpit, this sunlight readable flight computer made from a Kobo e-reader would be a great start.

Continue reading “Arduino Variometer In A Mint Tin”

Sea Level: How Do We Measure Global Ocean Levels And Do Rising Oceans Change That Benchmark?

Every summer you go down the shore, but lately you’ve begun to notice that the beach seems narrower each time you visit. Is that the sea level rising, or is the sand just being swept away? Speaking of sea levels, you keep hearing that they rise higher every year — but how exactly is that measured? After all, you can’t exactly use a ruler. As it turns out, there are a number of clever systems in place that can accurately measure the global sea level down to less than an inch and a half.

Not only are waves always rippling across the ocean’s surface, but tides periodically roll in and out, making any single instantaneous measurement of sea level hopelessly inaccurate. Even if you plan to take hundreds or thousands of measurements over the course of weeks or months, taking the individual measurements is still difficult. Pick a nice, stable rock in the surf, mark a line on it, and return every hour for two weeks to hold a tape measure up to it. At best you’ll get within six inches on each reading, no matter what you’ll get wet, and at worst the rock will move and you’ll get a damp notebook full of useless numbers. So let’s take a look at how the pros do it.

Continue reading “Sea Level: How Do We Measure Global Ocean Levels And Do Rising Oceans Change That Benchmark?”

SatNOGS Update Hack Chat

Join us on Wednesday, October 30 at noon Pacific for the SatNOGS Update Hack Chat with Pierros Papadeas and the SatNOGS team!

Ever since the early days of the Space Race, people have been fascinated with satellites. And rightly so; the artificial moons we’ve sent into orbit are engineering marvels, built to do a difficult job while withstanding an incredibly harsh environment. But while most people are content to just know that satellites are up there providing weather forecasts and digital television, some of us want a little more.

Enter SatNOGS. Since winning the very first Hackaday Prize in 2014, SatNOGS has grown into exactly what Pierros Papadeas and the rest of the team envisioned: a globe-spanning network of open-source satellite ground stations, feeding continuous observations into an open, accessible database. With extensive documentation and an active community, SatNOGS has helped hundreds of users build ground stations with steerable antennas and get them connected. The network tracks hundreds of Low-Earth Orbit (LEO) satellites each day, including increasingly popular low-cost Cubesats.

Join us as the SatNOGS crew stops by the Hack Chat to give us an update on their efforts over the last few years. We’ll discuss how winning the Hackaday Prize changed SatNOGS, how the constellation of satellites has changed and how SatNOGS is dealing with it, and what it takes to build a global network and the community that makes it work.

join-hack-chatOur Hack Chats are live community events in the Hackaday.io Hack Chat group messaging. This week we’ll be sitting down on Wednesday, October 30 at 12:00 PM Pacific time. If time zones have got you down, we have a handy time zone converter.

Click that speech bubble to the right, and you’ll be taken directly to the Hack Chat group on Hackaday.io. You don’t have to wait until Wednesday; join whenever you want and you can see what the community is talking about.

Xpedit Is A Mood Ring For Mother Nature

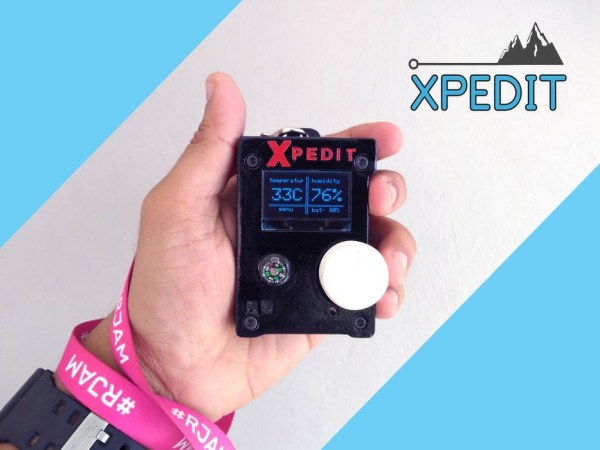
Whether you’re in the woods or way up a mountain, basic knowledge of your environment can yield a lot of power. The more you know about the temperature, humidity, barometric pressure, and your altitude, the easier it is to predict future weather and stick to your height limits. Sure, you could buy some pre-fab doohickey that does all of this, but why? [DIYMechanics] shows how easy it is to build your own pocket-sized weather station for under $20.

Xpedit’s brain is an ATMega328 running on a 20MHz crystal heartbeat. The atmospheric readings come from a BME280, a nifty all-in-one module that’s available for pennies on Ali. The rotary encoder handles user inputs, and the simple interface displays on an OLED. There’s even a tiny compass embedded in the 3D printed case.

We really like the custom alarm feature, which can buzz you via vibe motor if you’ve climbed too high, or the pressure is dropping. [DIYMechanics] has Xpedit completely open-sourced, so trek on down to the GitHub for the latest Eagles, Gerbers, and INOs. Don’t have a USBtiny ISP yet? He’s got the plans for that, too.

Maybe you’re the indoorsy type who’d rather read about mountainous jungle adventures than experience them firsthand. Add some weather-driven ambiance to your book nook by hacking an IKEA cloud lamp.

Pi Zero Gives Amateur Astronomer Affordable Control Of Telescope

Like many other hobbies, astronomy can be pursued on many levels, with equipment costs ranging from the affordable to the – well, astronomical. Thankfully, there are lots of entry-level telescopes on the market, some that even come with mounts that automatically find and track heavenly bodies. Finding a feature is as easy as aligning to a few known stars and looking up the object in the database embedded in the remote.

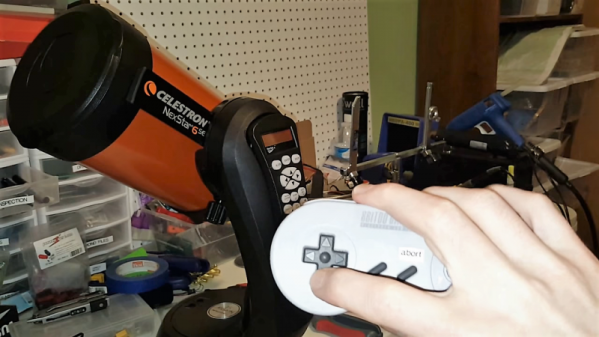
Few of the affordable mounts are WiFi-accessible, though, which is a gap [Dane Gardner]’s Raspberry Pi interface for Celestron telescopes aims to fill. For the price of a $10 Pi Zero W and a little know-how, [Dane] was able to gain full control over his ‘scope. His instrument is a Celestron NexStar, a Schmidt-Cassegrain reflector with a 150-mm aperture, has a motorized altitude-azimuth mount. The handheld remote had enough room for him to add the Zero, powering it from the mount’s battery pack. The handset has an RS-232 serial port built-in, but with the level differences [Dane] just connected the Pi directly to the handset before the UART. Running INDI, a cross-platform astronomical instrument control library, he now has total control of the scope, and he can use open source astronomy software rather than the limited database within the handset. As a neat side trick, the telescope can now be controlled with a Bluetooth gamepad.

Astronomy and electronics go hand in hand, whether in the optical or radio part of the spectrum. We like the way [Dane] was able to gain control of his telescope, and we’d like to hear about what he sees with his new tool. Assuming the Seattle weather ever cooperates.

Continue reading “Pi Zero Gives Amateur Astronomer Affordable Control Of Telescope”

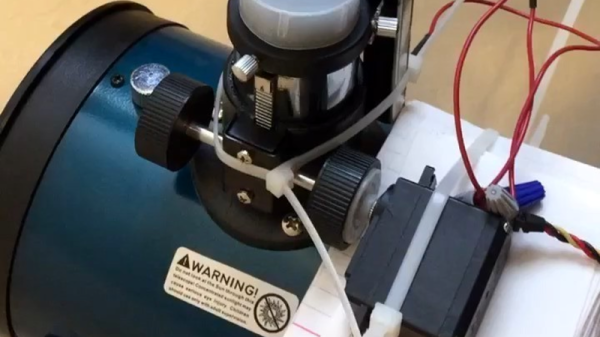
Modified Servo Adds Focus Control To Telescope

Scanning the heavens with a telescope is a great way to spend long, clear winter nights, but using a manual telescope can get to be a drag. A motorized mount with altitude and azimuth control is basic equipment for the serious observer, but adding a servo to control the focus of your telescope is one step beyond your average off-the-shelf instrument.

Having already motorized the two axes of the equatorial mount of his modest telescope as a senior project, [Eric Seifert] decided to motorize the focus rack as well. His first inclination was to use a stepper motor like he did on the other two axes, but with a spare high-torque servo at hand, he hacked a quick proof-of-concept. The servo was modified for continuous rotation in the usual way, but with the added twist of replacing the internal potentiometer with an external linear pot. Attached to the focus tube, the linear pot allows [Eric] to control the position and speed of the modified servo. Sounds like controlling the focus will be important to [Eric]’s planned web interface for his scope; we’ll be looking for details on that project soon.

We like the simplicity of this solution, and it’s a trick worth keeping in mind for other projects.  But if fancy steppers and servos aren’t your thing, fear not — astrophotography is as easy as slapping a couple of boards together with a hinge.

Continue reading “Modified Servo Adds Focus Control To Telescope”