Start Your Semiconductor Fab With This DIY Tube Furnace

Most of us are content to get our semiconductors from the usual sources, happily abstracting away the complexity locked within those little epoxy blobs. But eventually, you might get the itch to roll your own semiconductors, in which case you’ll need to start gearing up. And one of the first tools you’ll need is likely to be something like this DIY tube furnace.

For the uninitiated, [ProjectsInFlight] helpfully explains in the video below just what a tube furnace is and why you’d need one to start working with semiconductors. Perhaps unsurprisingly, a tube furnace is just a tube that gets really, really hot — like 1,200° C. In addition to the extreme heat, commercial furnaces are often set up to seal off the ends of the tube to create specific conditions within, such as an inert gas atmosphere or even a vacuum. The combination of heat and atmospheric control allows the budding fabricator to transform silicon wafers using chemical and physical processes.

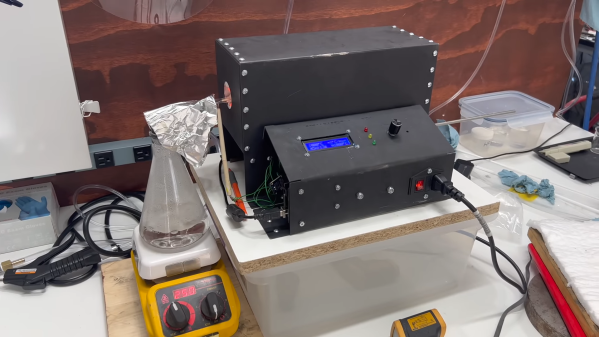
[ProjectsInFlight]’s tube furnace started with a length of heat-resistant quartz glass tubing and a small tub of sodium silicate refractory cement, from the plumbing section of any home store. The tube was given a thin coat of cement and dried in a low oven before wrapping it with nichrome wire. The wrapped tube got another, thicker layer of silicate cement and an insulating wrap of alumina ceramic wool before applying power to cure everything at 1,000° C. The cured tube then went into a custom-built sheet steel enclosure with plenty of extra insulation, along with an Arduino and a solid-state relay to control the furnace. The video below concludes with testing the furnace by growing a silicon dioxide coating on a scrap of silicon wafer. This was helped along by the injection of a few whisps of water vapor while ramping the furnace temperature up, and the results are easily visible.

[ProjectsInFlight] still needs to add seals to the tube to control the atmosphere in there, an upgrade we’ll be on the lookout for. It’s already a great start, although it might take a while to catch up to our friend [Sam Zeloof].

Continue reading “Start Your Semiconductor Fab With This DIY Tube Furnace” →

Off-Grid Radio Also Repairable Off-Grid

Low-power radios, often referred to in the amateur radio community as QRP radios, have experienced a resurgence in popularity lately. Blame it on certain parts of the hobby become more popular, like Parks on the Air (POTA) or Summits on the Air (SOTA). These are events where a radio operator operates off-grid at remote parks or mountaintops. These QRP rigs are a practical and portable way to make contacts. You would think that a five- or ten-watt rig running on batteries would be simple. Surprisingly, they can be enormously complex and expensive. That’s why [Dr. Daniel Marks] built the RFBitBanger, a QRP radio designed to not only be usable off-grid but to be built and maintained off-grid as well.

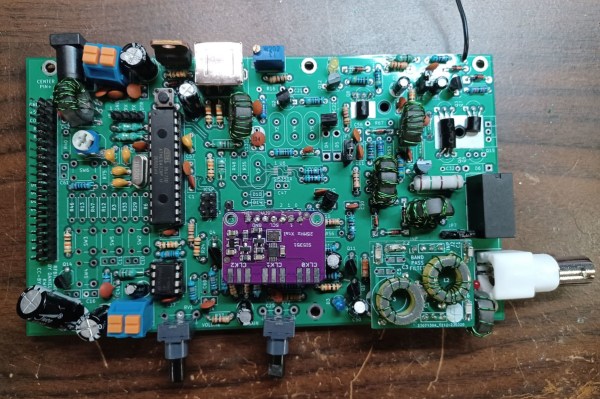
The radio accomplishes this goal by being built out of as many standard off-the-shelf components as possible. It eschews modern surface-mount components in favor of the much more accessible through-hole parts, including the ATMEGA328P at the center of the build. A PCB design is also available, but it can be built on perf board nearly as easily. The radio supports any mode a QRP operator might use, including CW, SSB, RTTY, and a new mode designed explicitly for this radio called SCAMP which is a low bandwidth, low SNR digital mode built into the Arduino-based firmware. It’s a single-band radio, but any band between 20 and 80 meters can be selected with pluggable filters.

As far as bomb-proof radios go, we can’t imagine a better way to live out an apocalypse than with a radio like this. As long as there’s a well-stocked parts drawer around, this radio could theoretically reach around the world without worrying about warranty claims, expensive parts, or even a company going out of business or not stocking parts for old radios anymore. There’s also more information about this build at the Open Research Institute for those interested. And, if you’re wondering how useful any radio could be using only five watts of transmitter power, take a look at this in-depth look at QRP radio operation.

Thanks to [Stephen Walters] for the tip.

Low Res Arduino Thermal Camera

Do you know how you see those cheap telescopes at the department store? The box has beautiful pictures that probably came from the Hubble. What you will see is somewhat different. You have to carefully look at [upir’s] Arduino thermal camera project because it intersperses pictures of what you expect an 8×8 sensor will produce with images produced by a much better camera.

The actual project — watch the video below — is undoubtedly neat. An inexpensive 8×8 IR sensor and an 8X8 LED panel join to form a crude but usable thermal camera.

Continue reading “Low Res Arduino Thermal Camera” →

Laser Engraver Uses All Of The DVD Drive

For the last ten to fifteen years, optical drives have been fading out of existence. There’s little reason to have them around anymore unless you are serious about archiving data or unconvinced that streaming platforms will always be around. While there are some niche uses for them still, we’re seeing more and more get repurposed for parts and other projects like this tabletop laser engraver.

The build starts with a couple optical drives, both of which are dismantled. One of the shells is saved to use as a base for the engraver, and two support structures are made out of particle board and acrylic to hold the laser and the Y axis mechanism. Both axes are made from the carriages of the disassembled hard drives, with the X axis set into the base to move the work piece. A high-output laser module is fitted to the Y axis with a heat sink, and an Arduino and a pair of A4988 motor controllers are added to the mix to turn incoming G-code into two-dimensional movement.

We’ve actually seen a commercial laser engraver built around the same concept, but the DIY approach is certainly appealing if you’ve got some optical drives collecting dust. Otherwise you could use them to build a scanning laser microscope.

Continue reading “Laser Engraver Uses All Of The DVD Drive” →

Apple III Slows Down To Smell The Roses

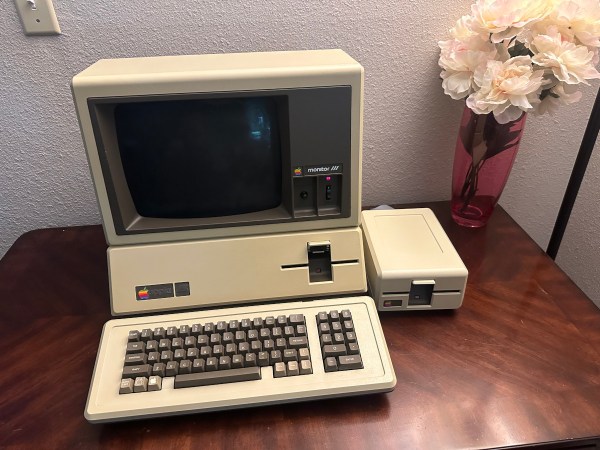
The most collectible items in the realm of vintage computers often weren’t the most popular of their era. Quite the opposite, in fact. Generally the more desireable systems were market failures when they first launched, and are now sought out because of a newly-appreciated quirk or simply because the fact that they weren’t widely accepted means there’s fewer of them. One of the retro computers falling into this category is the Apple III, which had fundamental hardware issues upon launch leading to a large recall and its overall commercial failure. [Ted] is trying to bring one of these devices back to life, though, by slowing its clock speed down to a crawl.

The CPU in these machines was a Synertek 6502 running at 1.8 MHz. With a machine that wouldn’t boot, though, [Ted] replaced it with his own MCL65+, a purpose-built accelerator card based on the 600 MHz Teensy 4.1 microcontroller in order to debug the motherboard. The first problem was found in a ROM chip which prevented the computer loading anything from memory, but his solution wouldn’t work at the system’s higher clock speeds. To solve that problem [Ted] disabled the higher clock speed in hardware, restricting the system to 1 MHz and allowing it to finally boot.

So far there haven’t been any issues running the computer at the slower speed, and it also helps keep the computer cooler and hopefully running longer as well, since the system won’t get as hot or unstable. This isn’t [Ted]’s first retrocomputing rodeo, either. His MCL chips have been featured in plenty of other computers like this Apple II which can run at a much faster rate than the original hardware thanks to the help of the modern microcontroller.

Force Feedback Steering Wheel Made From Power Drill

When it comes to controllers for racing games, there is perhaps no better option than a force feedback steering wheel. With a built-in motor to push against the wheel at exactly the right times, they can realistically mimic the behavior of a steering wheel from a real car. The only major downside is cost, with controllers often reaching many hundreds of dollars. [Jason] thought it shouldn’t be that hard to build one from a few spare parts though and went about building this prototype force feedback steering wheel for himself.

Sourcing the motor for the steering wheel wasn’t as straightforward as he thought originally. The first place he looked was an old printer, but the DC motor he scavenged from it didn’t have enough torque to make the controller behave realistically, so he turned to a high-torque motor from a battery-powered impact driver. This also has the benefit of coming along with a planetary gearbox as well, keeping the size down, as well as including its own high-current circuitry. The printer turned out to not be a total loss either, as the encoder from the printer was used to send position data about the steering wheel back to the racing game. Controlling the device is an Arduino, which performs double duty sending controller information from the steering wheel as well as receiving force feedback instructions from the game to drive the motor in the steering wheel. Continue reading “Force Feedback Steering Wheel Made From Power Drill” →

RF Remote Made Easy

The 433 MHz spectrum is a little bit of an oddball. It’s one of the few areas of the radio spectrum which is nearly universally unlicensed Outside of the US, it’s an open playground for devices that adhere to the power restrictions and other guidelines about best practices. IoT devices operate here, as well as security systems and, of course, remote controls. And, using a few off-the-shelf parts [hesam.moshiri] shows us how to take advantage of this piece of spectrum by designing and building a programmable and versatile 4-channel 433 MHz remote control.

Built around an ATmega8 microcontroller, making it easy to work with Arduino sketches, and with a 2×8 character LCD for ease-of-use when not connected to a computer, the wireless switching device can store up to 80 remote control codes in its EEPROM memory. This was one of the harder parts for [hesam] to sort out, but using structures to store the data for the codes eventually solved the problems. A simple GUI makes using it with whatever remote happens to be on hand fairly straightforward, including the ability to record codes from existing remotes on the fly and also to associate those codes with specific actions.

Schematics and a bill of materials are available on the project’s page, making this fairly accessible to those looking to add some wireless connectivity to a project, home automation system, or IoT device. It’s mainly set up as a switching device, but with some modifications could be put to work doing more complex tasks. The 433 MHz spectrum is an exciting place to be, too, and things like setting up entire security systems using it are not too far removed from a switching device like this.

[Editor’s note: As many mentioned in the comments, 433 MHz is a licensed ham band in the USA (ITU Region 2), so you can’t use it without a license. (Get one, it’s easy.)  In the USA, the equivalent band is at 315 MHz, which is why garage door remotes usually come with a 315/433 choice. Either way, check your local laws before you transmit.]

Continue reading “RF Remote Made Easy” →