While ultrasonic cleaning might sound a bit like the “sonic shower” from Star Trek, this is actually one case where the futuristic-sounding technology predates its use in Sci-Fi. Ultrasonic cleaners have been around since the 50s and are used to clean all sorts of oddly-shaped or specialty objects by creating cavitation within a liquid that allows the surface of the object to be scoured. With the right equipment, these cleaning devices are fairly straightforward to build as well.
This ultrasonic cleaner by [Branchus Creations] started off as a standard stainless steel laundry sink, but with the addition of a few transducers it really turns up the volume. They are attached to the underside of the sink with a combination of a bolt and hard epoxy so that the sound is efficiently transmitted to the sink, but they’re not much use without driver boards to power them. These drivers take AC power and convert it to the DC required to generate the ultrasonic frequencies, and this build uses a driver for each of the transducers all wired up to a common control board for ease-of-use.
The results speak for themselves; a test is performed on a sheet of aluminum foil which quickly turns takes on a Swiss cheese appearance after just a couple minutes in the cleaner. It’s also shown cleaning rusty nails and a few other things as well. For other nontraditional cleaning methods, be sure to check out this wet media blast cabinet built from a 55-gallon drum.
Continue reading “Converting A Sink To An Ultrasonic Cleaner”

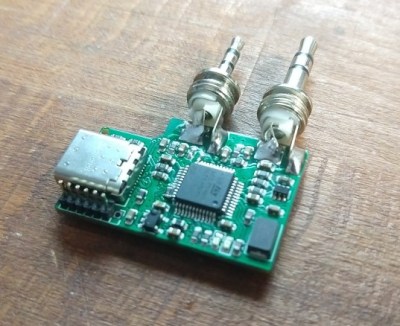 sound card as well as a virtual serial device, so interfacing to practically any host computer should be plug-and-play. Connection to the radio uses 12mm separation 3.5mm and 2.5mm TRS connectors, so is compatible with at least the Baofeng UV-5R but likely many other cheap transceivers that have the same physical setup.