Opening The Door To Functional Prints

If you are going to do something as a joke, there is nothing to say that you can’t do a nice job of it. If you’re like [Michael], a whimsical statement like “Wouldn’t it be funny to put Gründerzeit-style doors on the server cabinet?” might lead down a slippery slope. True to his word, [Michael] not only installed the promised doors, but he did a darn nice job of it.

Buying new doors was the easy part because the door frame and hinges were not standardized back then, so there was nothing on the server cabinet to his mount doors. He walks us through all the steps but the most interesting point was the 3D printed door hinges which [Michael] modeled himself and printed in steel. His new hinges feature his personal flair, with some Voronoi patterning while matching the shape of the originals. We love seeing 3D printed parts used as functional hardware, and hinges are certainly a piece of hardware meant to hold up under pressure.

This is not the first 3D printed door hardware we’ve seen. Check out this innovative latch printed as a single piece and here’s the skinny on making flexible objects yourself.

Continue reading “Opening The Door To Functional Prints”

Latskap Semi-Automatic Liquor Cabinet

A well-stocked liquor cabinet is a necessity for the classy gentleman or gentlelady who likes to entertain. Having the proper spirits and mixers on hand to make anything from a martini to a sidecar is always a solid way to ensure guests have a good time at your cocktail party. In the past, a beautifully crafted cherry or walnut liquor cabinet was enough to impress visitors with your affluence. These days, if you don’t want to look like a pauper, you have to take it a step further.

[Elias Bakken] and his uncle [Mike Moulton] have decided to take liquor cabinets into the 21st century with a semi-automatic liquor cabinet called Latskap. The project is still in progress, and in the prototyping stage, but their build log on Hackaday.io is showing a lot of potential. It shouldn’t be long before they have a fully functional prototype finished.

Continue reading “Latskap Semi-Automatic Liquor Cabinet”

3D Printer Enclosure Is Pleasant On The Eyes And Ears

There’s a lot going on in the 3D printing world. Huge printing beds, unique materials like concrete, and more accessible, inexpensive printers for us regular folk. The only thing that’s often overlooked with these smaller printers is the ruckus that they can make. The sounds of all those motors can get tiresome after a while, which was likely the inspiration for [Fabien]’s home 3D printer workstation. (Google Translate from French)
After acquiring a new printer, [Fabien] needed a place to put it and created his own piece of furniture for it. The stand is made out of spruce and is lined with insulation. He uses a combination of cork, foam, and recycled rubber tile to help with heat, sound, and vibration respectively. Don’t worry, though, he did install a ventilation system for the fumes! After the printer housing is squared away, he place a webcam inside so that the user can monitor the print without disturbing it. Everything, including the current print, is managed with a computer on the top of the cabinet.
Having a good workspace is just as important as having a quality tool, and [Fabien] has certainly accomplished that for his new 3D printer. There have been a lot of good workspace builds over the years, too, including electronics labs in a portable box and this masterpiece workbench. If you’ve ever experienced the frustration of working in an area that wasn’t designed for the task at hand, you’ll easily be able to appreciate any of these custom solutions.

The Prettiest Darn Arcade Cabinet You’ll See Today

We see an awful lot of arcade cabinets around here, and so it’s pretty unusual for a build to get much more than a second glance. But, this beauty is just too good not to mention. The entire build, named “Ready Player One” as a nod to the engrossing Ernest Cline novel, is detailed in [scoodidabop’s] post on Reddit.

Continue reading “The Prettiest Darn Arcade Cabinet You’ll See Today”

Bartop Arcade Honors Aspect With 4:3 IPad Screen

Let’s face it, we all love arcades, but not all of us can fit a full size stand-up in our homes. [Bentika] knew the solution was a bartop style cabinet, but it had to be designed and built to his specifications. You see, he’s a bit of an aspect ratio nerd. Only a proper 4:3 screen would do for emulating games designed for just such a display. Modern 4:3 displays are hard to come by, unless of course you have an iPad handy. The 1024 x 768 screens used on the early model iPads are perfect for the task.

Driving these screens used to be a chore, but thanks to hacker reverse engineering and overseas manufacturing, these days, controllers are only a few clicks away. [Bentika] ordered a controller for the iPad 1 screen from eBay. What he got was a controller that only worked with the iPad 2 screen. Thankfully he had a pile of old iPads to play with, so it wasn’t an issue.

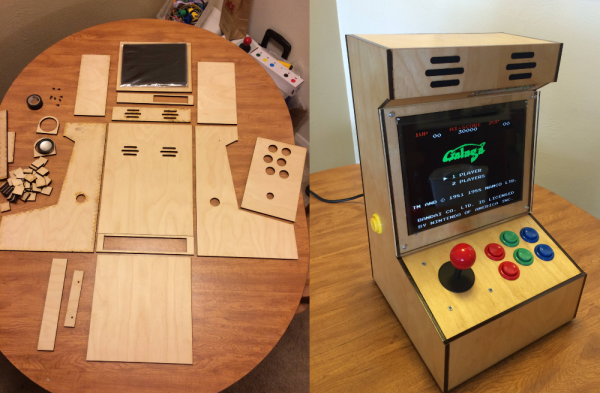
[Bentika] designed his cabinet using AutoDesk 123D based upon a basic outline provided by [Joshendy]. His final cut patters were created with Adobe Illustrator. He was able to get the entire cabinet laser cut for around $160, including materials. Cabinet assembly was easy, thanks to plenty of square gussets used to align the various pieces.

The controller for this arcade is of course a Raspberry Pi 2 running RetroPie. [Bentika] used a control block to interface the joystick and buttons to the Pi itself. RetroPie lends itself to “keyboardless” operation, he didn’t have to bring any of the Pi’s USB ports outside the case.

We have to say the final results are very nice. This system has all the portability of a CRT based bartop setup without the weight. You can check out more discussion of this hack over on Reddit, or click past the break for the video.

Continue reading “Bartop Arcade Honors Aspect With 4:3 IPad Screen”

Radio Receiver Or Art? Why Not Both?

We’ve heard it said before that you should build things twice. Once to learn how to build it and the second time to build it right. [AA7EE] must agree. He was happy with his homebrew regenerative receiver that he called Sproutie. But he also wanted to build one more and use what he learned to make an even better receiver. The Sproutie Mark II was born.

This isn’t some rip off of an old P-Box kit either. [AA7EE] used a four-device RF stage with FET isolation back to the antenna and a regulated power supply. Plug in coils allow reception on multiple bands ranging from about 3 to 13 MHz. There’s an audio stage with multiple selectable audio filters, and–the best part–a National HRO tuning dial that is a work of art all by itself.

Continue reading “Radio Receiver Or Art? Why Not Both?”

Pull-out Pantry Fills Space Next To Refrigerator

pull-out-pantry


Your refrigerator needs a few inches of space on the hinge side in order for the door to open fully. If there’s a wall on that side it means you leave a gap. A bit of lumber and some inexpensive hardware can turn that gap into a pull-out pantry.

This picture is from [Ratmax00’s] pantry project. He had a 6.5″ gap to work with and started the build by making a wooden frame using pocket screws for the butt joints. Four casters were added to the bottom to make it roll in and out easily. He needed a handle and a way to make sure commodities didn’t fall off the shelves. He chose to use a 3D printer for brackets that hold the fence dowels and a custom handle. If you don’t have that just hit the cabinet hardware aisle at your local home store.

We wonder if it would have been possible to use full-extension draw rails mounted above and below the cabinet in addition to a couple of wheels? This would help keep the pantry from scraping against the fridge or the wall.

While you’re building bookshelf sized things why not get to work on a hidden door as well?