Project Egress: Casting The Hatch Handle

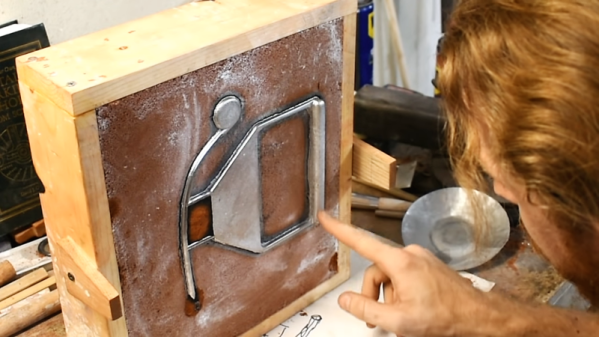
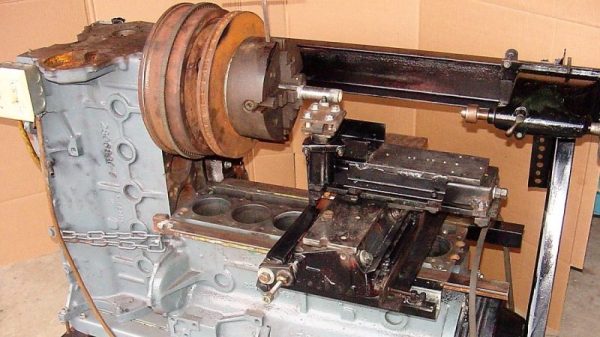
Every door needs a handle, even – especially – the door of a spaceship. And [Paul] from “Paul’s Garage” got the nod to fabricate the handle for the Apollo 11 Command Module hatch being built as part of Project Egress.

For those not familiar with Project Egress, it’s a celebration of the 50th anniversary of the first Moon landing that aims to recreate an important artifact from the mission: the Unified Crew Hatch, or UCH, from the Apollo 11 Command Module Columbia. Forty-four makers from various disciplines have been tasked with making the various pieces of the UCH, and each one is free to use whatever materials and methods he or she wants. [Paul] chose what will probably turn out to be the consensus material – aluminum – and decided to play to his strengths by casting the part.

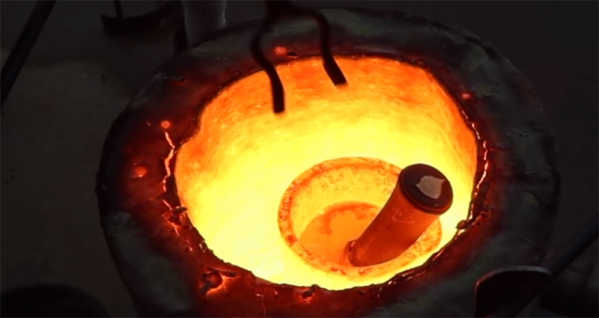
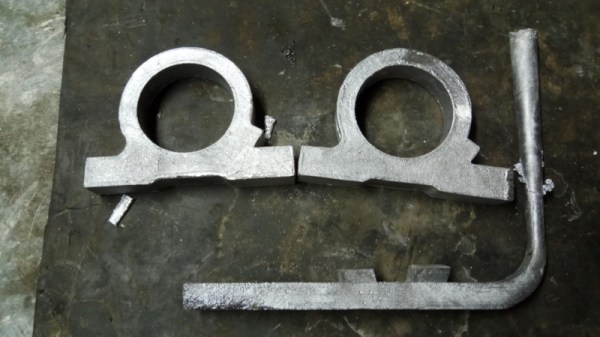
The handle itself is a chunky affair, as one would expect from something designed to be handled by an astronaut. [Paul] started with a 3D-printed version of the handle and created a two-piece mold in casting sand. The original part was probably machined, which meant that it didn’t have the draft angle that cast parts are supposed to have to make removal from the molding medium easier. [Paul] lucked out and got a perfect mold, and a perfect pour from silicon aluminum to boot. All the casting needed was a little cleanup and some holes to bolt it to the door.

[Paul]’s handle will get shipped to the Smithsonian along with the other parts, like [Fran Blanche]’s latch assembly, so that [Adam] can assemble the hatch live during the 50th-anniversary celebration later this month. Stay tuned for more Project Egress coverage as the parts keep rolling in.

Continue reading “Project Egress: Casting The Hatch Handle”

Casting A Cannon Is A Lot Harder Than You Think

We’ve seen backyard casting, and for the most part, we know what’s going on. You make a frame out of plywood or two by fours, get some sand, pack it down, and very carefully make a mold around a pattern. This is something else entirely. [FarmCraft101] is casting a bronze cannon. Sure, it’s scaled down a bit, but this is the very limit of what sanity would dictate a single person can cast out of molten metal.

This attempt at casting a cannon is more or less what you would expect from a backyard bronze casting experiment. There’s a wooden flask and a greensand mold, everything is tamped down well and there’s a liberal coating of talcum powder inside. This is a large casting, though, and this presented a problem: during the pour, the halves of the flask were only held together with a few c-clamps. This ended poorly, with molten bronze pushing against the mold and eventually flowing onto the garage floor. Doing this alone was perhaps a bad idea.

The failure of the mold meant some math was necessary, and after some quick calculations it was found that more than 300 pounds pushing the sides of the mold apart. A second pour, with the sides of the flask bound together with nylon straps, was much more successful with a good looking bronze cannon ready for some abuse with a wire wheel.

This is only the first video in the series, with the next videos covering the machining and boring out of the barrel. That’s some serious craft right there.

Continue reading “Casting A Cannon Is A Lot Harder Than You Think”

Casting CNC Parts In Aluminium

When it comes to machining, particularly in metal, rigidity is everything. [Tailortech] had a homebuilt CNC machine with a spindle held in place by a plastic bracket. This just wasn’t up to the job, so the decision was made to cast a replacement.

[Tailortech] decided to use the lost PLA process – a popular choice amongst the maker crowd. The spindle holder was first sketched out, then modeled in Fusion 3D 360. This was then printed in PLA slightly oversized to account for shrinkage in the casting process.

The PLA part was then used to make a plaster mold. [Tailortech] explains the process, and how to avoid common pitfalls that can lead to problems. It’s important to properly heat the mold once the plaster has set to remove moisture, but care must be taken to avoid cracking or wall calcination. It’s then necessary to slowly heat the mold to even higher temperatures to melt out the PLA prior to casting. With the mold completed, it can be filled with molten aluminium to produce the final part. When it’s cooled off, it’s then machined to final tolerances and installed on the machine.

Lost PLA casting is a versatile process, and goes to show that not everything has to be CNC machined out of billet to do the job. It’s also readily accessible to any maker with a furnace and a 3D printer. If you’ve got a casting project of your own, be sure to let us know. Video after the break.

Continue reading “Casting CNC Parts In Aluminium”

Casting Car Emblems Via 3D Printing

Casting is a process that can be quite demanding for the first timer, but highly rewarding once the basic techniques are mastered. It then becomes possible to quickly and reliably produce metal parts en masse, and with impressive tolerances if the right method is chosen. [VegOilGuy] has been experimenting with lost PLA casting, and decided to see if it could be applied to car emblems. 

The process begins with 3D models of various car emblems, primarily sourced from Thingiverse. These are printed in PLA, with sprues added to assist with the casting process. The parts are sanded to avoid unsightly print lines on the finished product, and any voids filled with wax. The various emblems are then assembled onto a casting tree, with extra sprues added to improve metal flow with wax and further PLA parts.

The investment mold is then created with plaster, and baked to remove water and melt out the PLA. This is crucial, as any water left in the mold can react explosively with the molten aluminium bronze.  The mold is then filled with metal and then allowed to cool. The plaster mold is destroyed, and the parts can then be removed. Final processing involves a trip through a rock tumbler before final polish with sandpaper.

[VegOilGuy] gets impressive results, with the parts looking excellent in their bronze colour. This is an unconventional color for a car emblem, but it’s noted that this material is an excellent candidate for chrome plating to get a more OEM finish.

You might find your lost PLA casting experiments could benefit from the help of a microwave, too. Video after the break.

Continue reading “Casting Car Emblems Via 3D Printing”

A No-Cost, Heavy Metal Lathe From Junkyard Parts

We have to admit that our first thought on seeing a Frankenlathe made from old engine blocks was that it was a set piece from a movie like The Road Warrior. And when you think about it, the ability to cobble together such a machine tool would probably make you pretty handy to have around in an apocalypse.

Sadly, surviving the zombie mutant biker uprising seemed not to be the incentive for [Paul Kuphaldt]’s version of the [Pat Delany] “Multimachine”. He seemed to be in it for the money, or more precisely from the lack of it. He was shooting for a zero-dollar build, and although he doesn’t state how close he came, we’re going to guess it was pretty close. The trick is to find big castings for the bed and headstock – Mopar slant 6 blocks in this case. The blocks are already precision machined dead flat and square, and the cylinder bores provide ample opportunities for stitching the castings together. The drivetrain comes from a 3-speed manual transmission, a 3/4-ton Chevy truck axle donated the spindle, and a V8 cylinder head was used for the cross slide. The tailstock seems to be the only non-automotive part on the machine.

We’d love to see a video of it in action, but there are ample pictures on [Paul]’s website to suggest that the heavy castings really make a difference in keeping vibration down. Don’t get us wrong – we love cast aluminum Gingery lathes too. But there’s something substantial about this build that makes us feel like a trip to the boneyard.

[via r/homemadetools]

How To Make Bisected Pine Cones Look Great, Step-by-Step

[Black Beard Projects] sealed some pine cones in colored resin, then cut them in half and polished them up. The results look great, but what’s really good about this project is that it clearly demonstrates the necessary steps and techniques from beginning to end. He even employs some homemade equipment, to boot.

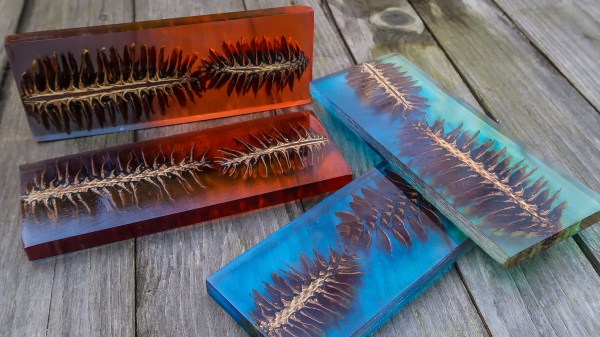
Briefly, the process is to first bake the pine cones to remove any moisture. Then they get coated in a heat-activated resin for stabilizing, which is a process that infuses and pre-seals the pine cones for better casting results. The prepped pine cones go into molds, clear resin is mixed with coloring and poured in. The resin cures inside a pressure chamber, which helps ensure that it gets into every nook and cranny while also causing any small air bubbles introduced during mixing and pouring to shrink so small that they can’t really be seen. After that is cutting, then sanding and polishing. It’s an excellent overview of the entire process.

The video (which is embedded below) also has an outstanding depth of information in the details section. Not only is there an overview of the process and links to related information, but there’s a complete time-coded index to every action taken in the entire video. Now that’s some attention to detail.

Continue reading “How To Make Bisected Pine Cones Look Great, Step-by-Step”

To Make Reproduction Train Whistles, The Old Ways Are Best

Late last year, artist [Steve Messam]’s project “Whistle” involved 16 steam engine whistles around Newcastle that would fire at different parts of the day over three months. The goal of the project was bring back the distinctive sound of the train whistles which used to be fixture of daily life, and to do so as authentically as possible. [Steve] has shared details on the construction and testing of the whistles, which as it turns out was a far more complex task than one might expect. The installation made use of modern technology like Raspberry Pi and cellular data networks, but when it came to manufacturing the whistles themselves the tried and true ways were best: casting in brass before machining on a lathe to finish.

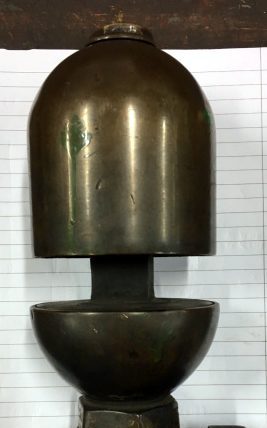
The original whistles are a peek into a different era. The bell type whistle has three major components: a large bell at the top, a cup at the base, and a central column through which steam is piped. These whistles were usually made by apprentices, as they required a range of engineering and manufacturing skills to produce correctly, but were not themselves a critical mechanical component.

In the original whistle shown here, pressurized steam comes out from within the bottom cup and exits through the thin gap (barely visible in the image, it’s very narrow) between the cup and the flat shelf-like section of the central column. That ring-shaped column of air is split by the lip of the bell above it, and the sound is created. When it comes to getting the right performance, everything matters. The pressure of the air, the size of the gap, the sharpness of the bell’s lip, the spacing between the bell and the cup, and the shape of the bell itself all play a role. As a result, while the basic design and operation of the whistles were well-understood, there was a lot of work to be done to reproduce whistles that not only operated reliably in all types of weather using compressed air instead of steam, but did so while still producing an authentic re-creation of the original sound. As [Steve] points out, “with any project that’s not been done before, you really can’t do too much testing.”

Embedded below is one such test. It’s slow-motion footage of what happens when the whistle fires after filling with rainwater. You may want to turn your speakers down for this one: locomotive whistles really were not known for their lack of volume.

Continue reading “To Make Reproduction Train Whistles, The Old Ways Are Best”