Dual-Wielding Robot Carves 3D Shapes From Foam With Warped Wire

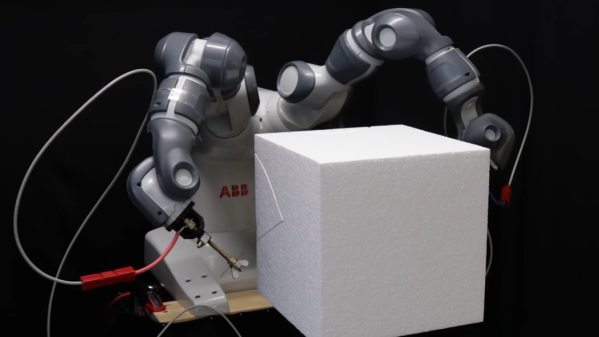
“Every block of expanded polystyrene foam has a statue inside it and it is the task of the dual-arm hot wire-wielding robot to discover it.” — [Michelangelo], probably.

Be prepared to have your mind blown by this dual-wielding hot-wire 3D foam cutter (PDF). We’ve all seen simple hot-wire cutters before, whether they be manual-feed cutters or CNC-controlled like a 3D-printer. The idea is to pass current through a wire to heat it up just enough to melt a path as it’s guided through a block of polystyrene foam. Compared to cutting with a knife or a saw, hot-wire cuts are smooth as silk and produces mercifully little of that styrofoam detritus that gets all over your workspace.

But hot-wire cutters can’t do much other than to make straight cuts, since the wire must be kept taut. “RoboCut”, though, as [Simon Duenser] and his colleagues at ETH Zurich call their creation, suffers from no such limitations. Using an ABB YuMi, a dual-arm collaborative robot, they devised a method of making controlled curved cuts through foam by using a 1-mm thick deformable rod rather than a limp and floppy wire for the cutting tool. The robot has seven degrees of freedom on each arm, and there’s only so much the rod can deform before being permanently damaged, so the kinematics involved are far from trivial. Each pass through the foam is calculated to remove as much material as possible, and multiple passes are needed to creep up on the final design.

The video below shows the mesmerizing sweeps needed to release the Stanford bunny trapped within the foam, as well as other common 3D test models. We’re not sure it’s something easily recreated by the home-gamer, but it sure is fun to watch.

Continue reading “Dual-Wielding Robot Carves 3D Shapes From Foam With Warped Wire”

On-Demand Manufacturing Hack Chat

Join us on Wednesday, March 4 at noon Pacific for the On-Demand Manufacturing Hack Chat with Dan Emery!

The classical recipe for starting a manufacturing enterprise is pretty straightforward: get an idea, attract investors, hire works, buy machines, put it all in a factory, and profit. Things have been this way since the earliest days of the Industrial Revolution, and it’s a recipe that has largely given us the world we have today, for better and for worse.

One of the downsides of this model is the need for initial capital to buy the machines and build the factory. Not every idea will attract the kind of money needed to get off the ground, which means that a lot of good ideas never see the light of day. Luckily, though, we live in an age where manufacturing is no longer a monolithic process. You can literally design a product and have it tested, manufactured, and sold without ever taking one shipment of raw materials or buying a single machine other than the computer that makes this magic possible.

As co-founder of Ponoko, Dan Emery is in the thick of this manufacturing revolution. His company capitalizes on the need for laser cutting, whether it be for parts used in rapid prototyping or complete production runs of cut and engraved pieces. Their service is part of a wider ecosystem that covers almost every additive and subtractive manufacturing process, including 3D-printing, CNC machining, PCB manufacturing, and even final assembly and testing, providing new entrepreneur access to tools and processes that would have once required buckets of cash to acquire and put under one roof.

Join us as we sit down with Derek and discuss the current state of on-demand manufacturing and what the future holds for it. We’ll talk about Ponoko’s specific place in this ecosystem, and what role outsourced laser cutting could play in getting your widget to market. We’ll also take a look at how Ponoko got started and how it got where it is today, as well as anything else that comes up.

join-hack-chatOur Hack Chats are live community events in the Hackaday.io Hack Chat group messaging. This week we’ll be sitting down on Wednesday, March 4 at 12:00 PM Pacific time. If time zones have got you down, we have a handy time zone converter.

Click that speech bubble to the right, and you’ll be taken directly to the Hack Chat group on Hackaday.io. You don’t have to wait until Wednesday; join whenever you want and you can see what the community is talking about.

Restoring A Rusty Rebar Cutter

We’ve all probably come across hunks of junk that used to be tools, long-neglected and chemically welded into a useless mass of solid rust. Such items are available for a pittance at the local flea market, or more likely found in an old barn or rotting on a junk pile. They appear to be far beyond salvage, but with the proper application of elbow grease and penetrating lubricants, even a nasty old seized-up rebar cutter can live again.

We honestly almost passed up on the video below when it came across our feed. After all, a rebar cutter is a dead-simple device, and half the fun of restoration videos like those made by [my mechanics] is seeing all the parts removed, restored, and replaced. But it ended up being far more interesting than we expected, and far more challenging too.

The cutter was missing its original handle and looked for all the world like it had been cast from a solid piece of iron oxide. [my mechanics] was able to get the main pivot bolts free with a combination of leverage, liberal application of penetrating oil, drilling, and the gentle persuasion of a hydraulic press.

These efforts proved destructive to both bolts, so new ones were made on the lathe, as were a number of other parts beyond saving. New cutters were fabricated from tool steel and a new handle was built; before anyone comments on anyone’s welding skills, please read [Jenny]’s recent article on the subject.

The finished product is strikingly dissimilar to the starting lump of oxidized junk, so there’s going to to be some debate in calling this a “restoration” in the classical sense. The end result of a [my mechanics] video is invariably a tool or piece of gear that looks far better than it did the day it was made, and any one of them would get a place of honor on our shelf. That said, he’d probably be swiftly shown the door if he worked at the Smithsonian.

Whatever you want to call these sort of videos, there are tons of them out there. We’ve featured a few examples of the genre, from the loving rehabilitation of classic Matchbox cars to rebuilding an antique saw set. They’re enough to make us start trolling garage sales. Or scrap yards.

Continue reading “Restoring A Rusty Rebar Cutter”

Making An Ultrasonic Cutter For Post-processing Tiny 3D Prints

An ultrasonic knife is a blade that vibrates a tiny amount at a high frequency, giving the knife edge minor superpowers. It gets used much like any other blade, but it becomes far easier to cut through troublesome materials like rubber or hard plastics. I was always curious about them, and recently made my own by modifying another tool. It turns out that an ultrasonic scaling tool intended for dental use can fairly easily be turned into a nimble little ultrasonic cutter for fine detail work.

Cheap ultrasonic scaler. The blue disk is for adjusting power. Foot switch not shown.

I originally started thinking about an ultrasonic knife to make removing supports from SLA 3D prints easier. SLA resin prints are made from a smooth, hard plastic and can sometimes require a veritable forest of supports. These supports are normally removed with flush cutters, or torn off if one doesn’t care about appearances, but sometimes the density of supports makes this process awkward, especially on small objects.

I imagined that an ultrasonic blade would make short work of these pesky supports, and for the most part, I was right! It won’t effortlessly cut through a forest of support bases like a hot knife through butter, but it certainly makes it easier to remove tricky supports from the model itself. Specifically, it excels at slicing through fine areas while preserving delicate features. Continue reading “Making An Ultrasonic Cutter For Post-processing Tiny 3D Prints”

The How And Why Of Tungsten Carbide Inserts, And A Factory Tour

It seems a touch ironic that one of the main consumables in the machining industry is made out of one of the hardest, toughest substances there is. But such is the case for tungsten carbide inserts, the flecks of material that form the business end of most of the tools used to shape metal. And thanks to one of the biggest suppliers of inserts, Sweden’s Sandvik Coromant, we get this fascinating peek at how they’re manufactured.

For anyone into machining, the video below is a must see. For those not in the know, tungsten carbide inserts are the replaceable bits that form the cutting edges of almost every tool used to shape metal. The video shows how powdered tungsten carbide is mixed with other materials and pressed into complex shapes by a metal injection molding process, similar to the one used to make gears that we described recently. The inserts are then sintered in a furnace to bind the metal particles together into a cohesive, strong part. After exhaustive quality inspections, the inserts are ground to their final shape before being shipped. It’s fascinating stuff.

Coincidentally, [John] at NYC CNC just released his own video from his recent jealousy-inducing tour of the Sandvik factory. That video is also well worth watching, especially if you even have a passing interest in automation. The degree to which the plant is automated is staggering – from autonomous forklifts to massive CNC work cells that require no operators, this looks like the very picture of the factory of the future. It rolls some of the Sandvik video in, but the behind-the-scenes stuff is great.

Continue reading “The How And Why Of Tungsten Carbide Inserts, And A Factory Tour”

Simple Jig Uses Electromagnet For Clean Angle Grinder Cuts

We like it when hacks are literal hack jobs, put together with what’s on hand to do a specific job. This quick and dirty angle grinder circle cutter certainly fills the bill, and makes decent cuts in sheet metal to boot.

The build starts with an unlikely source for parts – an old automotive AC compressor. The one that [Made in Poland] chose to sacrifice was particularly nasty and greasy, but after popping off the pulley, the treasure within was revealed: the large, ring-shaped clutch electromagnet. Liberated from the compressor, the electromagnet was attached to a small frame holding a pillow block. That acts as an axis for an adjustable-length arm, the other end of which holds a modified angle grinder. In use, the electromagnet is powered up by a small 12-volt power supply, fixing the jig in place on the stock. The angle grinder is traced around and makes a surprisingly clean cut. Check out the build and the tool in use in the video below.

At the time [Made in Poland] recorded the video, he noted that he did not have a plasma cutter. That appears to have changed lately, so perhaps he’ll swap out the angle grinder for plasma. And maybe he’ll motorize it for even smoother cuts.

Continue reading “Simple Jig Uses Electromagnet For Clean Angle Grinder Cuts”

Linear Track Makes Plasma Cuts Neat And Simple

No microcontroller, no display, and not even an LED in sight. That’s how [Made in Poland] decided to roll with this motorized linear plasma cutter, and despite the simplicity it really gets the job done when there’s metal to be cut.

Plasma cutting makes slicing and dicing heavy stock a quick job, but it’s easy to go off course with the torch or to vary the speed and end up with a poor edge. This tool takes the shakes out of the equation with a completely homebrew linear slide fabricated from square tubing. A carriage to hold the plasma cutter torch moves on a length of threaded rod chucked into the remains of an old cordless drill. The original clutch of the drill removes the need for limit switches when the carriage hits either end of the slide, which we thought was a great touch. Simple speed and direction controls are provided, as is a connection in parallel with the torch’s trigger. One nice feature of the carriage is the ability to swivel the torch at an angle, making V-groove welds in thick stock a snap. No need for a complicated bed with sacrificial supports and a water bath, either — just hang the stock over the edge of a table and let the sparks fall where they may.

Simple is better sometimes, but a CNC plasma table may still be your heart’s desire. We understand.

Continue reading “Linear Track Makes Plasma Cuts Neat And Simple”