Commodore 64 To Raspberry Pi Conversion Is Respectful & Complete

We’re big fans of taking old computers and giving them a new lease on life, but only when it is done respectfully. That means no cutting, no hot glue, and no gouging out bits to make the new computer fit. It’s best if it can be done in a way that the original parts can be restored if required.

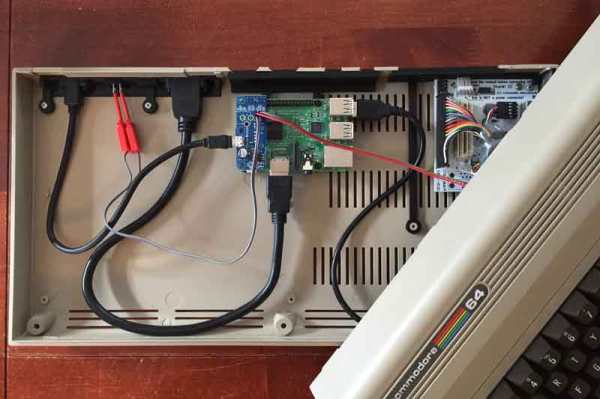
This Commodore 64 to Raspberry Pi conversion from [Mattsoft] definitely fits our criteria here, as it uses the old keyboard, joystick connectors and output portholes for the required authentic look. It does this through the clever use of a couple of 3D-printed parts that hold the Raspberry Pi and outputs in place, mounting them to use the original screw holes in the case.

Combine the Pi with a Keyrah V2 to connect the C64 keyboard and a PowerBlock to juice up all of the parts, and you’ve got a fully updated C64 that can use the keyboard, joysticks or other peripherals, but which also comes with a HDMI port, USB and other more modern goodies.

[Mattsoft] suggests using Combian 64, a C64 emulator for the Pi for the authentic look and feel. Personally, I might use it as a thin client to the big-ass PC with 16 CPU cores and 32GB of memory that’s hidden in my basement, but that’s just because I enjoy confusing people.

A Laser Cut Arcade Cabinet For Ants

Most of us would probably like to have an arcade cabinet at home, but it’s hard to justify the space they take up. Sure it’s an awesome conversation starter when friends are over, and you might even play it regularly, but at some point you’ll look over at the corner and realize there’s probably something more practical you could be doing with that particular section of the room.

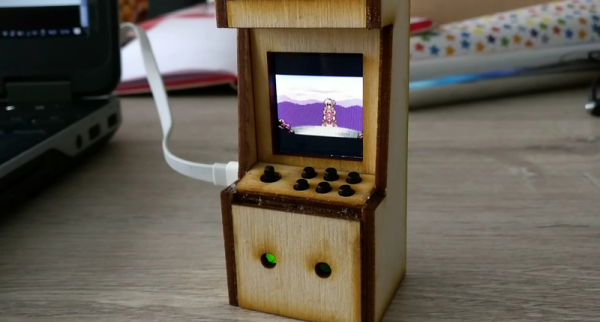
Perhaps the solution is to just make a smaller one. You could do one at half scale, or even desktop sized. But why stop there? Why not make one so small that you could put the thing in a drawer when you don’t need it? While it might be more of an academic experiment than a practical entertainment device, [RedPixel] has managed to create just such an easily concealable arcade cabinet out of a Pi Zero and laser cut wood. At only 83 mm high, this may well be the smallest functional arcade cabinet ever made (at least for now).

All of the cabinet parts were drawn in Inkscape and cut out of 3 mm plywood. The buttons and joystick are wired directly to the Pi Zero’s GPIO pins and configured with Adafruit-retrogame. The display is a SPI ILI9163, which [RedPixel] previously documented on his site.

The Pi is running the ever-popular RetroPie, which allows this tiny arcade cabinet to emulate 1000’s of console and arcade games, assuming you can deal with the controls anyway. While [RedPixel] has uploaded a video of his lilliputian cabinet running an emulator, there’s no video of him actually playing the thing. While we don’t doubt that it functions as advertised, gameplay on such a tiny array of inputs must be very difficult.

This may be the smallest functional arcade cabinet to date, but it isn’t without challengers. We’ve covered a number of very impressive builds that manage to invoke the look and feel of a hulking coin-up despite fitting neatly on your desk.

Continue reading “A Laser Cut Arcade Cabinet For Ants”

Emulating A Forgotten UNIX Box

The AT&T 3B2 series of computers are historically significant, being the main porting platform for System V Release 3 UNIX. Unfortunately, the documentation for these computers has been nearly lost to the sands of time. They are, however, architecturally interesting machines, and [Seth Morabito] has been working for some time on reverse engineering them. Now, [Seth] is calling it: his AT&T 3B2/400 emulator is almost complete, resurrecting an ancient machine from the dead by studying UNIX source code.

The architecture of this computer is unlike anything you’ve seen before, but well-suited to a UNIX machine. The chipset is built around the WE32100 manufactured by Western Electric, and includes a WE32101 MMU for all the fancy memory-mapped I/O. The implementation of this computer is fairly complex, with oodles of glue logic, over a dozen PALs, and various support chips for a PLL and DRAM controllers. This is computer architecture the way it was intended: inscrutable, baroque, and with a lot of fancy custom chips.

The emulator for this system is a bit simpler: you can just download and run it with simh. This emulator simulates 1, 2, or 4MB of system memory, one 720KB floppy diskette, and either one or two 30MB, 72MB, or 161MB MFM hard disk drives. Not everything is implemented so far — [Seth] is still working on an 8-port serial card and a network card — but this is a minimum viable system for developing and analyzing the history of UNIX.

Pi Handheld With A Mindblowing Enclosure

The Raspberry Pi is possibly the world’s most popular emulation platform these days. While it was never intended to serve this purpose, the fact remains that a small, compact computer with flexible I/O is ideally suited to it. We’ve featured a multitude of builds over the years using a Pi in a mobile form factor to take games on the go. [Michael]’s build, however, offers a lot more than a few Nintendo ROMs and some buttons from eBay. It’s a tour de force in enclosure design.

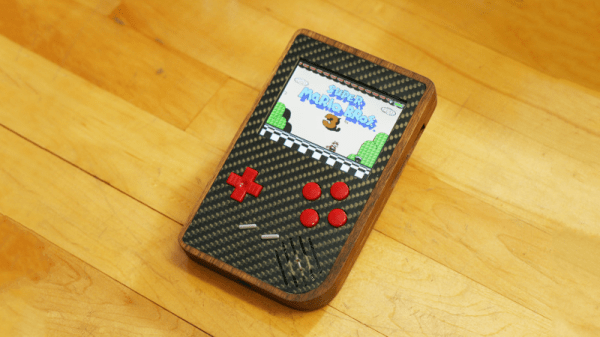
The build starts with the electronics. In 2017 it’s no longer necessary to cobble together five different accessory boards to handle the controls, battery charging, and display. Boards like Kite’s Super All In One exist, handling everything necessary for a handheld game console. With this as a starting point, he then set out to recreate Nintendo’s classic Game Boy, with a few tweaks to form and function.

It’s a textbook example of smart planning, design, and execution. We are taken through the process of creating the initial CAD drawings, then combining 3D printed parts with wood and carbon fibre for a look that is more akin to a high-end piece of hi-fi gear than anything related to gaming. The attention to detail is superb and the write-up makes it look easy, while [Michael] shares tips on how to safely cut carbon fibre to make your own buttons.

The final results are stunning, and it’s a great example of why a fine piece of wood is always a classy way to go for an enclosure. For another great example, try this walnut keyboard, or check out the roots of the Raspberry Pi Game Boy movement.

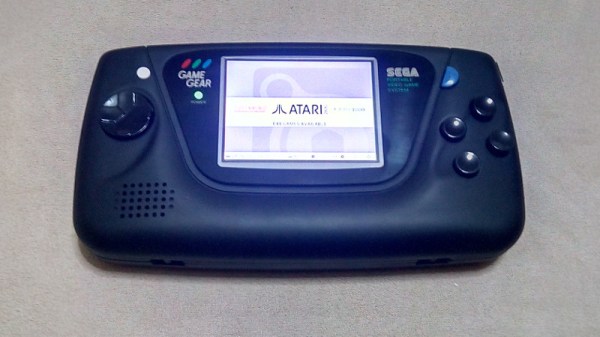
SegaPi Zero Shows Game Gear Some Respect

If you were a gamer in 1991, you were presented with what seemed like an easy enough choice: you could get a Nintendo Game Boy, the gray brick with a slightly nauseating green-tinted screen that was already a couple of years old, or you could get yourself a glorious new Sega Game Gear. With full color display and games that were ported straight from Sega’s home consoles, it seemed like the Game Gear was the true future of portable gaming. But of course, that’s not how things actually went. In reality, technical issues like abysmal battery life held the Game Gear back, and conversely Nintendo and their partners were able to squeeze so much entertainment out of the Game Boy that they didn’t even bother creating a true successor for it until nearly a decade after its release.

While the Game Gear was a commercial failure compared to the Game Boy back in the 1990s and never got an official successor, it’s interesting to think of what may have been. A hypothetical follow-up to the Game Gear was the inspiration for the SegaPi Zeo created by [Halakor]. Featuring rechargeable batteries, more face buttons, and a “console” mode where you can connect it to a TV, it plays to the original Game Gear’s strengths and improves on its weaknesses.

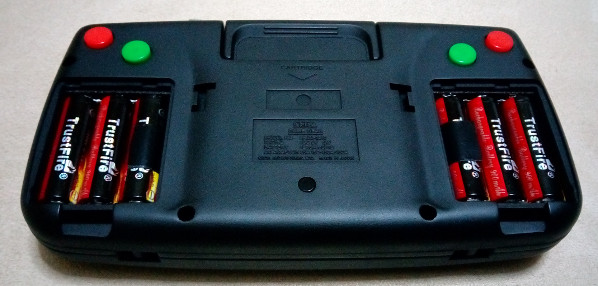
As the name implies the SegaPi Zero is powered by the Raspberry Pi Zero, and an Arduino Pro Micro handles user input by tactile switches mounted behind all the face buttons. A TP4056 charging module and step-up converter are also hiding in there, which take care of the six 3.7 lithium-Ion 14500 batteries nestled into the original battery compartments. With a total capacity of roughly 4,500 mAh, the SegaPi Zero should be able to improve upon the 3 – 4 hour battery life that helped doom the original version.

There’s no shortage of projects that cram a Raspberry Pi into a classic game system, but more often than not, they tend to be Nintendo machines. It could simply be out of nostalgia for Nintendo’s past glories, but personally we’re happy to see another entry into the fairly short list of Sega hacks.

Emulate ICs In Python

Most people who want to simulate logic ICs will use Verilog, VHDL, or System Verilog. Not [hsoft]. He wanted to use Python, and wrote a simple Python framework for doing just that. You can find the code on GitHub, and there is an ASCII video that won’t embed here at Hackaday, but which you can view at ASCIInema.

Below the break we have an example of “constructing” a circuit in Python using ICemu:

Continue reading “Emulate ICs In Python”

KIM-1 To COSMAC Elf Conversion — Sort Of

In the mid-1970s, if you had your own computer, you probably built it. If you had a lot of money and considerable building skill, you could make an Altair 8800 for about $395 — better than the $650 to have it built. However, cheaper alternatives were not far behind.

In 1976, Popular Electronics published plans for a computer called the COSMAC Elf which you could build for under $100, and much less if you had a good junk box. The design was simple enough that you could build it on a piece of perf board or using wire wrap. We featured the online archive of the entire Popular Electronics collection, but hit up page 33 of this PDF if you want to jump right to the article that started it all. The COSMAC Elf is a great little machine built around a 40-pin RCA 1802 processor, and for many was the first computer they owned. I lost my original 1802 computer in a storm and my recent rebuild in another completely different kind of storm. But there is a way to reclaim those glory days without starting from scratch.  I’m going to repurpose another retro-computing recreation; the KIM-1.

I’ll admit it, Rewiring a real KIM-1 to take an 1802 CPU would be difficult and unnecessary and that’s not what this article is about. However, I did have a KIM UNO — [Oscar’s] respin of the classic computer using an Arduino mini pro. Looking at the keyboard, it occurred to me that the Arduino could just as easily simulate an 1802 as it could a 6502. Heck, that’s only two digits different, right?

The result is pretty pleasing. A “real” Elf had 8 toggle switches, but there were several variations that did have keypads, so it isn’t that far off. Most Elf computers had 256 bytes of memory (without an upgrade) but the 1802 UNO (as I’m calling it) has 1K. There’s also a host of other features, including a ROM and a monitor for loading and debugging programs that doesn’t require any space in the emulated 1802.

Continue reading “KIM-1 To COSMAC Elf Conversion — Sort Of”