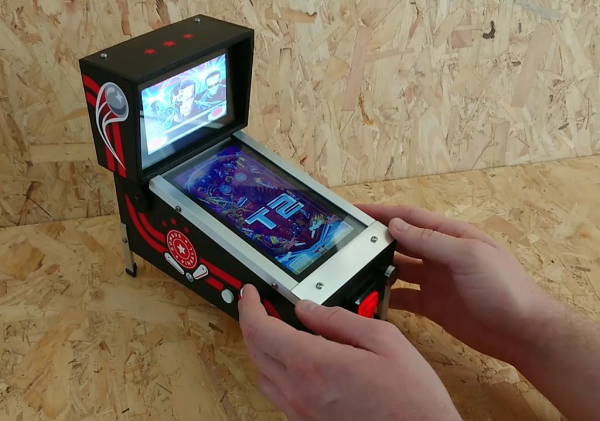
Pi Handheld With A Mindblowing Enclosure

The Raspberry Pi is possibly the world’s most popular emulation platform these days. While it was never intended to serve this purpose, the fact remains that a small, compact computer with flexible I/O is ideally suited to it. We’ve featured a multitude of builds over the years using a Pi in a mobile form factor to take games on the go. [Michael]’s build, however, offers a lot more than a few Nintendo ROMs and some buttons from eBay. It’s a tour de force in enclosure design.

The build starts with the electronics. In 2017 it’s no longer necessary to cobble together five different accessory boards to handle the controls, battery charging, and display. Boards like Kite’s Super All In One exist, handling everything necessary for a handheld game console. With this as a starting point, he then set out to recreate Nintendo’s classic Game Boy, with a few tweaks to form and function.

It’s a textbook example of smart planning, design, and execution. We are taken through the process of creating the initial CAD drawings, then combining 3D printed parts with wood and carbon fibre for a look that is more akin to a high-end piece of hi-fi gear than anything related to gaming. The attention to detail is superb and the write-up makes it look easy, while [Michael] shares tips on how to safely cut carbon fibre to make your own buttons.

The final results are stunning, and it’s a great example of why a fine piece of wood is always a classy way to go for an enclosure. For another great example, try this walnut keyboard, or check out the roots of the Raspberry Pi Game Boy movement.

Amiga Gets A PS/2 Keyboard Port

Name any retrocomputer — Apple II, Sinclair, even TRS-80s — and you’ll find a community that’s deeply committed to keeping it alive and kicking. It’s hard to say which platform has the most rabid fans, but we’d guess Commodore is right up there, and the Amiga aficionados seem particularly devoted. Which is where this Amiga PS/2 mouse port comes from.

The Amiga was a machine that was so far ahead of its time that people just didn’t get it. It was a true multimedia machine before multimedia was even a thing, capable of sound and graphics that hold up pretty well to this day. From the looks of [jtsiomb]’s workstation, he’s still putting his Amiga to good use, albeit with an inconvenient amount of cable-swapping each time he needs to use it. The remedy this, [jtsiomb] put together an emulator that translates scancodes from an external PS/2 keyboard into Amiga keyboard signals. Embedded inside the Amiga case where it can intercept the internal keyboard connector, the emulator is an ATmega168 that does a brute-force translation by way of lookup tables. A switch on the back allows him to choose the internal keyboard or his PS/2 keyboard via a KVM switch.

Are Amigas really still relevant? As of two years ago, one was still running an HVAC system for a school. We’re not sure that’s a testament to the machine or more a case of bureaucratic inertia, but it’s pretty impressive either way.

[via r/electronics]

Almost An Amiga For Not A Lot

If you ask someone old enough to have been a computer user in the 16-bit era what machine they had, you’ll receive a variety of answers mentioning Commodore, Atari, Apple, or even PC brands. If your informant lay in the Commodore camp though, you’ll probably have an impassioned tale about their Amiga, its capabilities, and how it was a clearly superior platform whose potential was wasted. The Amiga was for a while one of the most capable commonly available computers, and became something of a cult within its own lifetime despite the truly dismal performance of the various companies that owned it. Today it retains one of the most active retro computer scenes, has an active software community, and even sees new hardware appearing.

For Amiga enthusiasts without the eye-watering sums required to secure one of the new Amiga-compatible machines with a PowerPC or similar at its heart, the only option to relive the glory beside finding an original machine is to run an emulator. [Marco Chiapetta] takes us through this process using a Raspberry Pi, and produces an Amiga that’s close enough to the real thing to satisfy most misty-eyed enthusiasts.

He starts with a cutesy Amiga-themed Raspberry Pi case that while it’s not essential for the build, makes an entirely appropriate statement about his new machine, We’re taken through the set-up of the Amibian emulator distro, then locating a set of Amiga ROMs. Fortunately that last step is easier than you might think, even without trawling for an illicit copy.

The result is an Amiga. OK, it’s not an Amiga, but without the classic Commodore logo is it any more not an Amiga than some of the other non-branded Amiga-compatible boards out there? Less talking, more classic gaming!

We’ve covered quite a few Amigas on these pages. Getting an A500 online was the subject of a recent post, and we brought you news of a new graphics card for the big-box Amiga’s Zorro slot.

Atari 2600 In A Game Cartridge

[PJ Evans] had a ruined game cartridge lying around, just waiting for a project. As Activision’s F-14 Tomcat game for the Atari 2600 console, it seemed ripe for use as a project enclosure of some sort. When he came across a couple of 9-pin D-sub joystick ports, he had an idea. He realized his Rasperry Pi Zero could fit inside the cartridge. Add a power button, TV color selector, difficulty switch, as well as select and reset buttons, and you have an emulator.

[PJ]’s Pi Zero had more than enough GPIO pins to accommodate all of those buttons and switches plus a bunch more for the joysticks. Why not put the emulator inside a game cartridge? In terms of software [PJ] looked into Adafruit’s Retro Gaming with Raspberry Pi resource, which has tons of suggestions for setting up game emulators. He decided on the RetroPie operating system to help him map out all of the pins, with Stella doing the actual Atari 2600 emulation.

Thanks, @seb_ly]!

Game Boy Mod Uses Raspberry Pi Compute Module 3

[inches] wanted the power of a Raspberry Pi 3 in a form factor closer to the Pi Zero for a Game Boy mod. This led him to design a custom PCB to interface with one of the less popular items in the Raspberry Pi line: the Compute Module 3. A hardware comparison between the three platforms is available here.

After correcting some minor issues, it booted correctly on the first try. The final result is slightly larger than a Raspberry Pi Zero, but significantly smaller than the Raspberry Pi 3, and fits perfectly inside the Game Boy for a clean build.

The Raspberry Pi Zero remains difficult to source in some parts of the world and can cost nearly as much as the more powerful CM3 (e.g. in Southeast Asia). If you’re comfortable making a breakout board and benefit from the added computing power, it’s a reasonable option when it needs to be small.

Worth noting is that the Raspberry Pi Foundation does sell an open-source development kit for the CM3 that has been used in some projects, but the retail cost is relatively high compared to a Raspberry Pi 3. Smaller but less feature-rich breakout boards like the one by [inches] make the CM3 more accessible.

Thanks to [Lou Hannoe] for the tip.

FPGA Emulates NES Cart; Prototype So Cyberpunk

By now, most of us have had some experience getting ROMs from classic video games to run on new hardware. Whether that’s just on a personal computer with the keyboard as a controller, or if it’s a more refined RetrioPie in a custom-built cabinet, it has become relatively mainstream. What isn’t mainstream, however, is building custom hardware that can run classic video games on the original console (translated). The finished project looks amazing, but the prototype blows us away with it’s beauty and complexity.

[phanick]’s project is a cartridge that is able to run games on the Polish Famicon clone called the Pegasus. The games are stored on an SD card but rather than run in an emulator, an FPGA loads the ROMs and presents the data through the normal edge-connector in the cartridge slot of the console. The game is played from the retro hardware itself. It takes a few seconds to load in each ROM, but after that the Pegasus can’t tell any difference between this and an original cartridge.

The original prototype shown here was built back in 2012. Since then it’s been through a few iterations that have reduced the size. PCBs were designed and built in-house, and the latest revision also includes a 3D-printed case that is closer to the size of the original Famicon cartridges.

Even if you don’t have an interest in classic video games or emulation, the video below is worth checking out. (Be sure to turn on the subtitles if you don’t speak Polish.) [phanick] has put in a huge amount of time getting all of the details exactly right, and the level of polish shows in the final product. In fact, we’ve featured him before for building his own Famicom clone.

Continue reading “FPGA Emulates NES Cart; Prototype So Cyberpunk”

CP/M 8266

Hands up if you’ve ever used a machine running CP/M. That’s likely these days to only produce an answer from owners of retrocomputers. What was once one of the premier microcomputer operating systems is now an esoteric OS, a piece of abandonware released as open source by the successor company of its developer.

In the 1970s you’d have seen CP/M on a high-end office wordprocessor, and in the 1980s some of the better-specified home computers could run it. And now? Aside from those retrocomputers, how about running CP/M on an ESP8266? From multi-thousand-dollar business system to two-dollar module in four decades, that’s technological progress.

[Matseng] has CP/M 2.2 running in a Z80 emulator on an ESP8266. It gives CP/M 64K of RAM, a generous collection of fifteen 250K floppy drives, and a serial port for communication. Unfortunately it doesn’t have space for the ESP’s party piece: wireless networking, but he’s working on that one too. If you don’t mind only 36K of RAM and one less floppy, that is. All the code can be found on a GitHub repository, so if you fancy a 1970s business desktop computer the size of a postage stamp, you can have a go too.

There’s something gloriously barmy about running a 1970s OS on a two-dollar microcontroller, but if you have to ask why then maybe you just don’t understand. You don’t have to have an ESP8266 though, if you want you can run a bare-metal CP/M on a Raspberry Pi.