Retrotechtacular: Soldering The Tek Way

For a lot of us, soldering just seems to come naturally. But if we’re being honest, none of us was born with a soldering iron in our hand — ouch! — and if we’re good at soldering now, it’s only thanks to good habits and long practice. But what if you’re a company that lives and dies by the quality of the solder joints your employees produce? How do you get them to embrace the dark art of soldering?

If you’re Tektronix in the late 1970s and early 1980s, the answer is simple: make in-depth training videos that teach people to solder the Tek way. The first video below, from 1977, is aimed at workers on the assembly line and as such concentrates mainly on the practical aspects of making solid solder joints on PCBs and mainly with through-hole components. The video does have a bit of theory on soldering chemistry and the difference between eutectic alloys and other tin-lead mixes, as well as a little about the proper use of silver-bearing solders. But most of the time is spent discussing the primary tool of the trade: the iron. Even though the film is dated and looks like a multi-generation dupe from VHS, it still has a lot of valuable tips; we’ve been soldering for decades and somehow never realized that cleaning a tip on a wet sponge is so effective because the sudden temperature change helps release oxides and burned flux. The more you know.

The second video below is aimed more at the Tek repair and rework technicians. It reiterates a lot of the material from the first video, but then veers off into repair-specific topics, like effective desoldering. Pro tip: Don’t use the “Heat and Shake” method of desoldering, and wear those safety glasses. There’s also a lot of detail on how to avoid damaging the PCB during repairs, and how to fix them if you do manage to lift a trace. They put a fair amount of emphasis on the importance of making repairs look good, especially with bodge wires, which should be placed on the back of the board so they’re not so obvious. It makes sense; Tek boards from the era are works of art, and you don’t want to mess with that.

Continue reading “Retrotechtacular: Soldering The Tek Way”

Blast Away The Flux — With Brake Cleaner?

Can you use brake cleaner for flux removal on PCBs? According to [Half Burnt Toast], yes you can. But should you? Well, that’s another matter.

In our experience, flux removal seems to be far more difficult than it should be. We’ve seen plenty of examples of a tiny drop of isopropyl alcohol and a bit of light agitation with a cotton swab being more than enough to loosen up even the nastiest baked-on flux. If we do the same thing, all we get is a gummy mess embedded with cotton fibers smeared all over the board. We might be doing something wrong, or perhaps using the wrong flux, but every time we get those results, we have to admit toying with the idea of more extreme measures.

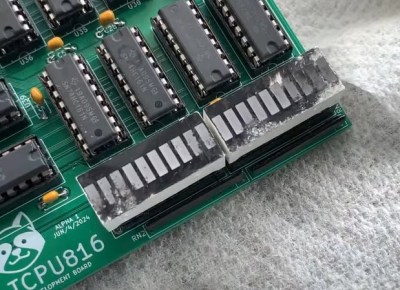
The LED bar graphs were not a fan of the brake cleaner.

[Toast] went there, busting out a fresh can of brake cleaner and hosing down some of the crustier examples in his collection. The heady dry-cleaner aroma of perchloroethylene was soon in the air, and the powerful solvent along with the high-pressure aerosol blast seemed to work wonders on flux. The board substrate, the resist layer, and the silkscreen all seemed unaffected by the solvent, and the components were left mostly intact; one LED bar graph display did a little melty, though.

So it works, but you might want to think twice about it. The chlorinated formula he used for these tests is pretty strong stuff, and isn’t even available in a lot of places. Ironically, the more environmentally friendly stuff seems like it would be even worse, loaded as it is with acetone and toluene. Whichever formula you choose, proceed with caution and use the appropriate PPE.

What even is flux, and what makes it so hard to clean? Making your own might provide some answers.

Continue reading “Blast Away The Flux — With Brake Cleaner?”

Busted: Toilet Paper As Solder Wick

It didn’t take long for us to get an answer to the question nobody was asking: Can you use toilet paper as solder wick? And unsurprisingly, the answer is a resounding “No.”

Confused? If so, you probably missed our article a few days ago describing the repair of corroded card edge connectors with a bit of homebrew HASL. Granted, the process wasn’t exactly hot air solder leveling, at least not the way PCB fabs do it to protect exposed copper traces. It was more of an en masse tinning process, for which [Adrian] used a fair amount of desoldering wick to pull excess solder off the pins.

During that restoration, [Adrian] mentioned hearing that common toilet paper could be used as a cheap substitute for desoldering wick. We were skeptical but passed along the tip hoping someone would comment on it. Enter [KDawg], who took up the challenge and gave it a whirl. The video below shows attempts to tin a few pins on a similar card-edge connector and remove the excess with toilet paper. The tests are done using 63:37 lead-tin solder, plus and minus flux, and using Great Value TP in more or less the same manner you’d use desoldering braid. The results are pretty much what you’d expect, with charred toilet paper and no appreciable solder removal. The closest it comes to working is when the TP sucks up the melted flux. Stay tuned for the bonus positive control footage at the end, though; watching that legit Chemtronics braid do its thing is oddly satisfying.

So, unless there’s some trick to it, [KDawg] seems to have busted this myth. If anyone else wants to give it a try, we’ll be happy to cover it.

Continue reading “Busted: Toilet Paper As Solder Wick”

Flux, From Scratch

Soldering flux is (or at least, should be) one of the ubiquitous features of any electronics bench. It serves the purpose of excluding oxygen from a solder joint as it solidifies, and in most cases its base is derived from pine rosin. Most of us just buy flux, but [pileofstuff] is having a go at making his own.

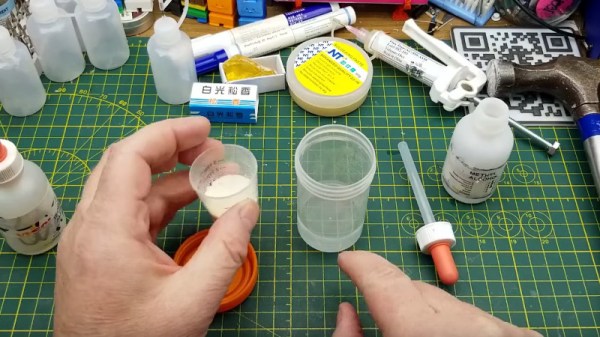
He starts with a block of rosin and a couple of different solvents. Isopropanol we’re happy with, but perhaps using methanol for something to be vaporized within breathing distance isn’t something we’d do. At about 25% rosin to solvent ratio the result is a yellow liquid flux, which he tests against some commercial fluxes. The result is a reasonable liquid flux, something which perhaps shouldn’t be too much of a surprise, and is a handy piece of information to store away should we ever be MacGuyver-like stuck in a pine forest with a need to save the day with electronics.

It would be interesting to try the same technique but with a solvent selected to soften the rosin for a paste flux, and perhaps any chemists among our readership could enlighten us about just what rosin is beside the heavy fractions left after extracting the volatiles from pine resin.

In the past we’ve taken a close look at how solder really works.

Continue reading “Flux, From Scratch”

Retrotechtacular: The Story Of Turpentine

If someone in 2023 has ever had much call to use turpentine, chances are good it was something to do with paint or other wood finishes, like varnish. Natural turpentine is the traditional solvent of choice for oil paints, which have decreased in popularity with the rise of easy-to-clean polymer-based paints and coating. Oh sure, there are still those who prefer oil paint, especially for trim work — it lays up so nice — but by and large, turpentine seems like a relic from days gone by, like goose grease and castor oil.

It wasn’t always so, though. Turpentine used to be a very big deal indeed, as shown by this circa 1940 documentary on the turpentine harvesting and processing industry. Even then it was only a shadow of its former glory, when it was a vital part of a globe-spanning naval empire and a material of the utmost strategic importance. “Suwanee Pine” shows the methods used in the southern United States, where fast-growing pines offer up a resinous organic gloop in response to wounds in their bark. The process shown looks a lot like the harvesting process for natural latex, with slanting gashes or “catfaces” carved into the trunks of young trees, forming channels to guide the exudate down into a clay collecting cup.

Continue reading “Retrotechtacular: The Story Of Turpentine”

Magnetic Gearbox, Part 2: Axial Flux Improves Performance

The number of interesting and innovative mechanisms that 3D printing has enabled always fascinates us, and it’s always a treat when one of them shows up in our feeds. This axial flux magnetic gearbox is a great example of such a mechanism, and one that really makes you think about possible applications.

The principles of [Retsetman]’s gearbox are simple for anyone who has ever played with a couple of magnets to understand, since it relies on that powerful attractive and repulsive force you feel when magnets get close to each other. Unlike his previous radial flux gearbox, which used a pair of magnet-studded cylindrical rotors nested one inside the other, this design has a pair of disc-shaped printed rotors that face each other on aligned shafts. Each rotor has slots for sixteen neodymium magnets, which are glued into the slots in specific arrangements of polarity — every other magnet for the low-speed rotor, and groups of four on the high-speed rotor. Between the two rotors is a fixed flux modulator, a stator with ten ferromagnetic inserts screwed into it.

In operation, which the video below demonstrates nicely, the magnetic flux is coupled between the rotors by the steel inserts in the stator so that when one rotor moves, the other moves at a 4:1 (or 1:4) ratio in the opposite direction. [Retsetman] got the gearbox cranked up to about 8,500 RPM briefly, but found that extended operation at as little as 4,000 RPM invited disaster not due to eddy current heating of the inserts or magnets as one might expect, but from simple frictional heating of the rotor bearings.

Torque tests of the original gearbox were unimpressive, but [Retsetman]’s experiments with both laminated stator inserts and more powerful magnets really boosted the output — up to a 250% improvement! We’d also like to see what effect a Halbach array would have on performance, although we suspect that the proper ratios between the two rotors might be difficult to achieve.

Continue reading “Magnetic Gearbox, Part 2: Axial Flux Improves Performance”

Whip Up Some Homemade Artisanal Flux

You don’t think much about the power company until you flip the lights on and they don’t come on. The same can be said of soldering flux. You don’t think much about it, usually, until you try soldering without it. Flux has a cleaning action on metal surfaces that allows for a proper solder joint. The problem is, do you have any idea what’s in the flux you are using? We don’t either. [Catsndogs] has a recipe to make your own flux and then you’ll know.

At the heart of rosin flux is basically tree sap. If you live near pine trees, you can source it naturally. If not, you can find it at music instrument stores. Stringed instruments use rosin, so it is readily available. If you do source it yourself, [Catsndogs] reports that it doesn’t matter if it is old or clean.  You do want to pick out as much tree bark and dead ants as you can, though. You essentially dissolve it in alcohol (at least 80% isopropyl or ethanol). Then filter it through filter paper or a coffee filter.

You can adjust the viscosity by allowing the alcohol to evaporate to make the mixture thicker or by adding more alcohol to make it thinner. Thicker flux is good for tacking down SMD parts. As you might expect, this isn’t “no clean” flux. Also, the flux is very flammable, so be careful.

This isn’t the first time we’ve heard of this recipe. Or even the second time. But it is a good reminder that you can make your own free of whatever wacky chemicals are in the commercial preparations.