ChipWhisperer Hits Kickstarter

Even the most well designed crypto algorithms can be broken if someone is smart enough to connect an oscilloscope to a processor. Over the last 15 years or so, an entire domain of embedded security has cropped up around the techniques of power and side channel analysis. The tools are expensive and rare, but [Colin O’Flynn] and the ChipWhisperer are here to bring a new era of hardware security to the masses.

The ChipWhisperer was the second place winner of last year’s Hackaday Prize. It’s an interesting domain of security research, and something that was previously extremely expensive to study. If you’re looking for a general overview of what the ChipWhisperer does, you might want to check out when we bumped into [Colin] at DEFCON last year.

While the original goal of the ChipWhisperer was to bring the cost of the tools required for power and side channel analysis down to something a hackerspace or researcher could afford, this was still too expensive for a Kickstarter campaign. To that end, [Colin] designed the ChipWhisperer Lite, a cut-down version, but still something that does most of what the original could do.

There are two parts to the ChipWhisperer Lite – the main section contains a big microcontroller, a big FPGA, and a high gain, low noise amplifier. This is the core of the ChipWhisperer, and it’s where all the power analysis happens. The other part is a target board containing an XMega microcontroller. This is where you’ll run all your encryption algorithms, and where you’ll find out if they can be broken by power analysis. The main board and target board are held together by a break-away connection, so if you want to run a power analysis on another board, just snap the ChipWhisperer in half.

[Colin] is offering up a ChipWhisperer Lite for around $200 USD – far, far less than what these tools cost just a year ago. We’re looking forward to a successful campaign and all the neat findings people with this board will find.

Hacklet 36 – Oscilloscope Projects

Oscilloscopes are one of the most often used tools of the engineer, hacker, or maker. Voltmeters can do a lot, but when you really need to get a good look at a signal, a good scope is invaluable. This week’s hacklet is triggered by the rising slope of some of the best Oscilloscope projects on Hackaday.io!

rigol500We start with [DainBramage’s] recent project Stretching the Limits of a Rigol DS-1102E Scope. The new Rigol ds1054z may be getting all the press lately, but the older DS-1102E (100 MHz) model is still a very capable scope. [DainBramage] broke out his vintage Singer CSM-1 service monitor to generate frequencies all the way up to 500 MHz. The Rigol did admirably well, detecting a sine wave all the way up to 500 MHz. This is in part due to the scope’s 1 gigasample-per-second sampling rate. Once things got beyond the specified limit of 100 MHz though, the signal began to attenuate.  Not bad for pushing a low-end scope way beyond its limits!


cornel-scopeNext up is [Bruce Land] with his PIC32 oscilloscope. Microcontroller scope projects are nothing new, but one that runs at nearly 1 MHz sampling rate while generating NTSC composite video is nothing to sneeze at. [Bruce] pulled this off by using Direct Memory Access (DMA) to move the data from the ADC to memory, and to get the video data from memory to the I/O pins used to generate video. The video itself is created by a resistor tree DAC. All you need to make black and white video is three resistors and two I/O pins. [Bruce] says the entire scope cost about $4.00 us in parts!

scope-hand[Jacob Christ] mixed art and science with his chipKIT Oscilloscope Plotter. [Jacob] used a Microchip PIC32 based Fubarino to draw patterns on his scope. To do this the scope must be set to X-Y mode. [Jacob] paired his Fubarino with a MCP4902 Digital to Analog Converter (DAC). Using a dedicated DAC is a great way to do this. [Jacob’s] images are a testament to that, as they’re some of the cleanest “scope art” drawings we’ve seen. Much like [Bruce Land], [Jacob] used his project as the basis for a college class. In fact, the image to the left was created by one of his students!

Want more scope goodness? Check out our new Oscilloscope Projects List!

Hackaday.io Update!

Hackaday.io is getting new features every day. Our dev team has just rolled out a new gallery view. Just click on a project’s featured image, or the “View Gallery” button, and you will be taken to a gallery view of every image used in the project – including log images. YouTube videos will render in the gallery as well. It’s a great way to view a timeline of progress for some of the projects on hackaday.io. For a great example of this, check out OpenMV’s gallery.

In other Hackaday.io news, check out the Caption CERN Contest! Every week we put up a new image from CERN’s archives. The Hackaday.io user who comes up with the funniest caption wins a T-Shirt from The Hackaday Store!

Looks like we’ve hit the end of the trace for this Hacklet. Same hack time, same hack channel, bringing you the best of Hackaday.io!

ATtiny85 Does Over The Air NTSC

[CNLohr] has made a habit of using ATtiny microcontrollers for everything, and one of his most popular projects is using an ATTiny85 to generate NTSC video. With a $2 microcontroller and eight pins, [CNLohr] can put text and simple graphics on any TV. He’s back at it again, only this time the microcontroller isn’t plugged into the TV.

The ATtiny in this project is overclocked to 30MHz or so using the on-chip PLL. That, plus a few wires of sufficient length means this chip can generate and broadcast NTSC video.

[CNLohr] mentions that it should be possible to use this board to transmit closed captioning directly to a TV. If you’re looking for the simplest way to display text on a monitor with an AVR, there ‘ya go: a microcontroller and two wires. He’s unable to actually test this, as he lost the remote for his tiny TV from the turn of the millennium. Because there’s no way for [CNLohr] to enable closed captioning on his TV, he can’t build the obvious application for this circuit – a closed caption Twitter bot. That doesn’t mean you can’t.

Video below.

Continue reading “ATtiny85 Does Over The Air NTSC”

TwinTeeth: The Delta Bot PCB Factory

There are a few all-in-one CNC/milling/plotting/3D printing/engraving bots out there that claim to be mini factories for hobbyists, prototypers, and other homebrew creators. The latest is Diyouware’s TwinTeeth, a bot obviously inspired by a few 3D printers, but something that has a few interesting features we hope will propagate through the open hardware ecosystem.

The design of the TwinTeeth is an inverse delta bot, kinematically similar to a large number of 3D printers out there. Instead of suspending the tool from a trio of arms, the TwinTeeth puts the work surface on the arms and suspends the tool from the top of the machine. There are a few neat bonuses for this setup – all the tools, from a BluRay laser diode, a Dremel, solder paste dispenser, and a plastic extruder for 3D printing can be mounted in easy to mount adapters. The TwinTooth design uses three locking pins to keep each toolhead in place, and after a little bit of software setup this machine can quickly switch between its various functions.

One very interesting feature of this bot is the ability to mask off PCBs for chemical etching with a BluRay laser diode. This actually works pretty well, as evidenced by the teams earlier work with a purpose-built PCB masker machine. The only problem with this technique is that presensitized boards must be used. If that’s an issue, no problem, just use the Dremel attachment with a v-bit cutter.

Another Garage Door Opener, This Time With Security

We’ve been seeing a lot of garage door opener hacks, whether it’s because one person inspired everyone else to build their own Internet-connected GDO or because there’s something in the water that’s caused the simultaneous building of one specific type of project, we’re not sure. However, the latest one we’ve seen adds a little something extra: motion-based security.

[DeckerEgo] really went all out with this one, too. The core of the project is a Raspberry Pi hardwired to a universal garage door remote. The Pi also handles a small webcam and runs a program called motion, which is a Linux program that allows for all kinds of webcam fun including motion detection. While the other builds we see usually use a button or limit switch to tell whether the door is open or closed, this one just watches the door with the webcam so [DeckerEgo] can actually see what’s going on in the garage. As a bonus, the motion software can be configured to alert him if anything suspicious is going on in the garage.

The build is full-featured as well, with an interesting user interface overlaid on the live picture of the garage door. According to [DeckerEgo] the camera is a necessity because he wouldn’t trust a simple status indicator, but if you wanted to try one of those before breaking out the Raspberry Pi, we’ve featured one recently that you can check out.

Hardware for a ST4 to USB interface

Cheap USB Control For Your Telescope

There’s many complex systems for automatically pointing a telescope at an object in the sky, but most of them are too expensive for the amateur astronomer. [Kevin]’s Arduino ST4 interface lets you connect your PC to a reasonably priced motorized telescope mount, without ripping it apart.

The ST4 port is a very basic interface. There’s one pin per direction that the mount can move, and a common pin. This port can be added to just about any motorized mount with some modification to the controller. To connect to an Arduino, a TLP521-4 quad optoisolator is used. This keeps the Arduino and PC fully isolated from the motor circuits. but lets the Arduino take control of the mount.

With the hardware in place, [Kevin] cranked out some software which is available on Google Code. A simple Arduino sketch provides the USB interface, and a custom driver allows the ASCOM Platform to control the mount. Since many astronomy software tools support ASCOM, this allows the mount to be controlled by existing software.

With the interface in place, the mount can be used to find objects (GOTO) and automatically follow them with high accuracy (autoguiding). You can watch the telescope move on its own after the break.

Continue reading “Cheap USB Control For Your Telescope”

Hacklet 35 – BeagleBone Projects

The Raspberry Pi 2 is just barely a month old, and now that vintage console emulation on this new hardware has been nailed down, it’s just about time for everyone to do real work. You know, recompiling stuff to take advantage of the new CPU, figuring out how to get Android working on the Pi, and all that good stuff that makes the Pi useful.

It will come as no surprise to our regular readers that there’s another board out there that’s just as good in most cases, and in some ways better than the Pi 2. It’s the BeagleBone Black, and for this edition of the Hacklet, we’re focusing on all the cool BeagleBone projects on Hackaday.io.

lcd
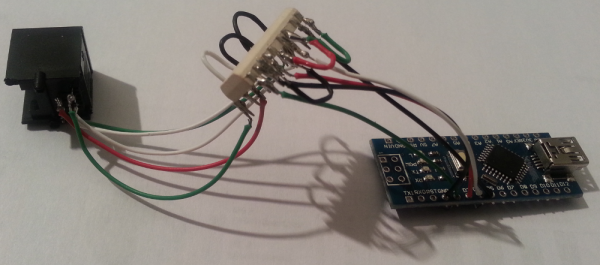
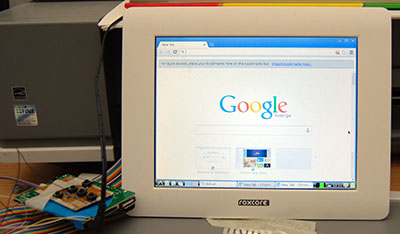
So you have a credit card sized Linux computer and a small, old LCD panel. If it doesn’t have HDMI, VGA or composite input, there’s probably no way of getting this display working, right? Nope. Not when you can make an LCD cape for $10.

[Dennis] had an old digital picture frame from a while back, and decided his BeagleBone needed a display. A few bits of wire and some FPC connectors, and [Dennis] has a custom display for his ‘Bone. It’s better than waiting for that DSI display…

bed[THX1082] is making a bed for his son. This isn’t your usual race car bed, or even a very cool locomotive bed. No, this is a spaceship bed. Is your bed a space ship? No, I didn’t think so.

Most of the work with plywood, MDF, paint, and glue is done, which means the best feature of this bed – a BeagleBone Black with an LCD, buttons, a TV, and some 3D printed parts – is what [THX] is working on right now. He’s even forking a multiplayer networked starship simulator to run in the bed. Is your bed a starship simulator?

beer

Beer. [Deric] has been working on a multi-step fermentation controller using the BeagleBone Black. For good beer you need to control temperatures and time, lest you end up with some terrible swill that I’d probably still drink.

This project controls every aspect of fermentation, from encouraging yeast growth, metabolization of sugars, and flocculation. The plan is to use two circuits – one for heating and one for cooling – and a pair of temperature sensors to ensure the beer is fermenting correctly.


If you’re looking for more BeagleBone Projects, there’s an entire list of them over on Hackaday.io with GLaDOs Glasses, Flight Computers, and Computer Vision.