A 3D-printed macropad that needs no solder or screws.

Snap-Together Macropad Does It Without Solder

Maybe we’re biased, but we think everyone has a use for a macropad. It’s just a matter of time before a highly personalized set of speed controls starts to sound like a great time-saving device to have around.

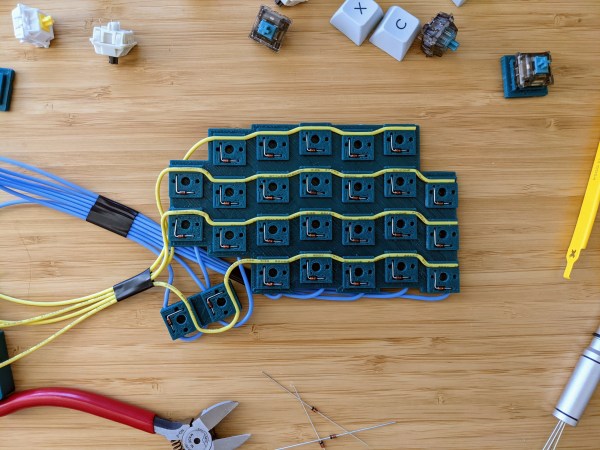
The column wire is red, and the row wire is blue. A printed clip snaps on to separate the two.Trouble is, macropads are usually kind of expensive to buy outright, and not everyone feels comfortable building keyboards. Okay, so what if you didn’t even have to solder anything? That’s the idea behind [Jan Lunge]’s hand-wired macropad.

You will still want to open a window for ventilation if you build this one, because this macropad requires a lot of 3D printing. What it doesn’t require is glue or screws, because everything snaps together.

Of course, the star of this build is [Jan]’s hot swap socket design. We especially love the little clip that holds the column wires in place while also providing a spacer between those and the row wires. Everything is connected up to a Pro Micro with non-insulated wire and held in place with bends at the ends and the magic of tension. Be sure to check out the build video after the break.

Thirsty for more than a six pack of switches? This design is easy to scale up until you run out of microcontroller inputs. At that point, you might want to add screens to keep track of all your macros.

Continue reading “Snap-Together Macropad Does It Without Solder”

3D-Printed, Hot-Swap Keyboard PCB Generator Is Super Cool

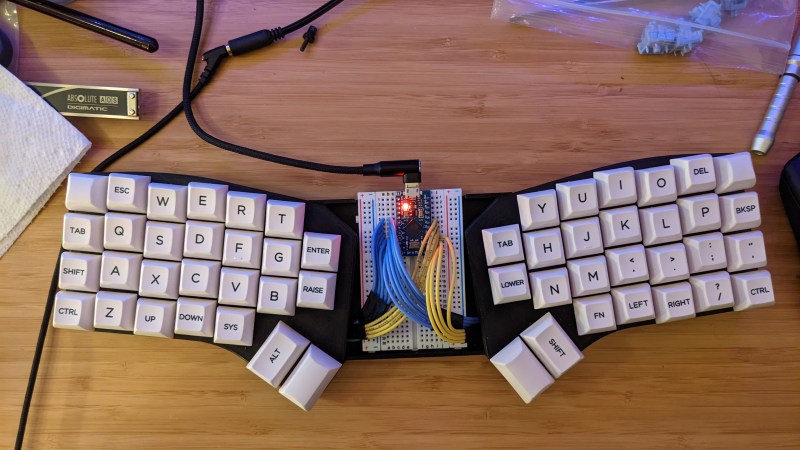
About a month ago, [50an6xy06r6n] shared their hot swap 3D-printed circuit board for keyboard design with the mechanical keyboard subreddit. It’s more of a prototyping tool than a permanent fixture, though nothing is stopping you from using it permanently. Well, now it’s even better, and open source to boot.

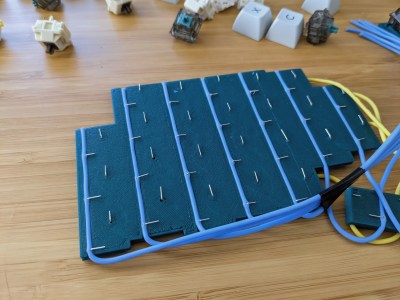
[50an6xy06r6n] came up with this to test split ergo layouts faster and not have to solder anything — the switch pins make contact with the row wires and folded diode legs. In fact, prepping all the diodes is probably the thing that takes the longest.

The design can be generated from layout data, or you can convert directly from a KLE JSON file. We love how delightfully clean this keyboard breadboard generator looks, and we wish we had thought of it!

[50an6xy06r6n]’s PCB generator currently supports Cherry MX/clones and Kailh Choc switch footprints. If you want ALPS, somebody’s gonna have to send [50an6xy06r6n] some ALPS to make that happen.

As long as all the contact points are good, you should be able to use this as the final PCB indefinitely. We’ve certainly seen our share of 3D-printed wire guides. Really, you could print the whole thing, including the switches.

Printable Hot-Swap Sockets Make Keyboard Building Even Cooler

Okay, so you want to build a keyboard — something crazy-curvy like the dactyl or dactyl manuform. The kind of keyboard that has to be hand-wired, because key wells and rigid PCBs do not play well together. You want to build this keyboard, but all that hand-wiring would mean that you can’t easily swap switches later. And it will means hours and hours of fiddly soldering. What do you do? You could buy or design your own switch PCBs, but again, those are rigid and space is limited inside of most of these designs.

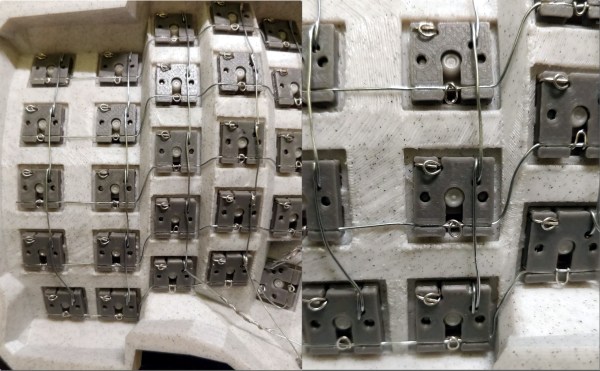
If you’re [stingray127], you trade those hours of soldering for a week of designing and printing some sweet little hot-swap sockets with wire guides. This is version four, which is easier to print than earlier versions. They are designed to use through-hole diodes and 24 AWG solid-core wire and give a tight fit. Can’t figure out how to use them? [stingray127] has a wiring guide with plenty of pictures.

We really like this idea, and it makes the end result feel more like a totally hand-wired keyboard than individual switch PCBs would As you can see, it involves little solder. The only downside is that you can only swap a few switches at a time, otherwise the matrix might fall apart. But that’s hardly even a downside.

Just want to make a macropad? You can easily print your way out of using a PCB for those, too.

Via KBD and r/mk

Guitar With Hot-Swappable Pickups Lights Our Fire

There’s a story that goes something like this: Chet Atkins was playing his guitar when someone remarked, ‘that guitar sounds great!’ Mr. Atkins immediately stopped playing and asked, ‘how does it sound now?’ While it’s true that the sound ultimately comes from you and your attention to expression, we feel that different pickups on the same guitar can sound, well, different from each other.

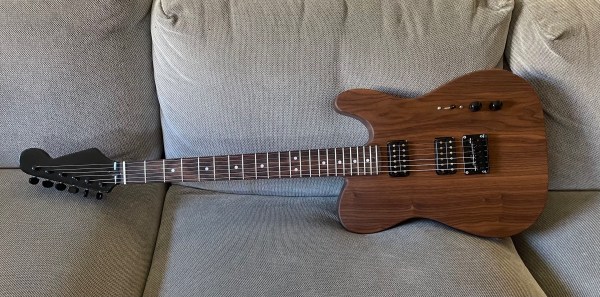
However, this is merely speculation on our part, because changing pickups is pretty serious surgery, and there’s only one company out there making guitars with hot-swappable pickups. Since their low-end model is out of most people’s price range, [Mike Lyons] took one for the team and decided to build a guitar from scratch to test out various pickups of any size, from lipstick to humbucker. [Mike] can swap them out in under a minute, and doesn’t need any tools to do it.

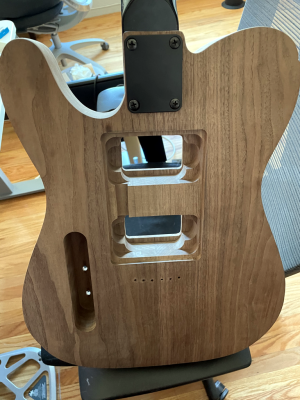
[Mike] modeled the swapping system on that one company’s way of doing things, because why reinvent the wheel? The pickups are inserted through the back and held in place with magnets and a pair of cleverly-designed printed pieces — one to mount the pickup to, and the other inside the pickup cavity.

As far as actually connecting the things up, [Mike] went with a commercially-available quick-connect pickup solution that uses a mini four-conductor audio plug and jack. The body is based on the Telecaster, while the headstock is more Stratocaster — the perfect visual combination, if you ask us.

We are particularly fond of [Mike]’s list of caveats for this project, especially the requirement that it had to be built using only hand tools and a 3D printer. Although a drill press would have been nice to use, [Mike] did a fantastic job on this guitar. Whether you’re into guitars or not, this is a great story of an awesome build.

What, you don’t even have hand tools? You could just print the whole guitar instead.

Custom Lego Server Case Looks As Though It Came Straight From A Data Center

The picture above appears to show two unremarkable 2U rack servers, of the kind that are probably hosting the page you’re reading right now. Nothing special there – until you look carefully and realize that the rack server case on the left is made entirely from Lego. And what’s more, the server even works.

When it comes to building Lego computers, [Mike Schropp] is the guy to call. We’ve previously featured hisĀ Lego gaming computer, a striking case wrapped around what was a quite capable machine by 2016 standards, as well as an earlier case that reminds us a little of a NeXT. His reputation for Lego-clad computers led server maker Silicon Mechanics to commission a case for a trade show, and [Mike] jumped at the challenge.

Making a home-grade machine is one thing, but supporting all the heavy drives, power supplies, and fans needed to make the machine work is something else. He used a combination of traditional Lego pieces along with a fair sampling of parts from the Lego Technics line to pull off the build, which looks nearly perfect. Sadly, the Lego unit sizes make the case slightly taller than 2U, but that’s a small quibble when everything else matches so well, even the colors. And the fact that the server works, obviously important for a trade show demo, is pretty amazing too. The power supplies are even hot-swappable!

Congratulations to [Mike] on yet another outstanding Lego creation.

ARM-Based NAS Is A Low Cost, Low Power Beauty

A NAS is always a handy addition to a home network, but they can be a little pricey. [Blake Burkhart] decided to create his own, prioritising budget and low power considerations, with a secondary objective to produce some router and IoT functionality on the side.

A Banana Pi R2 was a good choice to meet these requirements, being a router-based development board that also sports dual SATA connectors and gigabit Ethernet. [Blake] had some retrospective regrets about the performance of this particular SBC, but it does just fine when functioning purely as a NAS.

The enclosure for the device is a three bay hot-swap HDD module, with one of the bays gutted and used for the Banana Pi. It’s a simple idea, elegantly executed, which looks great. To access the ports of the Banana Pi, a custom acrylic side panel was laser cut, which also allowed LEDs to shine through – obligatory for any DIY server/computer build. When mounting this panel to the existing enclosure, [Blake] was reluctant to take his chances tapping the brittle acrylic, instead opting to melt the threads into the plastic with a pre-torched screw. We find that tapping acrylic is usually okay if you take it slow, but heat-tapping does sound fun.

The 12 V fan that came built into the hot-swap enclosure was too loud and awkwardly came in a non-standard size with a non-standard connector. What’s more, a buzzer alarm was triggered any time the fan was disconnected and 0 RPM was detected. [Blake]’s solution was to rewire the power pin of the connector to a 5 V rail; he found that running the fan at 5 V led to much quieter performance whilst keeping the HDDs sufficiently cool.

We find that when it comes to DIY network gear and routers, there are two approaches. Either create your own bespoke solution that perfectly fits your needs, like this perfect home router, or work around your current gear and build some tech to automatically reboot it for you.


Encrypted Drive Attack Hints At Original Xbox Hacking

[Thice] discovered a vulnerability in encrypted portable storage a few years ago. He’s just pointing about the exploit now. He mentions that he notified manufacturers long ago and we’d guess the wait to publish is to give them a chance to patch the exploit.

He calls it the Plug-Over Attack and for those who were involved with original Xbox hacking, this technique will sound very familiar. The Xbox used hard drive keys to lock the device when not in use. When you booted up the console it checked the hardware signature to make sure it was talking to the right motherboard. But if you booted up the device, then swapped the IDE cable over to a computer without cutting the power you could access the drive without having the password.

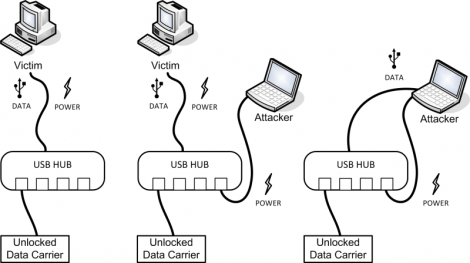
This attack is pretty much the same thing. Plug in a drive, unlock it on the victim system the normal way, then replug into the attacking system. In the image above you can see that a USB hub will work for this, but you can also use a hacked USB cable that patches a second jack into the power rail. For some reason the encryption system isn’t able to lock itself when the USB enumerates on the new system, only when power is cycled. Some of them have a timer which watches for drive idle but that still doesn’t protect from this exploit.