Digital Replica Of Antique Weather Monitoring Instrument

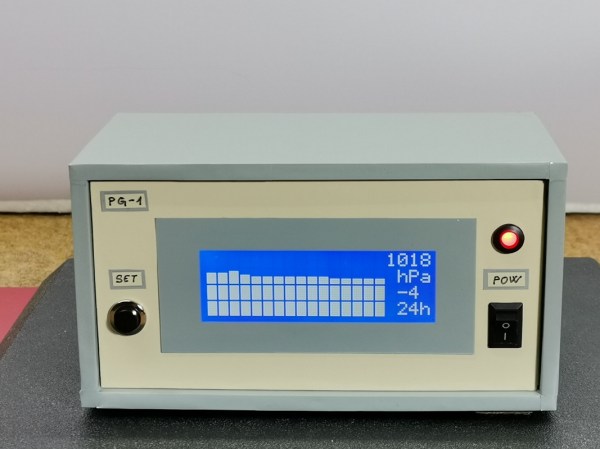
Computers and digital sensors have allowed for the collection and aggregation of data barely possible to imagine to anyone in the instrumentation scene even sixty years ago. Before that, things like weather stations, seismometers, level sensors, and basically any other way of gathering real data about the world would have been performed with an analog device recording the information on some sort of spool of paper. This was much more tedious but the one thing going for these types of devices was their aesthetic. [mircemk] is back to bring some of that design inspiration to a digital barometric display.

The barometer is based around an Arduino Arduino Nano and a relatively large I2C display to display the captured data. It also uses a BME 280 pressure sensor board, but the technical details of this project are not the focal point here. Instead, [mircemk] has put his effort in recreating the old analog barographs, which display barometric data on a spool of paper over time, on the I2C display. As the device measures atmospheric pressure, it adds a bar to the graph, displaying the data over time much as the old analog device would have.

We’ve discussed plenty of times around here that old analog meters and instrumentation like this recreation of a VU meter are an excellent way of getting a more antique aesthetic than is typically offered by digital replacements. Adding in a little bit of style to a project like this can go a long way, or you can simply restore the original antique instead.

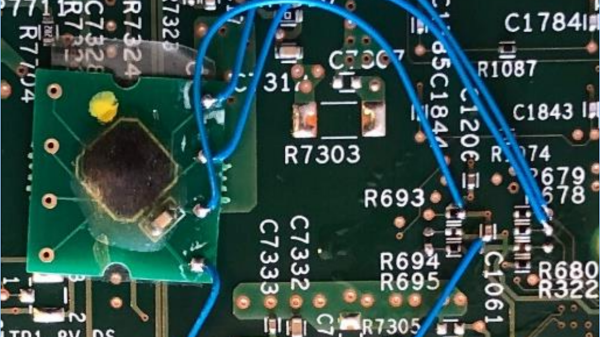
A modchip described in the article - a small PCB with an epoxy blob on it, soldered to the Cisco switch PCB using four thin wires

Counterfeit Cisco Hardware Bypasses Security Checks With Modchips

Some pictures recently surfaced on social media, showing a small PCB tapped into four points on Cisco-branded boards. What is this about? A NSA backdoor so data can be exfiltrated to some third party? Well, that’s theoretically possible, but it’s actually used for bypassing hardware authenticity checks in Cisco hardware being cloned — a sizable industry. Of course, “can’t believe it’s not Cisco” hardware is only valuable insofar that it’s able to run the Cisco software, and that’s where the bodge boards play a major role.

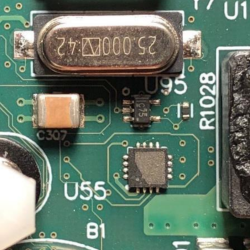
An unidentified IC on the a different counterfeit Cisco board, with markings soldered offA 2020 report by F-Secure details an investigation, comparing three switches marked as Cisco 2960X – one known genuine and two known counterfeits. The counterfeits had the aforementioned implants either soldered to the bottom of the PCB or added to the board as a separate component, and the paper goes into why they’re important for successful counterfeiting.

Apparently, these chips emulate or bypass an I2C EEPROM containing part of the code executed during the boot sequence, and Cisco depends on this EEPROM’s contents for authenticity verification. Cisco software reads the EEPROM twice — once for verification, and once again for actually running it. The microcontroller included on the mod board can return a genuine binary with a valid signature on the first read, and a binary with hardware checks patched out for subsequent reads.

The paper will tell you about way more than this — it’s thorough yet captivating. As you’d expect, it devotes quite a bit of time to comparing genuine and counterfeit boards, showing that the cloning process is pretty to-the-T, save for some part substitutions. For instance, check out the PDF page 12 to see how via locations are exactly copied between PCBs in a bizarre way, or the Cisco file format and authenticity check analysis closer to the end of the report. All in all, the 38 pages of the document make for a fun foray into what makes Cisco authentication mechanisms tick, and what helps clone hardware makers bypass them.

Are such chips ever used for adding backdoors and data exfiltration? There’s no evidence of that, as much as that’s not to be excluded — bypassing anti-cloning protections would make other hijinks more viable no doubt, that said, only hardware authentication bypass measures were found so far. This mechanism also breaks during software updates, and absolutely, leaves some to be desired when it comes to its stated functionality. That said, such fun insights can help us, say, enforce right-to-repair, enable hardware reuse, and thwart many predatory business practices in areas where laws fail us.

Dead Washer Lives Again With ATTiny

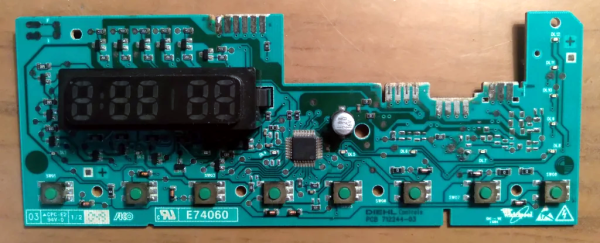
We aren’t saying that appliances are a scam, but we have noticed that when your appliances fail, there’s a good chance it will be some part you can no longer get from the appliance maker. Or in some cases, it’s a garden-variety part that should cost $2, but has been marked up to $40. When [Balakrishnan] had a failure of the timer control board for a Whirlpool washing machine, it was time to reverse engineer the board and replace it with a small microcontroller.

Of course, this kind of hack is one of those that won’t help you unless you need exactly that timer board. However, the process is generally applicable. Luckily, the motherboard chip was documented and the timer control board used a simple ATmega88, so it was easy to see that the devices were communicating via I2C.

Reading the I2C  bus is easy with a logic analyzer, and this revealed the faulty device’s I2C address. The board that failed was only for display, so a simple program that does nothing other than accept I2C data put the washer in working order. Once it was working with an Arduino, an ATTiny45 did the work with a lot less space and cost.

If you don’t want to reverse engineer the washing machine, you could just replace all the controls. That even works if the old washer wasn’t electronic to start.

Working With I2S-Compatible FM Tuners

While the Internet is a great place to get access to any music or audio you can dream of, there’s still a place for broadcast radio. [mit41301] has recently been exploring implementing a simple FM tuner chip in various projects.

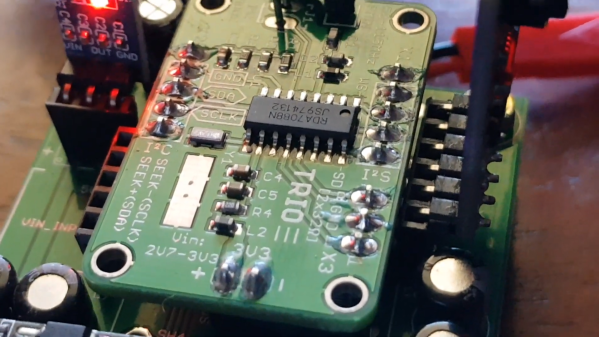
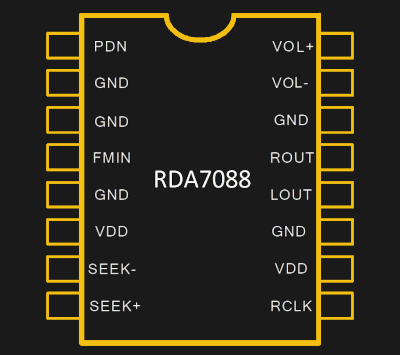
The chip in question is the RDA7088, which is designed to require the bare minimum in external components, and is available in a compact SOP16 package. As per the datasheet, it was intended for use in applications like portable radios, PDAs, cell phones, and MP3 players.

[mit41301]’s first attempt involved using the chip as a simple tuner, hooked up to a PIC10F200 for control. Investigation revealed it was capable of outputting digital audio via I2S, while being commanded via I2C. By default, it spits out audio at a low sample rate of 8 kHz, but reconfiguration will jump that up to 44.1 or 48 kHz. Piping that digital I2S stream out to a DAC then delivers analog output that can be fed to an amplifier. The build also got remote control, with the PIC handling decoding IR signals and outputting commands to the radio chip.

Following this success, [mit41301] then went further, hooking up an ESP-01 to the chip to try and get RDS going. If you’re unfamiliar with the Radio Data System, it’s a way for short textual messages to be sent out by FM broadcasters. In addition to the duties carried out by the PIC module, the ESP-01 is also charged with receiving RDS data from the RDA7088, and outputting it to a display.

While using such chips is routine in industry, it’s always great to see a DIY guide to interfacing with specific hardware. If you want to integrate FM radio into your own projects, the RDA7088 is a simple and easy way to do so. We’ve seen similar work before, adding FM radio to the Raspberry Pi.

Continue reading “Working With I2S-Compatible FM Tuners”

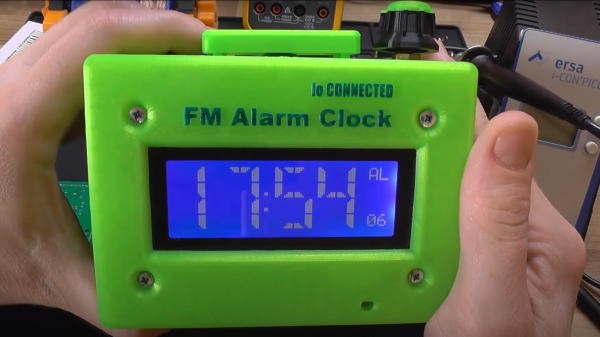
Two hands holding a 3d printed alarm clock with an LCD display, snooze button and knob on top

IO Connected Radio Alarm Clock

[CoreWeaver] creates an alarm clock that includes features one might expect in such a project, including an FM radio, snooze button inputs and a display, but goes beyond the basic functionality to include temperature sensing and a PC connection, opening the way for customizable functionality.

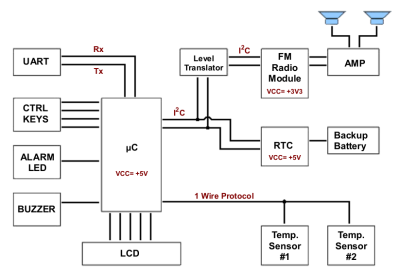
Block diagram for the IO connected Alarm Clock

An Atmega328 is used for the main microcontroller which communicates via I2C both to a DS1307 real time clock (RTC) and a TEA5767 FM module. The main power comes from a 9V power source with an LM317 and LM7805 linear regulators providing a 3.3V and 5V power rail, respectively. Most of the electronics are powered using 5V except for the TEA5767, which is powered from the 3.3V rail and has its I2C communication levels shifted from 5V to 3.3V. The audio output of the TEA5767 feeds directly into the TDA7052 audio amplifier to drive the speakers. Since the RTC has an auxiliary coin cell battery for power, the alarm clock can keep accurate time even when not plugged in. Continue reading “IO Connected Radio Alarm Clock”

Using I²C Sensors With Any Linux Via USB And IIO

Hooking up I2C sensors is something which is generally associated with microcontrollers and SBCs, yet it’s very easy to use such I2C sensors from basically any system that runs Linux. After all, I2C (that is, SMBus) is one of the interfaces that is highly likely to be used on your PC’s mainboard as well as peripherals. This means that running our own devices like the well-known BME280 temperature, pressure and humidity sensor, or Si1145 light sensor should be a piece of cake.

In a blog post from a few years ago, [Peter Molnar] explains in detail how to wire up a physical adapter to add a USB-connected I2C interface to a system. At its core is the ATtiny85 AVR-based MCU, which provides a built-in USB interface, running the I2C-Tiny-USB firmware.

The essential part here is that the MCU shows up to the Linux kernel as an i2c device, requiring the i2c-dev driver to be loaded. After this the I2C device that is connected to the adapter MCU’s I2C bus can be used via the Linux module’s API calls, either directly or via existing drivers. [Peter] found that the BMP280 driver came with Debian Sid, for example.

A Pi Pico plugged into a breadboard, with an I2C OLED display connected to it

Need An USB-I2C Adapter? Use Your Pico!

Given its abundance and simplicity, the RP2040 has no doubt become a favourite for USB peripheral building – in particular, USB-connected tools for electronics experiments. Today, we see one more addition to our Pico-based tool arsenal – a USB-I2C adapter firmware for RP2040 by [Renze Nicolai]. This is a reimplementation of the ATTiny-based I2C-Tiny-USB project and complies to the same protocol – thus, it’s compatible with the i2c-tiny-usb driver that’s been in the Linux kernel for ages. Just drag&drop the .uf2, run a script on your Linux system, and you will get a /dev/i2c-X device you can work with from userspace code, or attach other kernel drivers to.

The software will work with any RP2040 devboard – just connect your I2C devices to the defined pins and you’ll have them show up in i2cdetect output on your Linux workstation. As a demo, [Renze] has written a userspace Python driver for one of these SSD1306 128×64 OLEDs, and gives us a commandline that has the driver accept output of an ffmpeg command capturing your main display’s contents, duplicating your screen on the OLED – in a similar fashion that we’ve seen with the “HDMI” I2C-driven display a few months back. Everything you might need is available on the GitHub page, including usage instructions and examples, and the few scripts you can use if you want to add an udev rule or change the I2C clock frequency.

Just to name a few purposes, you can use a Pi Pico as a tool for SWD, JTAG, CAN, a logic analyser with both digital and analog channels, or even as a small EMP-driven chip glitching tool. The now-omnipresent $3 Pi Pico boards, it seems, are a serious contender to fondly remembered hacker tools of the past, such as the legendary BusPirate.

Continue reading “Need An USB-I2C Adapter? Use Your Pico!”