We all have our own preferences when it comes to travel souvenirs — that little something that brings back the memories and feelings of a past holiday every time we look at it, whether it’s the cliché fridge magnet, some local speciality, or just the collection of photos we took. But then there are those journeys that can’t be summarized into a single item and may require a bit more creativity. For [Jonathan], it was last year’s trip around the world that took him and [Maria] to locations all over Europe, Asia, and Oceania, and he found a great way to remember it: an interactive, laser-cut travel globe displaying all the places they went to.
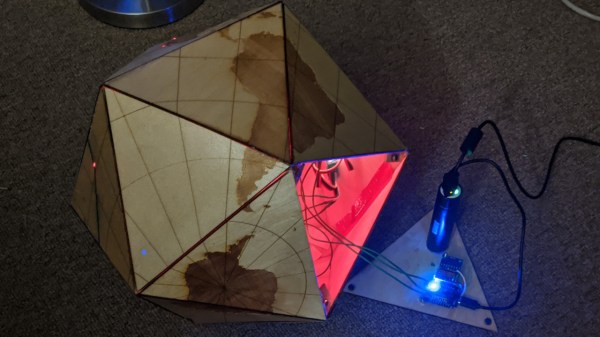
Building a sphere is of course a bit tricky with a laser cutter, so [Jonathan] went for the icosahedron shaped Dymaxion map projection (think of a large d20 dice) and burnt the world onto it. Inside the globe is an ESP8266, an MPU-6050 IMU, and a bunch of LEDs to light up the travel locations using the WLED library. Taking the data from the IMU, he customized the WLED library to determine which way the globe is positioned, and highlights the top-facing location in a different color.
While that would already make a nice souvenir on its own, [Jonathan] didn’t stop here. Using Google’s My Maps service, which lets you create custom maps with own points of interest and have for example photos attached to them, the ESP8266 hosts the travel map also as a web page. Feeding the IMU data to the JavaScript code that’s handling the map API, the globe itself now doubles as an input device to control the virtual map. So whenever the globe is physically rotated to highlight a certain location, the web page’s map is focused to that same location and shows randomly the pictures they have taken there. Check out the video below to see it all in action.
This is a great way to reminisce about a memorable journey even years down the road, and while it may not be flexible to extend, it seems like the kind of trip that deserves a standalone device anyway. Plus, the Dymaxion map is definitely an interesting projection — so here’a a foldable one, just because. And If you like tracking things on a globe, here’s one that shows the location of the ISS.
Continue reading “Travel Globe Spins You Around Memory Lane”
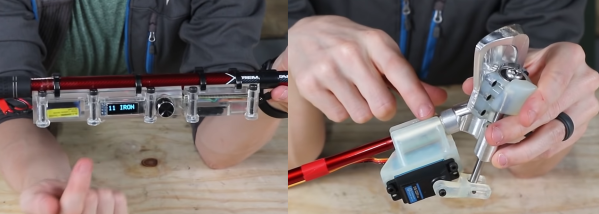


 cut in half and hollowed out on a lathe. A beam sits on the centre line of the ball, mounted on a bearing in each half to allow the ball to spin around it. Steering done by shifting the centre of mass, by moving a steel pendulum that hangs below the beam side to side with heavy-duty servo. The servo is controlled with an Arduino, and an IMU to detects the balls orientation. Power is provided by and RC Lipo battery. The wireless controller is a sneaky little device that is taped to [Mark]’s back and covered with clothing, and steers the ball by detecting how far he leans with an IMU module. The brain is an Arduino Mini and an NRF24L01 provides the RF link.