The Jolly Cart-Pushing Robot

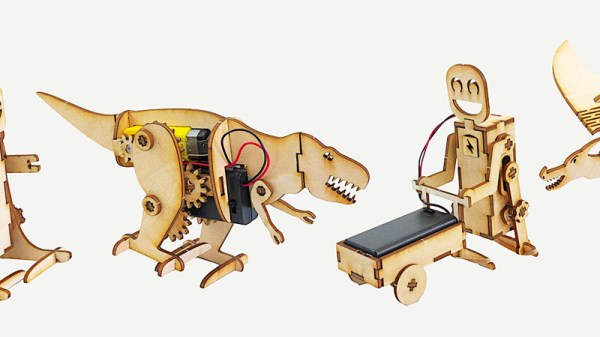
[Lance] loves making simple robots with his laser cutter. He finds great satisfaction from watching his robots operate using fairly simple mechanisms and designs a whole slew of them inspired by different animals, including a dinosaur and a dragon. His latest build is a jolly cart-pushing robot.

He cut each piece of his robot on his laser cutter, and in order to get the pieces to fit snugly together he made each tab a little bigger than its corresponding slot, ensuring the piece wouldn’t fall out. This also helps account for the loss in the material due to kerf, which is the bit of each piece of material that gets lost in the cut end of the laser cutter.

Making his robot walk was mostly as easy as attaching each leg to a simple DC motor such that the motor would rotate each leg in succession, pushing the robot along. From time to time, [Lance] also had to grease the robot’s moving parts using a bit of wax to help reduce friction. He even used a little rubber band to give the robot some traction.

[Lance] did a pretty good job detailing the build in his video. He also linked to a few other fun little robot designs that could entertain you as well. Pretty easy hack, but we thought you might find the results as satisfying as we did.

Robot companions may be here to stay. Time will tell.

Continue reading “The Jolly Cart-Pushing Robot”

CNC Hot-Wire Cutter Gives Form To Foam

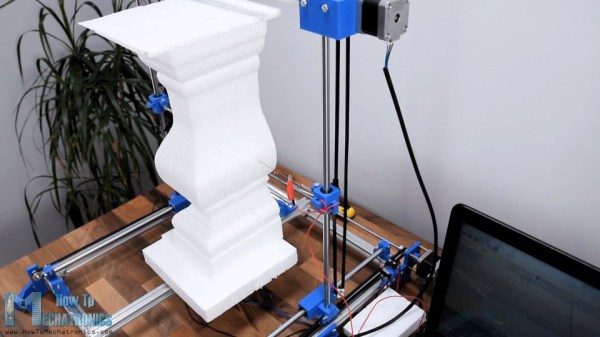
Rapid prototyping tools are sometimes the difference between a project getting off the ground and one that stays strictly on paper. A lightweight, easy-to-form material is often all that’s needed to visualize a design and make a quick judgment on how to proceed. Polymeric foams excel in such applications, and a CNC hot-wire foam cutter is a tool that makes dealing with them quick and easy.

We’re used to seeing CNC machines where a lot of time and expense are put into making the frame as strong and rigid as possible. But [HowToMechatronics] knew that the polystyrene foam blocks he’d be using would easily yield to a hot nichrome wire, minimizing the cutting forces and the need for a stout frame. But the aluminum extrusions, 3D-printed connectors. and linear bearings he used still make for a frame stiff enough to give clean, accurate cuts. The addition of a turntable to the bed is a nice touch, turning the tool into a 2.5D machine. The video below details the construction and goes into depth on the toolchain [HowToMechatronics] used to go from design to G-code, including the tricks he used for making a continuous path, as well as integrating the turntable to make three-dimensional designs.

Plenty of hot-wire foam cutters have graced our pages before, everything from tiny hand-held cutters to a hot-wire “table saw” for foam. We like the effort put into this one, though, and the possibilities it opens up.

Continue reading “CNC Hot-Wire Cutter Gives Form To Foam”

Laser Cutting Wooden Pogo Pin Test Jigs

Now as far as problems go, selling so many products on Tindie that you need to come up with a faster way to test them is a pretty good one to have. But it’s still a problem that needs solving. For [Eric Gunnerson] the solution involved finding a quick and easy way to produce wooden pogo test jigs on his laser cutter, and we have a feeling he’s not the only one who’ll benefit from it.

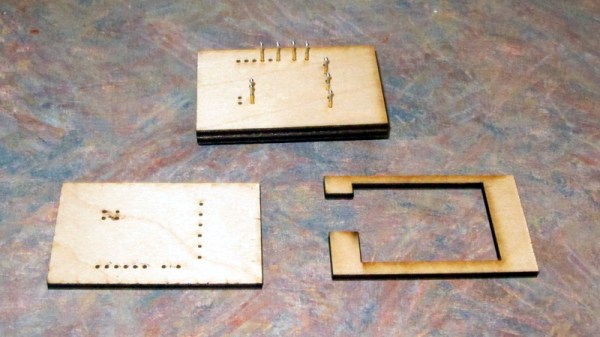
The first step was exporting the PCB design from KiCad into an SVG, which [Eric] then brought into Inkscape for editing. He deleted all of the traces that he wasn’t interested in, leaving behind just the ones he wanted to ultimately tap into with the pogo pins. He then used the Circle tool to put a 0.85 mm red dot in the center of each pad.

You’re probably wondering where those specific parameters came from. The color is easy enough to explain: his GlowForge laser cutter allows him to select by color, so [Eric] can easily tell the machine to cut out anything that’s red. As for the size, he did a test run on a scrap of wood and found that 0.85 mm was the perfect dimensions to hold onto a pogo pin with friction.

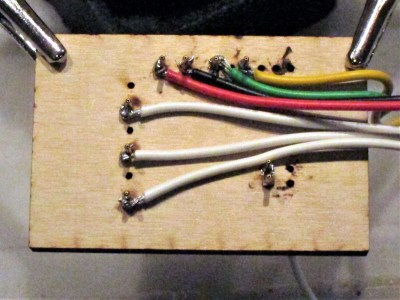
[Eric] ran off three identical pieces of birch plywood, plus one spacer. The pogo pins are inserted into the first piece, the wires get soldered around the back, and finally secured with the spacer. The whole thing is then capped off with the two remaining pieces, and wrapped up in tape to keep it together.

Whether you 3D print one of your own design or even modify a popular development board to do your bidding, the test jig is invaluable when you make the leap to small scale production.

Put That DLP Printer To Use Making PCBs

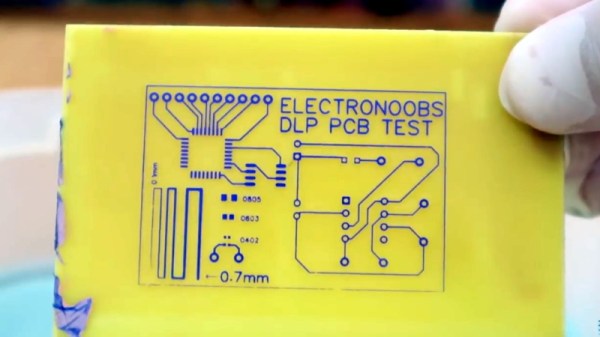
Now that these DLP printers are cheaper and more widely available, we’re starting to see hackers poking around the edge of the envelope to see what else the machines are capable of. [Electronoobs] recently got his hands on a couple of these printers, and thought he would do some experiments with using them for PCB production.

Rather than extruding molten plastic, these printers use light to cure resin layer-by-layer. In theory if the printer is good enough to cure the light-activated resin for a high resolution print, it should be able to do much the same thing with photosensitive PCBs.

Unfortunately, getting an STL out of a PCB design program takes a few intermediary steps. In the video after the break, [Electronoobs] shows his workflow that takes his design from EasyADA and turning it into a three dimensional object the DLP printer will understand. He does this with Blender and it looks pretty straightforward, but in the past we’ve seen people do similar tricks with Inkscape if that’s more your style.

Once you’ve grafted another dimension onto your PCB design, you may need to scale it to the appropriate size. [Electronoobs] notes that his STL for a 60 mm wide PCB came out of Blender as less than 2 mm wide, so you might need to break out the dreaded mathematics to find the appropriate scale value. Once the dimensions look good, you can load this file up into the printer as you would any normal print.

On the printer side of things, [Electronoobs] manually laminates UV photoresist film onto some copper clad boards with an iron, but you could skip this step and buy pre-sensitized boards as well. In any event, you drop the board where the UV resin normally goes, press the print button, and wait about ten minutes. That should give it enough time to expose the board, and you then proceed with the normal washing and acid bath process that hackers have been doing since time immemorial.

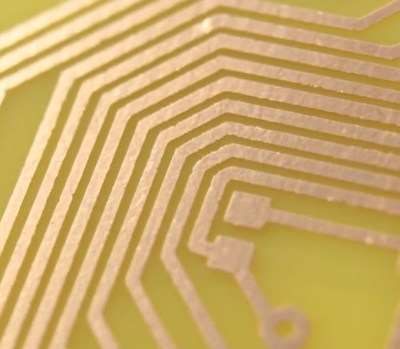
As [Electronoobs] shows, the results are quite impressive. While this still won’t make it any easier for you to do double-sided PCBs in the home lab, it looks like a very compelling method for producing even SMD boards with relative ease. This isn’t the first time somebody has tried using a DLP printer to run off some PCBs, but now that the technology has matured a bit it looks like it’s finally becoming practical.

Continue reading “Put That DLP Printer To Use Making PCBs”

Knock Your 3D Printer Down To 2D

Hackers love 3D printers. In fact, they might love them a little too much. We hope know we aren’t be the only ones who couldn’t turn down a good deal on an overseas printer (or two). But when you’re not pumping out plastic boats and other PLA dust collectors, what are you supposed to do with them?

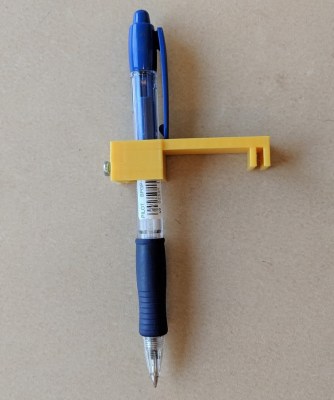
Well if you’re like [Uri Shaked] you could hand them a pen and tell them to get writing. The holidays are coming up quick, and somebody’s gotta sign all these cards. In his detailed write-up, he shows how he was able to add a pen to his Creality CR-10 printer to turn it into a lean mean letter-writing machine without making any permanent changes to the printer.

The physical aspect of this hack is about as simple as they come: just come up with some way to hold the pen a bit below the printer’s hotend. The positioning here is a bit critical, as you don’t want to crash the nozzle into the bed while writing out a missive. [Uri] got fancy and designed a little bracket that clamps onto the CR-10 and even has a M3 screw to hold the pen in place, but you could get away with zip ties if you just want to experiment a bit.

[Uri] goes into much greater detail on the software side of things, which is good, as it does take a bit of Inkscape trickery to get the printer to perform the specific dance moves required. He goes through step by step (with screen shots) explaining how to set up Orientation Points and configure the tool parameters for optimal performance. Even if you aren’t looking to put a 3D printer to work autographing your 8x10s before the next hackerspace meet, this is an excellent guide on producing GCode with Inkscape which can be helpful for tasks such as making PCBs.

The general process here is very similar to adding a laser module to your 3D printer, but with considerably lower risk of your eyeballs doing their best Death Star impression.

Continue reading “Knock Your 3D Printer Down To 2D”

Turn A Cheap 3D Printer Into A Cheap Laser Cutter

We know it’s hard to hear it, but the days of you being a hotshot at the local Hackerspace because you’ve got a 3D printer at home are long gone. While they’re still one of the most persnickety pieces of gear on the hacker’s bench, they’re certainly not the rarest anymore. Some of these printers are so cheap now they’re almost impulse buys. Like it or not, few people outside of your grandmother are going to be impressed when you tell them you’ve got a personal 3D printer anymore; and we wouldn’t be surprised if even granny picked up a Monoprice Mini during the last open box sale.
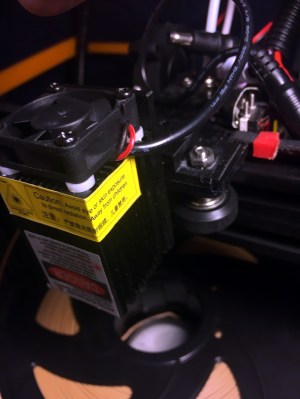
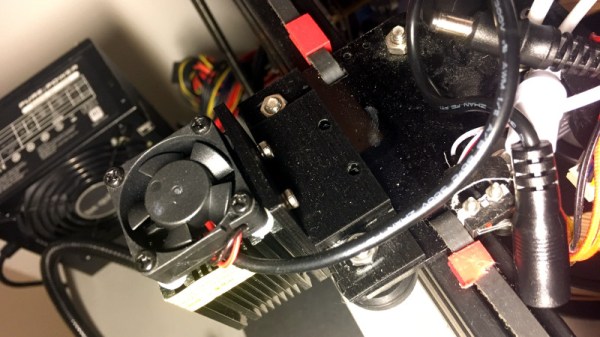
But while 3D printer ownership isn’t the pinnacle of geek cred it once was, at least there’s a silver lining: cheap motion platforms we can hack on. [squix] writes in to tell us about how he added a laser to his $200 USD Tevo Tarantula 3D printer, greatly expanding the machine’s capabilities without breaking the bank. The information in his write-up is pretty broadly applicable to most common 3D printer designs, so even if you don’t have a Tarantula it shouldn’t be too hard to adapt the concept.

The laser is a 2.5 W 445 nm module which is very popular with low-cost laser cutter setups. It’s a fully self-contained air cooled unit that just needs a source of 12 V to fire up. That makes it particularly well suited to retrofitting, as you don’t need to shoehorn in any extra support electronics. [squix] simply connected it to the existing power wires for the part cooling fan he added to the Tarantula previously.

You may want to check the specs for your 3D printer’s control board before attaching such a high current device to the fan connector. Best case it just overloads the board’s regulator and shuts down, worst case the magic smoke might escape. A wise precaution here might be to put a MOSFET between the board’s fan output the and the laser, but we won’t tell you how to live your life. As far as laser safety, this device should probably work inside an opaque box, or behind closed doors.

Once the laser is hanging off the fan port of your printer’s controller, you can turn it on with the normal GCode commands for fan control, M106 and M107 (to turn it on and off, respectively). You can even control the laser’s power level by adding an argument to the “on” command like: M106 S30.

Then you just need to mount the laser, and it’s more or less business as usual. Controlling a laser engraver/cutter isn’t really that different from controlling a 3D printer, so [squix] is still using OctoPrint to command the machine; the trick is giving it a “3D model” that’s just a 2D image with no Z changes to worry about. We’ve seen the process for doing that in Inkscape previously.

With this laser module going for as little as $60 USD (assuming you’ve got a 3D printer or two laying around to do the conversion on), this is a pretty cheap way to get into the subtractive manufacturing game. Next stop from there is getting one of those K40’s everyone’s talking about.

Continue reading “Turn A Cheap 3D Printer Into A Cheap Laser Cutter”

Cheap Front Panels With Dibond Aluminium

The production capability available to the individual hacker today is really quite incredible. Even a low-end laser engraver can etch your PCBs, and it doesn’t take a top of the line 3D printer to knock out a nice looking enclosure. With the wide availability of these (relatively) cheap machines, the home builder can churn out a very impressive one-off device on a fairly meager budget. Even low volume production isn’t entirely out of the question. But there’s still one element to a professional looking device that remains frustratingly difficult: a good looking front panel.

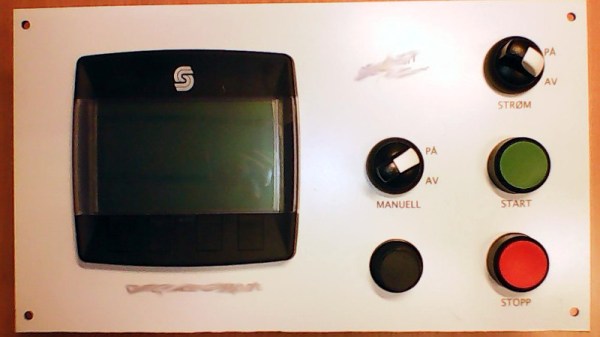
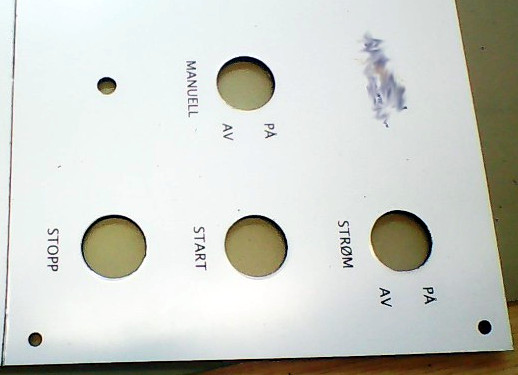
Now if your laser is strong enough to engrave (and ideally cut) aluminum sheets, then you’ve largely solved this problem. But for those of us who are plodding along with a cheap imported diode laser, getting text and images onto a piece of metal can be rather tricky. On Hackaday.io, [oaox] has demonstrated a cost effective way to create metal front panels for your devices using a print service that offers Dibond aluminum. Consisting of two thin layers of aluminum with a solid polyethylene core, this composite material was designed specifically for signage. Through various online services, you can have whatever you wish printed on a sheet of pre-cut Dibond without spending a lot of money.

As explained by [oaox], the first step is putting together the image you’ll send off to the printer using a software package like Inkscape. The key is to properly define the size of the Dibond plate in your software and work within those confines, otherwise the layout might not look how you expected once the finish piece gets back to you. It’s also important to avoid lossy compression formats like JPEG when sending the file out for production, as it can turn text into a mushy mess.

When you get the sheet back, all you need to do is put your holes in it. Thanks to the plastic core, Dibond is fairly easy to cut and drill as long as you take your time. [oaox] used a step drill for the holes, and a small coping saw for the larger openings. The final result looks great, and required very little effort in the grand scheme of things.

But how much does it cost? Looking around online, we were quoted prices as low as $7 USD to do a full-color 4×4 inch Dibond panel, and one site offered a 12×12 panel for $20. For a small production run, you could fit several copies of the graphics onto one larger panel and cut them out with a bandsaw; that could drop the per-unit price to only a couple bucks.

We’ve seen some clever attempts at professional looking front panels, from inkjet printing on transparencies to taking the nuclear option and laser cutting thin plywood. This is one of those issues the community has been struggling with for years, but at least it looks like we’re finally getting some decent options.