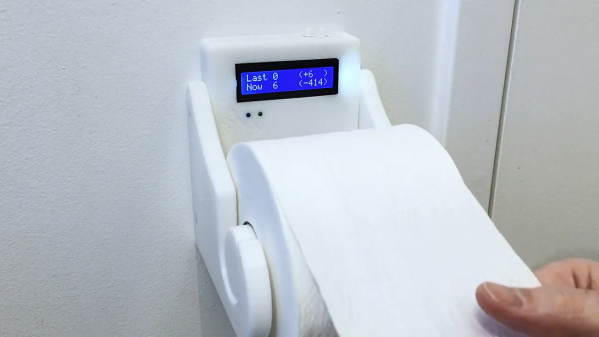
Google Sheet showing wins and losses of sports team. Data automated by IFTTT, Alexa, and Particle

An Overly Complicated Method Of Tracking Your Favorite Sports Team

Much of the world appears to revolve around sports, and sports tracking is a pretty big business. So how do people keep up with their favorite team? Well, [Jackson] and [Mourad] decided to devise a custom IoT solution.

Their system is a bit convoluted, so bear with us. First, they tell Alexa whether or not the team won or lost that week. Alexa then sends that information to IFTTT where two different Particle Argon boards are constantly polling the results to decide how to respond next. One Particle responds by lighting up an LED, green for a win and red for a loss. Another Particle board displays the results on an LCD screen. But this is where things get tricky. One of the more confusing aspects of their design is one of the Particle boards then signals back to IFTTT, telling it to tally the number of wins and losses. This seems a bit roundabout since the system started with IFTTT in the first place. Regardless, they seemed to be happy with the result and I’m sure they learned something in the process.

This project might not fulfill any functional need given that Alexa knows everything about all our lives already and you could just ask her how your favorite team is doing whenever you want to. But hey, we’re all about learning by doing here at Hackaday and we’re all guilty of building useless projects here and there just because we can. In any case, their project could serve as a good intro to integrating your Particle with IFTTT or Alexa since there appears to be quite a bit of probably unnecessary handshaking going on here.

Continue reading “An Overly Complicated Method Of Tracking Your Favorite Sports Team”

iPhone pictured with a lock

Make Your Own BLE-Enabled IOS App From Scratch

Even those readers who are most skeptical of Apple products will like this Bluetooth Low Energy (BLE)-enabled iOS app tutorial from [Akio].

With everything being “connected” these days smartphone applications are of course a ubiquitous part of our existence. We’ve seen plenty of examples connecting your Bluetooth-enabled projects to an Android device, but comparatively fewer tutorials for connecting to iOS devices. This mostly has to do with Android’s much larger market share and also Android’s more open-source friendly business model. Nevertheless, if you do much IoT development either as a hobby or professionally, then you probably find yourself interacting with Apple devices more than you like to admit.

[Akio’s] app is essentially updating a chart, in real-time, with data read from an Adafruit nRF52832 Feather board. He then walks you through all the basics of creating a user interface (UI) using Apple’s Storyboard interface, a simple drag-and-drop scheme similar to something you’ve probably used in many other contexts. [Akio] shows readers how to add buttons for allowing users to interact with the app, labels for displaying data to the user, as well as walks you through Apple’s odd methodology of connecting UI elements to code using IBAction and IBOutlets. The highlight of his tutorial is showing readers how to add charts to their iOS apps which seems to take a few more steps than you might imagine.

[Akio] does a really good job detailing all the relevant functions so that readers will hopefully understand what each piece of the code is doing. And we really enjoyed him adding individual video tutorials for some of the trickier programming steps. He also readily admits that some folks may opt to develop their UI exclusively in code as opposed to the Storyboard but he argues that the Storyboard is still important for beginners and is really handy when the UI is fairly simple.

Of course, in true open-source fashion, [Akio] provides all his code on his GitHub repository so you can clone the repo and run the code yourself as well as credit some of the resources he used while making his app. Two things we really love to see. Hopefully, [Akio’s] tutorial will make connecting to iOS devices seem much less onerous than it once was.

Moon Bouncing And Radar Imaging With LoRa

The LoRa radio protocol is well known to hardware hackers because of its Long Range (hence the name) but also its extremely low power use, making it a go-to for battery powered devices with tiny antennae. But what if the power wasn’t low, and the antenna not tiny? You might just bounce a LoRa message off the moon. But that’s not all.

The team that pulled off the LoRa Moonbounce consisted of folks from the European Space Agency, Lacuna Space, and the CA Muller Radio Astronomy Station Foundation which operates the Dwingeloo Radio Telescope. The Dwingeloo Radio Telescope is no stranger to Amateur Radio experiments, but this one was unique.

LoRa Moonbounce plotted for doppler shift by frequency
A radar image of the moon generated from LoRa Moonbounce

Operating in the 70 cm Amateur Radio band (430 MHz) meant that the LoRa signal was not limited to the low power signals allowed in the ISM bands. The team amplified the signal to 350 Watts, and then used the radio telescope’s 25 Meter dish to direct the transmission toward the moon.

The result? Not only were they able to receive the reflected transmission using the same transceiver they modulated it with — an off the shelf IOT LoRa radio — but they also recorded the transmission with an SDR. By plotting frequency and doppler delay, the LoRa transmission was able to be used to get a radar image of the moon- a great dual purpose use that is noteworthy in and of itself.

LoRa is a versatile technology, and can even be used for tracking your High Altitude Balloon that’s returned to Terra Firma.

ESP32 board with battery and nearby antenna

How To Easily Set Up Secure OTA Firmware Updates On ESP32

After an electronic IoT device has been deployed into the world, it may be necessary to reprogram or update it. But if physical access to the device (or devices) is troublesome or no longer possible, that’s a problem.

OTA updates allow a device to download new firmware, install it, and reboot itself into the new version. Convenient? Yes. Secure? It definitely needs to be.

Fortunately, over-the-air (OTA) firmware updates are a thing, allowing embedded devices to be reprogrammed over their wireless data connection instead of with a physical hardware device. Security is of course a concern, and thankfully [Refik] explains how to set up a basic framework so that ESP32 OTA updates can happen securely, allowing one to deploy devices and still push OTA updates in confidence.

[Refik] begins by setting up a web server using Ubuntu Linux, and sets up HTTPS using a free SSL certificate from Let’s Encrypt, but a self-signed SSL certificate is also an option. Once that is done, the necessary fundamentals are in place to support deploying OTA updates in a secure manner. A bit more configuration, and the rest is up to the IoT devices themselves. [Refik] explains how to set things up using the esp32FOTA library, but we’ve also seen other ways to make OTA simple to use.

You can watch a simple secure OTA firmware update happen in the video, embedded below. There are a lot of different pieces working together, so [Refik] also provides a second video for those viewers who prefer a walkthrough to help make everything clear. Watch them both, after the break.

Continue reading “How To Easily Set Up Secure OTA Firmware Updates On ESP32”

DIY Hydroelectric Plant

Impressive Off-Grid Hydroelectric Plant Showcases The Hacker Spirit

We all know the story arc that so many projects take: Build. Fail. Improve. Fail. Repair. Improve. Fail. Rebuild. Success… Tweak! [Kris Harbour] is no stranger to the process, as his impressive YouTube channel testifies.

DIY Hydroelectric Plant
An IOT charge controller makes power management easier.

Among all of [Kris’] off-grid DIY adventures, his 500 W micro hydroelectric turbine has us really pumped up. The impressive feat of engineering features Arduino/IOT based controls, 3D printed components, and large number of custom-machined components, with large amounts of metal fabrication as well.

[Kris] Started the build with a Pelton wheel sourced from everyone’s favorite online auction site paired with an inexpensive MPPT charge controller designed for use with solar panels. Eventually the turbine was replaced with a custom built unit designed to produce more power. An Arduino based turbine valve controller and an IOT enabled charge controller give [Kris] everything he needs to manage the hydroelectric system without having to traipse down to the power house. Self-cleaning 3D printed screens keep intake maintenance to a minimum. Be sure to check out a demonstration of the control system in the video below the break.

As you watch the Hydro electric system playlist, you see the hacker spirit run strong throughout the initial build, the failures, the engineering, the successes, and then finally, the tweaking for more power. Because why stop at working when it can be made better, right? We highly recommend checking it out- but set aside some time. The whole series is oddly addictive, and This Hackaday Writer may have spent inordinate amounts of time watching it instead of writing dailies!

Of course, you don’t need to go full-tilt to get hydroelectric power up and running. Even at a low wattage, its always-on qualities mean that even a re-purposed washing machine can be efficient enough to be quite useful.

Thanks to [Mo] for alerting us to the great series via the Tip Line!

Continue reading “Impressive Off-Grid Hydroelectric Plant Showcases The Hacker Spirit”

Rolling Your Own Long-Range IoT Sensor Network

Homebrew wireless sensors are nothing new around these parts: grab an ESP8266, hang a BME280 from the I2C pins, and you’re just a few lines of code away from joining the Internet of Things on your own terms. Builds like this are so cheap and easy that they make an excellent first project for folks looking to get into the electronics game, but what if you’re looking for something a bit more bespoke?

In that case, you could follow in the footsteps of [Discreet Mayor] and put together a custom modular architecture for long-range wireless sensors. The core of the system is a breakout board for the Texas Instruments SimpleLink CC1312 wireless MCU which features a simple 2×11 header connector. This allows the module to either be plugged into a larger board or have a small sensor PCB attached directly to it.

Rather than using WiFi or requiring some existing radio infrastructure, the boards automatically create a private network using the IEEE 802.15.4 standard at a range of up to 600 meters. A dedicated receiver isn’t necessary, to pull data off the network, one of the CC1312 boards simply gets connected to a computer through a simple FT232 adapter.

[Discreet Mayor] has already created a number of projects that use these custom radios for communication, from a pool monitoring system to a temperature sensor for the BBQ. That portable battery operated devices are able to use this common communications backbone just as well as mains powered static devices is a testament to the work that went into the firmware to make it as robust and efficient as possible.

Like the idea of long-range private networks, but less enthusiastic about having to come up with your own hardware? Not to worry. Over the summer, Espressif announced that they’re working on an ESP32 variant that includes support for IEEE 802.15.4. Just as soon as this chip shortage is over, we might even get to see the thing.

IoT flower pot monitors moisture and temperature levels.

Smart Flower Pot Build Is All About That Base

For some reason, it seems like most of the plant monitoring setups we see separate the plant and the monitoring system. This makes sense in a don’t-own-a-waterbed-and-a-cat kind of way, but it also doesn’t from an aestheitc standpoint. This build by [Jorge Enrique Gamboa Fuentes] sure does look nice and tidy as an all-in-one unit, and fortunately is built with obvious issues in mind. It tracks water level, soil moisture, and soil temperature with a single device — a STEMMA-connected soil sensor that does all the monitoring work.

This attractive beginner build is a Python-powered project that runs on a PyPortal Titano and has a speaker that anthropomorphizes the thing so it can berate you politely ask for water in English. But the real magic of this build is in the enclosure itself. Thankfully, it’s designed with a drip tray, but it also keeps the electronics out of the water, allowing just the tip of the sensor to get wet. You can view the vital signs directly on the device, or on a web dashboard whenever you’re away.

In the future, [Jorge] wants to experiment with GCP and Azure, connect more flower pots together, and add more sensors so that it is more autonomous. One of the major lessons learned was that you probably shouldn’t start with a succulent, because they need very little water and this will drag out your development time considerably unless you over-water it, which will kill it. Check it out after the break.

If [Jorge] wanted to go the easy route, they might stick this plant under an old Keurig that’s been converted to an automatic watering device.

Continue reading “Smart Flower Pot Build Is All About That Base”