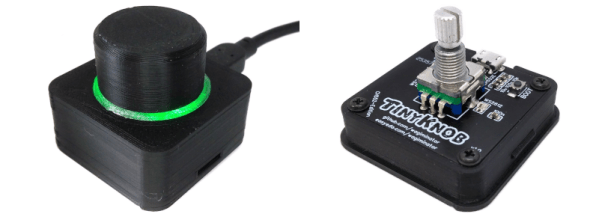
An In-Depth Look At The Haptic Smart Knob

At Hackaday, we love those times when we get a chance to follow up on a project that we’ve already featured. Generally, it’s because the project has advanced in some significant way, which is always great to see. Sometimes, though, new details on the original project are available, and that’s where we find ourselves with [Scott Bez] and his haptic smart knob project.

Alert readers may recall [Scott]’s announcement of this project back in March. It made quite a splash, with favorable comments and a general “Why didn’t I think of that?” vibe. And with good reason; the build quality is excellent, and the idea is simple yet powerful. By attaching a knob to the shaft of a brushless DC motor and mounting a small circular LCD screen in the middle, [Scott] came up with an input device that could be reprogrammed on the fly. The BLDC can provide virtual detents at any interval while generating haptic feedback for button pushes, and the LCD screen can provide user feedback.

But how is such a thing built? That’s the subject of the current video, which has a ton of neat design details and build insights. The big challenge for [Scott] was supporting the LCD screen in the middle of the knob while still allowing the knob — and the motor — to rotate. Part of the solution was, sadly, a hollow-shaft motor that was out of stock soon after he released this project; hopefully a suitable replacement will be available soon. Another neat feature is the way [Scott] built tiny strain gauges into the PCB itself, which pick up the knob presses that act as an input button. We also found the way button press haptics are provided by a quick jerk of the motor shaft very clever.

This is one of those projects that seems like a solution waiting for a problem, and something that you’d build just for the coolness factor. Hats off to [Scott] for following up a sweet build with equally juicy details.

Continue reading “An In-Depth Look At The Haptic Smart Knob”

OLED Display Kicks Knob Up Several Accurate Notches

As far as input devices go, the potentiometer is pretty straightforward: turn it left, turn it right, and you’ve pretty much seen all there is to see. For many applications that’s all you need, but we can certainly improve on the experience with modern technology. Enter this promising project from [upir] that pairs a common potentiometer with a cheap OLED display to make for a considerably more engaging user experience.

To save time, the code is fine tuned in a simulator.

The basic idea is to mount the display over the potentiometer knob so you can show useful information such a label that shows what it does, and a readout of the currently detected value. But you’ll likely want to show where the knob is currently set within the range of possible values as well, and that’s where things get interesting.

In the video after the break, [upir] spends a considerable amount of time explaining the math behind details like the scrolling tick marks. The nearly 45 minute long video wraps up with some optimization, as getting the display to move along with the knob in real-time on an Arduino UNO took a bit of extra effort. The final result looks great, and promises to be a relatively cheap way to add an elegant and functional bit of flair to an otherwise basic knob.

With the code and this extensive demonstration of how it all works, adding a similar capability to your next knob-equipped gadget shouldn’t be too much of a challenge. Perhaps it could even be combined with the OLED VU meters we’ve covered previously. Be sure to let us know if you end up using this technique, as we’d love to see it in action.

Continue reading “OLED Display Kicks Knob Up Several Accurate Notches”

3D Printed Absolute Encoder Is Absolutely Wonderful

When you need to record the angle of something rotating, whether it’s a knob or a joint in a robotic arm, absolute rotary encoders are almost always the way to go. They’re cheap, they’re readily available, and it turns out you can make a pretty fantastic one out of a magnetic sensor, a zip tie, and a skateboard bearing.

When [Scott Bezek] got his hands on a AS5600 magnet sensor breakout board, that’s just what he did. The sensor itself is an IC situated in the middle of the board, which in Scott’s design sits on a 3D-printed carrier. A bearing mount sits atop it, which holds — you guessed it — a bearing. Specifically a standard 608 skateboard bearing, which is snapped into the mount and held securely by a zip tie cinched around the mount’s tabs. The final part is a 3D-printed knob with a tiny magnet embedded within, perpendicular to the axis of rotation. The knob slides into the bearing and the AS5600 reads the orientation of the magnet.

Of course, if you just wanted a rotary knob you could have just purchased an encoder and been done with it, but this method has its advantages. Maybe you can’t fit a commercially-available encoder in your design. Maybe you need the super-smooth rotation provided by the bearing. Or maybe you’re actually building that robotic arm — custom magnetic encoders like this one are extremely common in actuator design, and while the more industrial versions (usually) have fewer zip ties, [Scott]’s design would fit right in.

Continue reading “3D Printed Absolute Encoder Is Absolutely Wonderful”

This Week In Security: KNOB, Old Scams Are New Again, 0-days, Backdoors, And More

Bluetooth is a great protocol. You can listen to music, transfer files, get on the internet, and more. A side effect of those many uses is that the specification is complicated and intended to cover many use cases. A team of researchers took a look at the Bluetooth specification, and discovered a problem they call the KNOB attack, Key Negotiation Of Bluetooth.

This is actually one of the simpler vulnerabilities to understand. Randomly generated keys are only as good as the entropy that goes into the key generation. The Bluetooth specification allows negotiating how many bytes of entropy is used in generating the shared session key. By necessity, this negotiation happens before the communication is encrypted. The real weakness here is that the specification lists a minimum entropy of 1 byte. This means 256 possible initial states, far within the realm of brute-forcing in real time.

The attack, then, is to essentially man-in-the-middle the beginning of a Bluetooth connection, and force that entropy length to a single byte. That’s essentially it. From there, a bit of brute forcing results in the Bluetooth session key, giving the attacker complete access to the encrypted stream.

One last note, this isn’t an implementation vulnerability, it’s a specification vulnerability. If your device properly implements the Bluetooth protocol, it’s vulnerable.

CenturyLink Unlinked

You may not be familiar with CenturyLink, but it maintains one of the backbone fiber networks serving telephone and internet connectivity. On December 2018, CenturyLink had a large outage affecting its fiber network, most notable disrupting 911 services for many across the United States for 37 hours. The incident report was released on Monday, and it’s… interesting.
Continue reading “This Week In Security: KNOB, Old Scams Are New Again, 0-days, Backdoors, And More”

A Macro Keyboard In A Micro Package

Remember back in the early-to-mid 2000s when pretty much every cheap USB keyboard you could find started including an abundance of media keys in its layout? Nowadays, especially if you have a customized or reduced-sized mechanical keyboard, those are nowhere to be seen. Whenever our modern selves need those extra keys, we have to turn to external peripherals, and [Gary’s] Knobo is one that looks like it could’ve come straight out of a fancy retail package.

The Knobo is a small macro keypad with 8 mechanical Cherry-style keys and a clickable rotary encoder knob as its main feature. Each key and knob gesture can be customized to any macro, and with five gestures possible with the knob, that gives you a total of thirteen inputs. On top of that, the build and presentation look so sleek and clean we’d swear this was a product straight off of Teenage Engineering’s money-printing machine.

The actions you can do with those inputs range from simple media controls with a volume knob all the way to shortcuts to make a Photoshop artist’s life easier. Right now you can only reprogram the Knobo’s Arduino-based firmware with an In-Circuit Serial Programmer to change what the inputs do, but [Gary] is currently working on configuration software so that users without any programming knowledge will be able to customize it too.

Knobs are just one of those things that everyone wants to use to control their computers, much like giant red buttons. Alternative input devices can range from accessibility-designed to just downright playful. Whatever the inspiration is for them, it’s always nice to see the creativity of these projects.

Continue reading “A Macro Keyboard In A Micro Package”

Cloning Knobs For Vintage Testing Equipment

Knobs! Shiny candy-colored knobs! The last stand of skeuomorphism is smart light switches! Everyone loves knobs, but when you’re dealing with vintage equipment with a missing knob, the odds of replacing it are slim to none. That’s what happened to [Wesley Treat] when he picked up a vintage Philco tube tester. The tester looked great, but a single knob for a rotary switch was missing. What to do? Clone some knobs! You only need some resin and a little bit of silicone.

The process of copying little bits of plastic or bakelite is fairly standard and well-tread territory. Go to Michaels or Hobby Lobby, grab some silicone and resin, make a box, put your parts down, cover them in silicone, remove the parts, then put resin in. For simple parts, and parts with flat bottoms like knobs, this works great. However, there’s something weird about the knob on this old Philco tube tester. Firstly, it doesn’t fit a standard 1/4″ shaft — it’s a bit bigger. There’s also no set screw. Instead, this knob has a stamped spring aligning it with the flat part of the D-shaft in this rotary switch. This means a copy of this knob wouldn’t be useful to anyone else, and that no other knob would work with this tube tester.

However, a bit of clever engineering would make a copy of this knob fit the existing switch. Once the resin was cured, [Wesley] drilled out the hole, then sanded a dowel down to fit into the flat of the D-shaft. It took a little kergiggering, but the knob eventually fit onto one of the rotary switches. Not bad for a few bucks in silicone and resin.

You can check out the entire build process below.

Continue reading “Cloning Knobs For Vintage Testing Equipment”

Indexing Chuck Not Required

Becoming accomplished with a lathe is a powerful skillset, but it’s only half of the journey. Being clever comes later, and it’s the second part of the course. Patience is in there somewhere too, but let’s focus on being clever. [TimNummy] wants a knobbed bolt with critical parameters, so he makes his own. After the break, there is a sixty-second summary of the linked video.

Making stock hardware is a beginner’s tasks, so custom hardware requires ingenuity or expensive machinery. Adding finger notches to a bolthead is arbitrary with an indexing chuck, but one isn’t available. Instead, hex stock becomes a jig, and the flat sides are utilized to hold the workpiece at six intermittent angles. We can’t argue with the results which look like a part that would cost a pretty penny.

Using material found in the workshop is what being clever is all about. Hex brass stock comes with tight tolerances on the sides and angles so why not take advantage of that?

[TimNummy] can be seen on HaD for his Jeep dome light hack and an over-engineered mailbox flag. Did you miss [Quinn Dunki]’s piece on bootstrapping precision machine tools? Go check that out!

Continue reading “Indexing Chuck Not Required”