Homebrew LED Bulbs Keep Your Circadian Rhythms Steady

There was a time when LED light bulbs were a premium product that commanded a premium price, mainly because of limited supply and the usual marketing tricks. But now is not that time, since you can pick up an LED bulb for a buck or two at pretty much any store. So why in the world would you go to the effort to make your own light bulb?

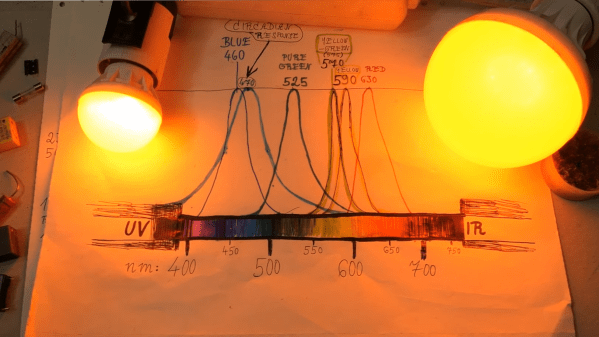
For [DiodeGoneWild], the answer is simple: it’s all about staying in rhythm. Circadian rhythm, that is. We all know how light toward the blue end of the spectrum is bad for our sleep cycle, since it convinces our lizard brain that dawn is at hand. But even if you pick an LED bulb with a warm, or reddish, color temperature, there’s still a lot of UV light being emitted thanks to the phosphor LEDs that are typically used in them.

[DiodeGoneWild]’s first attempt at a design, in the first video below, mostly avoids phosphor LEDs in favor of a mix of yellow, red, and yellow-green LEDs to get a warmer spectrum. He used the housing and base from an expired bulb to enclose his custom circular PCB, the fabrication of which using a hand drill as a lathe and a Dremel to machine concentric tracks in the cladding was a real treat. So was the power supply, for that matter — a dropping capacitor followed by a bridge rectifier and a filtering cap. We like the discharge resistors across the caps and the fusible resistor on the mains side — it’s nice to see safety factored in from the start. And what’s not to like about using a DVD as a makeshift spectroscope?

We see that [DiodeGoneWild] has just dropped a second design, this time in a much smaller bulb and with relatively more phosphor LEDs.

Continue reading “Homebrew LED Bulbs Keep Your Circadian Rhythms Steady”
Tidy POV Display Using The ESP32

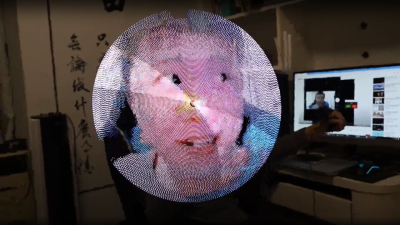
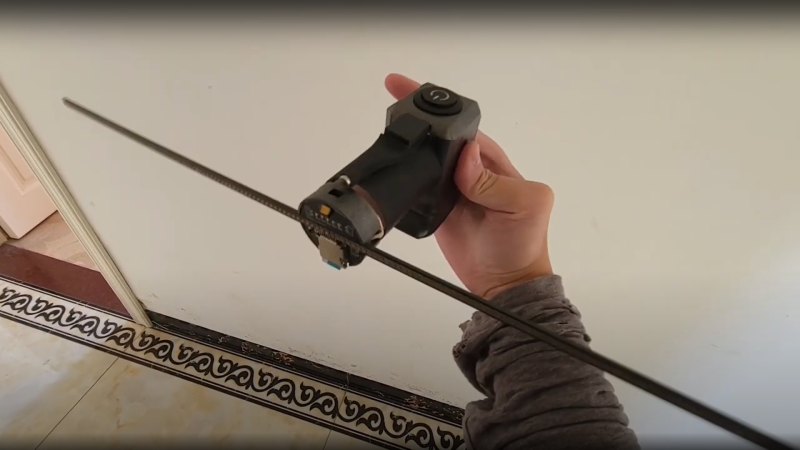
Chinese Youtuber [corebb] presents the second version of his POV display. The earlier version used 5050-sized SMT addressable LEDs, which didn’t give great resolution, so he rev’d the design to use a much higher number (160 to be exact) of APA102 LEDs. These are 2mm on the side, making them a little more difficult to handle, so after some initial solder paste wobbles, he decided to use a contract assembly house to do the tricky bit for him. This failed as they didn’t ‘understand’ the part and placed them the wrong way around! Not to be deterred, he had another go with a modified solder stencil, and eventually got the full strip to light up correctly.

Based on an ESP32 (using the Arduino stack) and SDCard for control, and a LiPo cell charged wirelessly, the build is rather tidy. A couple of hall effect switches are mounted at the start of each of the two arms, presumably lining

Real-time video streaming? Check!

up with a magnet on the case somewhere, although this isn’t clear. The schematic and PCB appear to have been designed with JLCEDA, which is a repackaging of EasyEDA. We can see the attraction with the heavy integration of this with the JLC and LCSC services. It appears that he even managed to get streamed video working — showing a live video from a webcam — which is quite an undertaking to pull off when you think how much processing needs to happen in real-time. As he alludes to in the video, trying to increase the resolution beyond this point is not viable with the processing capability of the ESP32.

A resin-printed case finishes off the build, with a screw-thread mount added to the rear, to allow typical camera mounts to be used to hold the thing down. A smart move we think.

We love POV displays around here, this spherical POV display is especially fabulous, but you don’t need fancy hardware if you have a handy ceiling fan and a bit of protoboard spare.

Continue reading “Tidy POV Display Using The ESP32”

Surface Mount Breathing Light PCB, using LM358 op-amp

Surface-Mount Light Breathes Life Into Your Project

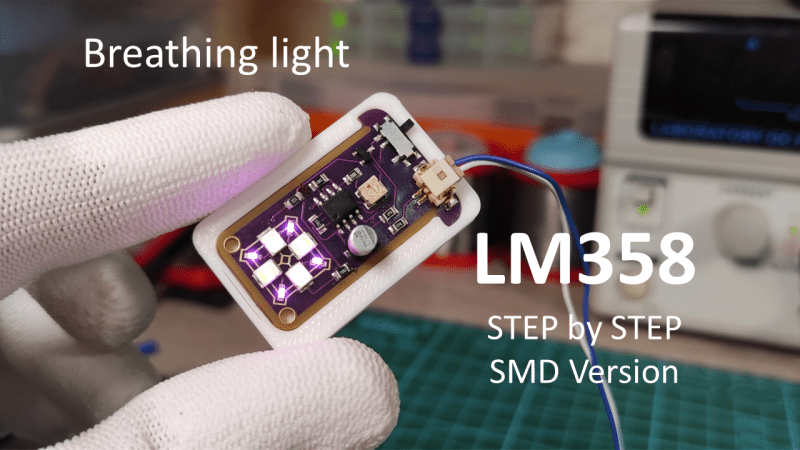
If you’ve ever seen those gadgets with the “breathing light” LEDs on them and wondered how to do it, then [DIY GUY Chris] can show you how to design your own surface-mount version, using only analogue electronics.

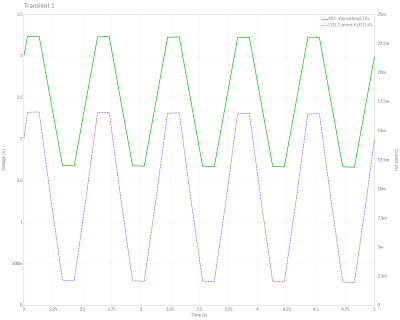
Simulation trace showing the LED breathing light circuit operating. Traces for voltage and current are shown over a few seconds
The LED current tracks up and down in an approximately triangular-wave pattern

The circuit itself is built around a slow triangular-wave oscillator, that ramps the current up and down in the LEDs to make it look as if the lights are breathing in and out. The overall effect is rather pleasing, and the oscillation speed can be adjusted using the on-board potentiometer.

This project is actually an update to a previous version that used through-hole components (also shown in the video below), and goes to show that revisiting completed projects can give them a new lease of life. It also shows how easy it has become to design and order custom circuit boards these days. It’s not so long ago that a project like this would have been either made on stripboard or etched from copper-plated FR4 in a bubbling tank of acid!

If you have revisited an old project that you’re proud of and would like to show others, why not drop us a message on our tips line?

We have covered some other options for breathing LEDs in the past, such as this digital logic version, and this Arduino library that has a host of other effects to choose from, too. Continue reading “Surface-Mount Light Breathes Life Into Your Project”

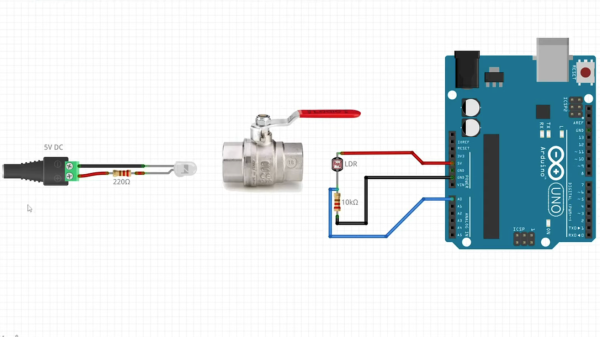
A diagram showing an LED on the left, a lever-style plumbing valve in the center, and an Arduino Uno on the right.

Plumbing Valves As Heavy Duty Analog Inputs

Input devices that can handle rough and tumble environments aren’t nearly as varied as their more fragile siblings. [Alastair Aitchison] has devised a brilliant way of detecting inputs from plumbing valves that opens up another option. (YouTube) [via Arduino Blog]

While [Aitchison] could’ve run the plumbing valves with water inside and detected flow, he decided the more elegant solution would be to use photosensors and an LED to simplify the system. This avoids the added cost of a pump and flow sensors as well as the questionable proposition of mixing electronics and water. By analyzing the change in light intensity as the valve closes or opens, you can take input for a range of values or set a threshold for an on/off condition.

[Aitchison] designed these for an escape room, but we can see them being great for museums, amusement parks, or even for (train) simulators. He says one of the main reasons he picked plumbing valves was for their aesthetics. Industrial switches and arcade buttons have their place, but certainly aren’t the best fit in some situations, especially if you’re going for a period feel. Plus, since the sensor itself doesn’t have any moving parts, these analog inputs will be easy to repair should anything happen to the valve itself.

If you’re looking for more unusual inputs, check out the winners of our Odd Inputs and Peculiar Peripherals contest or this typewriter that runs Linux.

Continue reading “Plumbing Valves As Heavy Duty Analog Inputs”

Neodriver Ornament Brightens Up Christmas

Stores will sell you all kinds of gaudy holiday ornaments, but there’s nothing like the style and class achieved by building your own. [w3arycod3r] did just that, whipping up the fun and festive Neodriver Ornament.

It’s a battery-powered build, and runs off an rechargeable 18650 cell which provides several days of operation at a low duty cycle. An ATtiny85 is charged with sending out commands to various NeoPixel devices, from rings to rectangular arrays. [w3arycod3r] then designed various PCBs that could carry the hardware and battery in a well-balanced package that would hang nicely when suspended from a ribbon on a Christmas tree.

As is always the fun part with addressable LEDs, [w3arycod3r] whipped up some fun animations to suit. The 5×5 rectangular arrays of NeoPixels are able to deliver scrolling text, while another animation blips out the RNA sequence of everyone’s least favorite coronavirus, SARS-CoV-2. Getting everything to fit into a ATtiny85’s 8 KB of code space and 512 byte EEPROM was a challenge, but slimming down the Adafruit NeoPixel library and using direct AVR register manipulation in place of regular Arduino functions helped.

Overall, it’s a fun holiday build that looks great on the tree. Alternatively, consider making yourself some rheoscopic ornaments this holiday season. And, if you’ve whipped up your own fun holiday build, throw it on the tipsline!

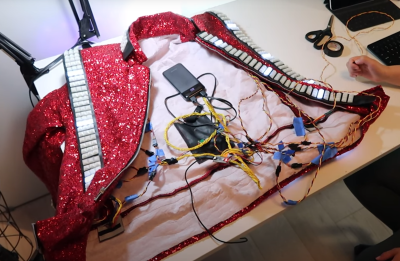
Two shots of a Thriller jacket with LED strips being worn by Louise Katzovitz, one from the front and the other from the back.

Thrills With An LED “Thriller” Jacket

[Louise Katzovitz] has created a light-up jacket in the style of the jacket worn by Michael Jackson in the 1983 music video for “Thriller”. [Louise Katzovitz]’s Thriller jacket is the perfect example of combining sewing hacks and electronic hacks to make an awesome, wearable jacket.

A bomber jacket was used as the base form to layer on the sequins and LED strips. Instead of bands of metal studs, [Louise] used WS2812B 60 pixels/m LED strips. 3D-printed transparent PLA “gems” were placed on top of the LEDs to mimic the form of the metal studs in the original jacket and provide diffusion for the underlying LEDs.

Inside of the LED thriller jacket, with battery pack, arduino nano and wiring exposed

Each LED strip was laid out on a piece of vinyl strip. Then, a top layer of vinyl was cut to allow each of the LEDs to poke through, with the 3D printed gems super-glued on top. The assembled LED bands are attached to the jacket by Velcro with the wiring fed behind the lining material, which can be removed easily via small hooks. The whole thing is driven by an Arduino Nano and a 5 V power bank.

With the details and process worked out, [Louise] even made a tiny version of the jacket for her dog. We’ve featured LED wearables and fashion before and [Louise]’s jacket is a great addition. These projects are perfect for anyone who wants to wow their friends this upcoming Halloween season. Video after the break!

Continue reading “Thrills With An LED “Thriller” Jacket”

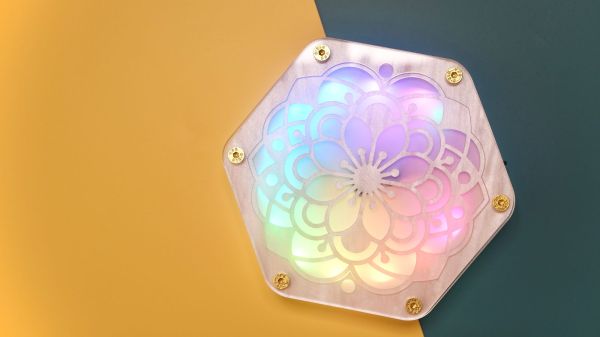
laser cut acrylic coaster with rgb leds inside

Your Mug Will Like This Glowy Coaster

[Charlyn] wanted to highlight their friends beautiful mug collection, so the Glowy Coaster was born.

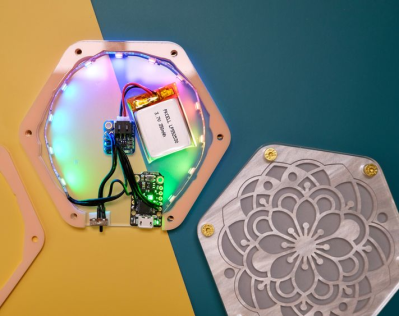
The coaster is made up of six layers of laser cut acrylic. The top and bottom layer are cut out of clear acrylic, providing a flat surface for the coaster. A top pattern layer made of pearl acrylic has a thin piece of vellum put underneath it to provide diffusion for the LED strip sandwiched inside. The middle layers are made of peach acrylic and have their centers hollowed out to provide room for the electronics inside. The top pearl acrylic layer gives the coaster, as [Charlyn] writes, a “subtle touch of elegance”. The coaster itself is screwed together by an M3 screw at each point of the hexagon that feed through to heat-set inserts.

inside of glowy coaster with electronics exposed

The electronics consist of a short NeoPixel strip, cut to include 12 LEDs pointed in towards the center of the coaster. The LEDs are driven by a Trinket M0 microcontroller with a LiPo “backpack” to provide power, attachment points for the exposed power switch and recharging capability to the 110 mAh 3.7 V battery. The code is a slightly modified NeoPixel “rainbow” wheel loop (source available as a gist). The design files are available through Thingiverse.

Creations like these highlight how much care and work goes into a project with minimal beauty, where decisions, like the opacity and thickness of the acrylic or countersinking the M3 screws, can have huge consequences for the overall aesthetic. [Charlyn] has an attention to detail that brings an extra touch of professionalism and polish to the project.

Coasters are a favorite for laser cutting and we’ve covered many different types, including
coaster bots, coaster engravers and even a color changing, drink sensing coasters.

Continue reading “Your Mug Will Like This Glowy Coaster”