Automatic Phone Dialer Illuminates Inner Workings

The invention of the transistor ushered in a lot of technologies that we now take for granted, and one of the less-thought-about areas that it improved living conditions worldwide was by making the touch-tone phone possible. No longer would the world have to fuss with dials to make phone calls, they could simply push some buttons. This technology is still in use today, and it is possible to build external phone dialers that use these tones to make phone calls, as [SunFounder] demonstrates with his latest project.

The tones that a phone makes when a button is pressed correlate with specific frequencies for each number. Automatic dialers like this one help when there are multiple carriers (like different long-distance carriers, for example) where different prefixes can be used to make calls cheaper depending on the destination of the call. A preprogrammed dialer can take all of this complication out of making phone calls. [SunFounder] is able to make a simple dialer from scratch, using an Arduino, its “tone” library, and a speaker that is simply held up to the phone that the call will be placed on.

[SunFounder] points out that he built this more because he’s interested in the inner workings of phones, and not because he needed a purpose-built dialer. It’s a good demonstration of how phones continue to use DTMF though, and how easy it is to interface with such a system. It might also suit a beginner as an introduction to the world of phreaking.

Heads-Up Display Turns Car Into Fighter Jet

While most of us will never set foot in a fighter jet, some of us can still try to get as close as possible. One of the most eye-catching features of a fighter jet (at least from the pilot’s point-of-view) is the heads-up display, so that’s exactly what [Frank] decided to build into his car to give it that touch of fighter jet style.

Heads-up displays use the small reflectivity of a transparent surface to work. In this case, [Frank] uses an LED strip placed on the dashboard to shine up into the windshield. A small amount of light is reflected back to the driver which is able to communicate vehicle statues without obscuring view of the road. [Frank]’s system is able to display information reported over the CAN bus, including voltage, engine RPM, and speed.

This display seems to account for all the issues we could think up. It automatically cycles through modes depending on driving style (revving the engine at a stoplight switches it to engine RPM mode, for example), the LEDs automatically dim at night to avoid blinding the driver, and it interfaces with the CAN bus which means the ability to display any other information in the future should be relatively straightforward. [Frank] does note some rough edges, though, namely with the power supply and the fact that there’s a large amount of data on the CAN bus that the Teensy microcontroller has a hard time sorting out.

That being said, the build is well polished and definitely adds a fighter jet quality to the car. And if [Frank] ever wants even more aviation cred for his ground transportation, he should be able to make use of a 747 controller for something on the dashboard, too.

8-bit Computer For On-The-Go Programming

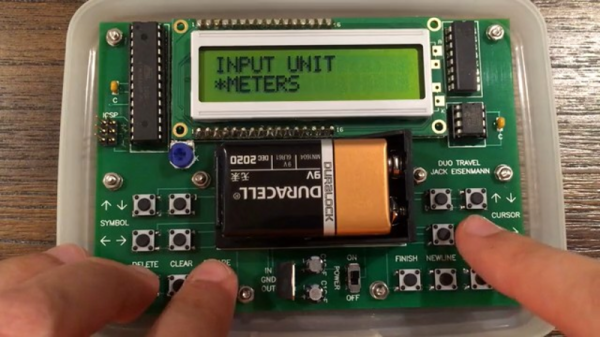
If there was one downside to 8-bit computers like the Commodore 64, it’s that they weren’t exactly portable. Even ignoring their physical size, the power requirements would likely have required a prohibitively large power bank of some sort to lug around as well. The problem of portability has been solved since the late ’70s, but if you still want that 8-bit goodness in a more modern package you’ll have to look at something like retrocomputing madman [Jack Eisenmann]’s DUO Travel computer.

The computer is based around the ubiquitous ATmega328 which should make the ease at which it is programmable apparent. Even so, its 14-button keypad makes it programmable even without another computer. While it has slightly less memory than a standard C-64, it’s still enough for most tasks. And, since its powered by a 9-volt battery it doesn’t require any external power sources either.

The most impressive part of the build, however, is the custom programming language specifically tailored for this platform. After all, a 14-button keypad wouldn’t be a great choice if you had to program in Perl or C all the time. There is some example code on the project page for anyone interested in this specific implementation. While it’s not the most minimal computer [Jack] has ever built, it’s certain to be much more practical.

Continue reading “8-bit Computer For On-The-Go Programming”

Unlikely Cascade Of Failures Leads To Microwave’s Demise

Surely a blown light bulb can’t kill a microwave oven, right? You might not expect it to, but that was indeed the root cause of a problem that [mikeselecticstuff] recently investigated; the cascade of failures is instructive to say the least.

While the microwave that made its way to [mike]’s bench wasn’t exactly engineered to fail, it surely was not designed to succeed. We won’t spoil the surprise, but suffice it to say that his hopes for a quick repair after the owner reported a bang before it died were dashed by an arc across the interior light bulb that put a pulse of mains voltage in places it didn’t belong. That the cascade of failures killed the appliance is a testament to how designing to a price point limits how thoroughly devices can be tested before production runs in the millions are stuffed into containers for trips to overseas markets.

Even though [mike] made his best effort to adhere to the Repair Manifesto, the end result was a scrapped microwave. It wasn’t a total loss given the interesting parts inside, but a disappointment nonetheless unless it forces us to keep in mind edge-case failure modes in our designs.

Continue reading “Unlikely Cascade Of Failures Leads To Microwave’s Demise”

Hackaday Prize Entry: Oscilloscope For The Masses

If you head down to your local electronics supply shop (the Internet), you can pick up a quality true-RMS multimeter for about $100 that will do almost everything you will ever need. It won’t be able to view waveforms, though; this is the realm of the oscilloscope. Unlike the multimeter’s realistic price point, however, a decent oscilloscope is easily many hundreds, and often thousands, of dollars. While this is prohibitively expensive for most, the next entry into the Hackaday Prize seeks to bring an inexpensive oscilloscope to the masses.

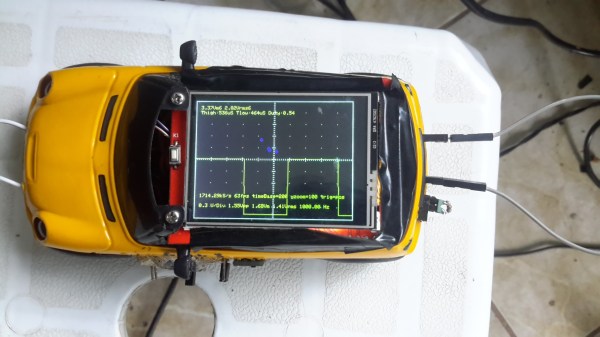
The multiScope is built by [Vítor] and is based on the STM32-O-Scope which is built around a STM32F103C8T6 microcontroller. This particular chip was chosen because of its high clock speed and impressive analog-to-digital resolution, which are two critical specifications for any oscilloscope. This particular scope has an inductance meter built-in as well, which is another feature which your otherwise-capable multimeter probably doesn’t have.

New features continue to get added to this scope by [Vítor]. Most recently he’s added features which support negative voltages and offsets. His particular scope is built inside of a model car, too, but we believe this to be an optional feature.

New Take On The Binary Clock

By now it might seem like there’s no new way to build a binary clock. It’s one of the first projects many build to try out their first soldering irons, so it’s a well-traveled path. Every now and then, however, there’s a binary clock that takes a different approach, much like [Stephen]’s latest project which he calls the byte clock.

The clock works by dividing the 24-hour day into half and using an LED to represent this division, which coincidentally works out to representing AM or PM. The day is divided in half over and over again, with each division getting its own LED. In order to use this method to get one-second resolution it would need 16 LEDs, but since that much resolution isn’t too important for a general-use clock, [Stephen] reduced this to eight.

Additionally, since we’re in the Internet age, the clock has built-in WiFi courtesy of a small version of Python called WiPy which runs on its own microcontroller. A real-time clock rounds out the build and makes sure the clock is as accurate as possible. Of course an RTC might not have the accuracy as some other clocks, but for this application it certainly gets the job done.

Antique Pinball Machine Lives As Clock

A big problem with restoring old arcade or pinball machines is finding original parts to get them running again. That’s part of the fun, though; when something finally works after weeks or months of effort. On the other hand, sometimes the only hope for old parts that will never be in a pinball machine again is for [Randy] to come across them. One of those parts he had lying around was a backglass for an old machine, and decided to turn it into a unique word clock.

The original pinball machine was built in 1956, and despite its age the backglass had almost no signs of wear or damage. There are 43 lights on this particular machine which is more than enough for 12 hours, minutes (by the 10s), seconds, and a few extras. An ATtiny85 serves as the controller and drives a fleet of Neopixels hidden in the display. There are also three buttons which control the brightness and allow the time to be set.

Be sure to check out the video below of this one-of-a-kind clock in action. A lot more went into this build as well including framing the glass, giving it a coat of paint and polish, and programming the clock into the microcontroller. Old backglasses from pinball machines seem to be relatively popular to repurpose into more conventional clocks, too, even clocks of an atomic nature.

Continue reading “Antique Pinball Machine Lives As Clock”