Whimsical Solder Stand Moonlights As Toy 3D Printer

A few Lego pieces provide key functionality, like an articulated dispenser head.

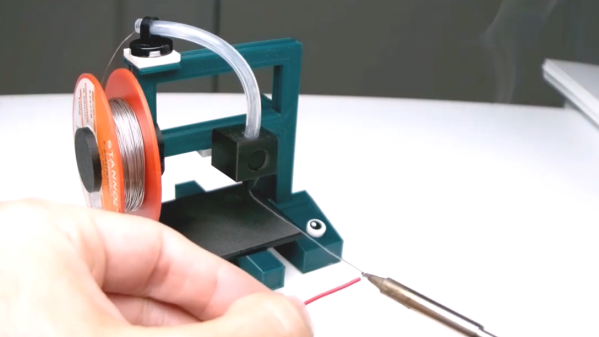
Most of us have bent a length of solder into a more convenient shape and angle when soldering, and just sort of pushed the soldering iron and work piece into the hanging solder instead of breaking out a third hand. Well, [yukseltemiz] seems to have decided that a solder dispenser and a miniature 3D printer model can have a lot in common, and created a 1/5 scale Ender 3 printer model that acts as a solder stand and dispenser. The solder spool hangs where the filament roll would go, and the solder itself is dispensed through the “print head”.

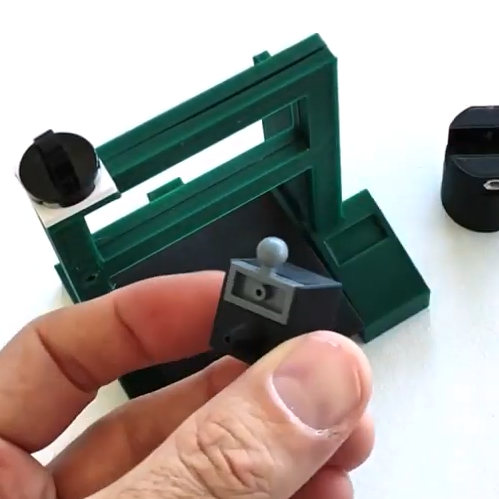
It’s cute, and we do like the way that [yukseltemiz] incorporated a few Lego pieces into the build. A swivel and eyelet guides the solder off the roll and a small Lego ball and socket gives the dispenser its articulation, an important feature for bending solder to a more convenient angle for working. It makes us think that using Lego pieces right alongside more traditional hardware like M3 nuts and bolts might be an under-explored technique. You can see the unit in action in the brief assembly video, embedded below.

Continue reading “Whimsical Solder Stand Moonlights As Toy 3D Printer”

Toy O-Scope Is Dope

Not many of our childhood doll and action figure’s accessories revolved around lab equipment except maybe an Erlenmeyer flask if they were a “scientist.” No, they tended to be toasters, vehicles, and guns. When we were young, our heroes made food, drove sexy automobiles, and fought bad guys. Now that we’re older, some of our heroes wield soldering irons, keyboards, and oscilloscopes. [Adrian Herbez] made a scale model oscilloscope that outshines the beakers and test tube racks of yesteryear. Video also shown below. Continue reading “Toy O-Scope Is Dope”

Tiny Raspberry Pi Mac Nails The Apple Aesthetic

We know that some in the audience will take issue with calling a Raspberry Pi in a 3D-printed case the “World’s Smallest iMac”, but you’ve got to admit, [Michael Pick] has certainly done a good job recreating the sleek look of the real hardware. While there might not be any Cupertino wizardry under all that PLA, it does have a properly themed user interface and the general aversion to external ports and wires that you’d expect to see on an Apple desktop machine.

The clean lines of this build are made possible in large part by the LCD itself. Designed specifically for the Raspberry Pi, it offers mounting stand-offs on the rear, integrated speakers, a dedicated 5 V power connection, and a FFC in place of the traditional HDMI cable. All that allows the Pi to sit neatly on the back of the panel without the normal assortment of awkward cables and adapters going in every direction. Even if you’re not in the market for a miniature Macintosh, you may want to keep this display in mind for your future Pi hacking needs.

Well, that’s one way to do it.

Despite this clean installation, the diminutive Raspberry Pi was still a bit too thick to fit inside the 3D-printed shell [Michael] designed. So he slimmed it down in a somewhat unconventional, but admittedly expedient, way. With a rotary tool and a steady hand, he simply cut the double stacked USB ports in half. With no need for Ethernet in this build, he bisected the RJ-45 connector as well. We expect some groans in the comments about this one, but it’s hard to argue that this isn’t a hack in both the literal and figurative sense.

We really appreciate the small details on this build, from the relocated USB connectors to the vent holes that double as access to the LCDs controls. [Michael] went all out, even going so far as to print a little insert for the iconic Macintosh logo on the front of the machine. Though given the impressive work he put into his miniature “gaming PC” a couple months back, it should come as no surprise; clearly this is a man who takes his tiny computers very seriously.

Continue reading “Tiny Raspberry Pi Mac Nails The Apple Aesthetic”

Miniature Star Wars Arcade Lets You Blow Up The Death Star On The Go

If you have fond childhood memories of afternoons spent at the local arcade, then you’ve had the occasional daydream about tracking down one of those old cabinets and putting it in the living room. But the size, cost, and rarity of these machines makes actually owning one impractical for most people.

While this fully functional 1/4th scale replica of the classic Star Wars arcade game created by [Jamie McShan] might not be a perfect replacement for the original, there’s no denying it would be easier to fit through your front door. Nearly every aspect of the iconic 1983 machine has been carefully recreated, right down to a working coin slot that accepts miniature quarters. Frankly, the build would have been impressive enough had he only put in half the detail work, but we certainly aren’t complaining that he went the extra mile.

[Jamie] leaned heavily on resin 3D printed parts for this build, and for good reason. It’s hard to imagine how he could have produced some of the tiny working parts for his cabinet using traditional manufacturing techniques. The game’s signature control yoke and the coin acceptor mechanism are really incredible feats of miniaturization, and a testament to what’s possible at the DIY level with relatively affordable tools.

The cabinet itself is cut from MDF, using plans appropriately scaled down from the real thing. Inside you’ll find a Raspberry Pi 3 Model A+ running RetroPie attached directly to the back of a 4.3 inch LCD with integrated amplified speakers. [Jamie] is using an Arduino to handle interfacing with the optical coin detector and controls, which communicates with the Pi over USB HID. He’s even added in a pair of 3,000 mAh LiPo battery packs and a dedicated charge controller so you can blow up the Death Star on the go.

Still don’t think you can fit one in your apartment? Not to worry, back in 2012 we actually saw somebody recreate this same cabinet in just 1/6th scale.

Continue reading “Miniature Star Wars Arcade Lets You Blow Up The Death Star On The Go”

New (mis)Use For Lithophanes: Miniature Diorama Backgrounds

What’s better than a well-lit photo of a 3D-printed miniature? A photo of the miniature in a mini diorama, of course. [OrionDeHunter] shows off a clever technique that has something in common with old-timey photo stages and painted backgrounds, and (mis)uses 3D-printed lithophanes to pull it off. What [OrionDeHunter] does is use a curved and painted lithophane as a stand-in for a background, and the results look great!

Lithophanes are intended to be illuminated from behind to show an image, with thin areas showing as lighter and thicker areas darker, but when it comes to high contrast patterned images like brick walls, the same things that make a good lithophane just happen to also make a pretty good 3D model in the normal sense. No 3D scanning or photogrammetry required.

Here is the basic process: instead of creating a 3D model of a brick wall from scratch, [OrionDeHunter] simply converted an image of a brick wall (or stairs) into a curved lithophane with an online tool. The STL model of the lithophane is then 3D printed, painted, and used as a swappable background. When macro shots of the miniatures are taken, the curved background looks just right and allows for some controlled lighting. It’s a neat trick, and well applied in this project. Some sample images demonstrating how it works are just under the break.

Lithophanes were originally made using marble or thin porcelain, but a modern spin has been put on the technique with 3D printing. Enterprising hackers have even discovered ways to add color, too.

Putting An Arcade Cabinet Inside Of An NES Controller

The arcade game shoehorned into an original Nintendo Entertainment System controller from [Taylor Burley] is certainly made slightly easier by its starting with one of those miniature cabinets that are all the rage now, but since he’s still achieved the feat of an entire arcade game in a controller we still stand by the assessment in our title.

In fact, he’s put not one but four arcade games into the controller. The board that [Taylor] liberated from the miniature game system can actually be switched between the onboard games by shorting out different pads on the PCB. Normally this would be done during manufacture with a zero-ohm resistor, but in this case, he’s wired the pads out to a strip of membrane keypad liberated from an LED remote control. By holding a different button while powering on the system, the user can select which of the games they want to boot into.

The original buttons and directional pad have been preserved, and in the video after the break, [Taylor] shows how he wires them into the arcade PCB. The Start and Select buttons had to go since that’s where the tiny color LCD goes now, but they wouldn’t have been used in any of these games anyway. With the addition of a small battery pack and charge controller, this build is a clever way to take several classic arcade titles with you on the go.

With the growing popularity of these tiny arcade cabinets, we’ve seen a number of hackers tearing into them. The work that [wrongbaud] has done in modifying them to run other ROMs is not to be missed if you’re looking at building a project using one of these little bundles of nostalgia.

Continue reading “Putting An Arcade Cabinet Inside Of An NES Controller”

Ultra Tiny PC Plays Snake

[Steve Martin] used to do a comedy act about “Let’s get small!” You have to wonder if [Paul Klinger] is a fan of that routine, as he recently completed a very small 3D printed PC that plays snake. Ok, it isn’t really a PC and it isn’t terribly practical, but it is really well executed and would make a great desk conversation piece. You can see the thing in all its diminutive glory in the video below.

The 3D printer turned out a tiny PC case, a monitor, and a joystick. The PC contains an ATtiny1614, an RGB LED, and some fiber optic to look like case lighting. The monitor is really a little OLED screen. A 5-way switch turns into the joystick.

Continue reading “Ultra Tiny PC Plays Snake”