Simple PCB Repairs Keep Old Vehicle Out Of The Crusher

For those of us devoted to keeping an older vehicle on the road, the struggle is real. We know that at some point, a part will go bad and we’ll learn that it’s no longer available from the dealer or in the aftermarket, at least at a reasonable cost. We might get lucky and find a replacement at the boneyard, but if not — well, it was nice knowing ya, faithful chariot.

It doesn’t have to be that way, though, at least if the wonky part is one of the many computer modules found in most cars made in the last few decades. Sometimes they can be repaired, as with this engine control module from a Ford F350 pickup. Admittedly, [jeffescortlx] got pretty lucky with this module, which with its trio of obviously defective electrolytics practically diagnosed itself. He also had the advantage of the module’s mid-90s technology, which still relied heavily on through-hole parts, making the repair easier.

Unfortunately, his luck stopped there, as the caps had released the schmoo and corroded quite a few traces on the PCB. Complicating the repair was the conformal coating on everything, a common problem on any electronics used in rough environments. It took a bit of probing and poking to locate all the open traces, which included a mystery trace far away from any of the leaky caps. Magnet wire was used to repair the damaged traces, the caps were replaced with new ones, and everything got a fresh coat of brush-on conformal coating.

Simple though they may be, we really enjoy these successful vehicle module repairs because they give us hope that when the day eventually comes, we’ll stand a chance of being able to perform some repair heroics. And it’s nice to know that something as simple as fixing a dead dashboard cluster can keep a car out of the crusher.

Continue reading “Simple PCB Repairs Keep Old Vehicle Out Of The Crusher”

Laptop Memory Upgradable Again

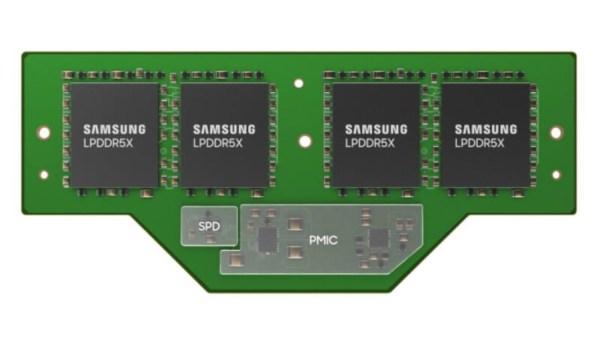
For some computing components, the bottleneck to improved speed and performance hasn’t been power consumption or clock speed but physical space. But a new memory standard may provide all of the power and space-saving benefits of soldered memory modules without losing any upgradability.

The standard is called compression attached memory modules (CAMM) and provides a way for small form factor computers to have upgradable memory without needing dual in-line memory module (DIMM) slots. Unlike DIMM, though, CAMM modules allow for modern high-speed low-power memory to be used and can take advantage of dual-channel properties even if only one memory module is installed. CAMM modules are held in place with small screws, similar to modern M.2 drives, and don’t have the massive footprint of a DIMM slot. This allows laptop manufacturers to save nearly as much space as having soldered memory.

While this won’t solve the problem of computer manufacturers offering only soldered memory as a cash-grab, hopefully, some take the new standard under their wing for those of us who value the upgradability of our hardware. There are of course some problems with newer standards, but right now it seems like the only other viable option is soldered modules or slower, heavier computers. Some may argue that these soldered-on modules can be upgraded in theory, but not without considerable effort.

A Cheap 3D Printer Control Panel As A General Purpose Interface

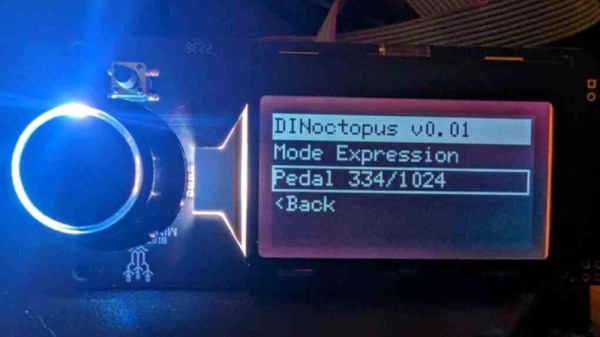
Browsing the usual websites for Chinese electronics, there are a plethora of electronic modules for almost every conceivable task. Some are made for the hobbyist or experimenter market, but many of them are modules originally designed for a particular product which can provide useful functionality elsewhere. One such module, a generic control panel for 3D printers, has caught the attention of [Bjonnh]. It contains an OLED display, a rotary encoder, and a few other goodies, and he set out to make use of it as a generic human interface board.

To be reverse engineered were a pair of 5-pin connectors, onto which is connected the rotary encoder and display, a push-button, a set of addressable LEDs for backlighting, a buzzer, and an SD card slot. Each function has been carefully unpicked, with example Arduino code provided. Usefully the board comes with on-board 5 V level shifting.

While we all like to build everything from scratch, if there’s such an assembly commonly available it makes sense to use it, especially if it’s cheap. We’re guessing this one will make its way into quite a few projects, and that can only be a good thing.

CT Scans Help Reverse Engineer Mystery Module

The degree to which computed tomography has been a boon to medical science is hard to overstate. CT scans give doctors a look inside the body that gives far more information about the spatial relationship of structures than a plain X-ray can. And as it turns out, CT scans are pretty handy for reverse engineering mystery electronic modules, too.

The fact that the mystery module in question is from Apollo-era test hardware leaves little room for surprise that [Ken Shirriff] is the person behind this fascinating little project. You’ll recall that [Ken] recently radiographically reverse engineered a pluggable module of unknown nature, using plain X-ray images taken at different angles to determine that the undocumented Motorola module was stuffed full of discrete components that formed part of a square wave to sine wave converter.

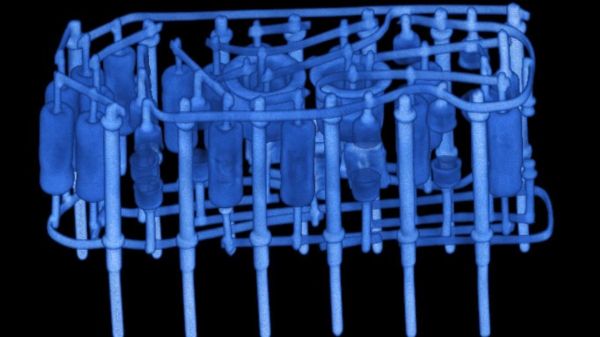
The module for this project, a flip-flop from Motorola and in the same form factor, went into an industrial CT scanner from an outfit called Lumafield, where X-rays were taken from multiple angles. The images were reassembled into a three-dimensional view by the scanner’s software, which gave a stunningly clear view of the components embedded within the module’s epoxy body. The cordwood construction method is obvious, and it’s pretty easy to tell what each component is. The transistors are obvious, as are the capacitors and diodes. The resistors were a little more subtle, though — careful examination revealed that some are carbon composition, while others are carbon film. It’s even possible to pick out which diodes are Zeners.

The CT scan data, along with some more traditional probing for component values, let [Ken] reverse engineer the whole circuit, which turned out to be a little different than a regular J-K flip-flop. Getting a non-destructive look inside feels a little like sitting alongside the engineers who originally built these things, which is pretty cool.

Reverse Engineering Your Own Bluetooth Audio Module

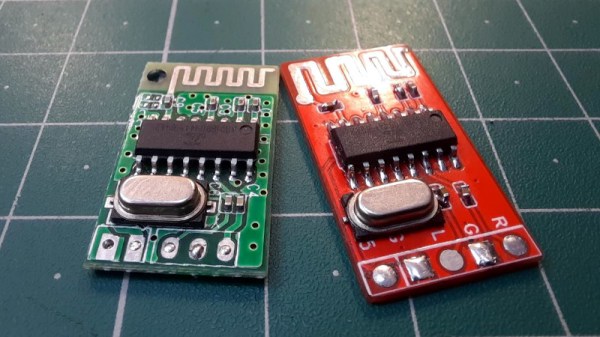
There was a time when we would start our electronic projects with integrated circuits and other components, mounted on stripboard, or maybe on a custom PCB. This is still the case for many devices, but it has become increasingly common for an inexpensive ready-built module to be treated as a component where once it would have been a project in its own right. We’re pleased then to see the work of [ElectroBoy], who has combined something of both approaches by reverse engineering the pinout of a Chinese Bluetooth audio chip with minimal datasheet, and making his own take on an off-the-shelf Bluetooth audio module.

The JL_AC6939B comes in an SOIC16 package and requires a minimum number of components. The PCB is therefore a relatively simple proposition and indeed he’s fitted all parts and traces on one side with the other being a copper ground plane. It’s dangerous to assume that’s all there is to a board like this one though, because many an engineer has come unstuck trying to design a PCB antenna. We’d hazard a guess that the antenna here is simply a wavy PCB line rather than an antenna with a known impedance and bandwidth, at the very least it looks to have much thicker traces than the one it’s copying.

It’s possible that it’s not really worth the effort of making a module that can be bought for relative pennies ready-made, but to dismiss it is to miss the point. We make things because we can, and not merely because we should.

Simple Dev Board Module Socket

When you’re building a quick prototype or a one-off project it’s nice to be able to securely mount the various modules and development boards. Sometimes these boards have mounting holes, but often they don’t. As an example from the latter category, digital music instrument maker and performer [DIYDSP] shows us how to build a simple socket to mount an STM32 Nucleo-32 module.

The socket is built on a standard pad-per-hole piece of vector board cut to the desired size. Pairs of female pin header strips are soldered down to the board. The inner pair of headers is for the module, the outer pair is for your interconnections. The headers are connected up with short solder bridges, and [DIYDSP] recommends you extend the outer pair several pins longer than necessary. These extras can be used for additional power or ground points, or on some boards they could connect to the debug header pins. He prefers to use female sockets because that lessens the odds that an accidentally bent pin will short something out.

Final step is to drill your mounting holes in the desired location, and no more development boards free-floating and held up only by wires. Do you have any tips for mounting these kinds of modules, either individually as shown here or onto PCBs? Let us know in the comments.

Continue reading “Simple Dev Board Module Socket”

Forth Module The Size Of A Stick Of Gum

Australian engineer [John Catsoulis] developed a small module called the Scamp2 dedicated to running Forth. The focus of his Udamonic project was not only to highlight Forth, but to make a module which was easy to use and doesn’t require any IDE on your computer. According to the website, these modules have found their niche in education as well as rapid prototyping for product development. His site has some good resources, including several Scamp/Forth example applications such as a model train controller or adding a real-time clock module.

The core of the module is a Microchip PIC24F64GB202 MCU with 64K Flash and 8K RAM. Of this, Forth takes up only 20K of Flash and 2K of RAM. [John] is using FlashForth, a version of Forth which came from [Mikael Nordman] at the University of Queensland almost ten years ago. FlashForth has been implemented on a wide variety of PIC and AVR ATmega processors and has apparently developed quite a following in Australia and elsewhere.

We estimate from the photo that the Scamp is about 80 mm long, just slightly longer than a standard piece of MIL-A-A-20175A Type II chewing gum ( 73 mm ). You can use it as-is, or with the header pins installed, the Scamp can be plugged into a breadboard for easy hacking. Regarding the interfacing of Scamp to other equipment, [John] says “Writing software to use other hardware is very easy, and fun.” We like his attitude.

Here is some more information from his Hackaday.io project page, and he also has a Tindie site. If you want a good overview of using Forth in embedded systems, check out Forth: The Hacker’s Language by our own Forth-guru [Elliot Williams]. Thanks to [Stephen Walters] for sending in the tip.

Continue reading “Forth Module The Size Of A Stick Of Gum”