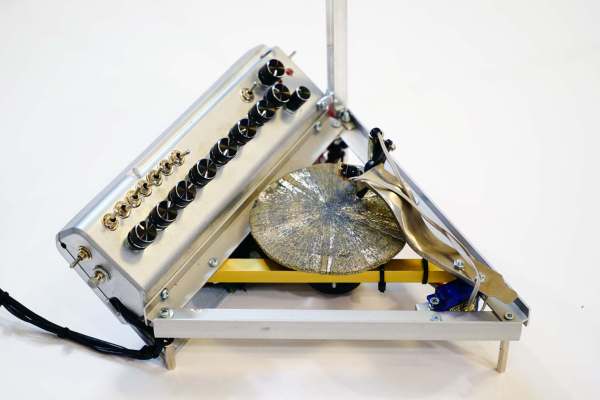
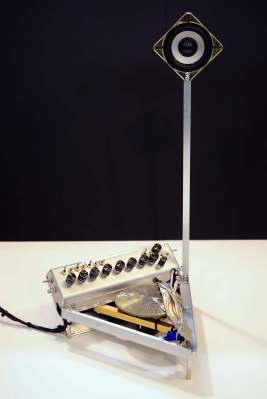
It’s An Upright Piano, It’s A Looper, It’s A Pi Project

We don’t really get out much, but we have noticed that there are brightly painted upright pianos in public places these days. Research indicates that these pianos are being placed by small, independent local organizations, most of which aim to spread the joy of music and encourage a sense of community.

[Sean and Mike] took this idea a couple of steps further with Quaver, their analog looping piano. Both of them are maker/musicians based in Lancaster, Pennsylvania, which happens to be a hot spot for public pianos. [Sean and Mike] often stop to play them and wanted a good way to capture their impromptu masterpieces. Quaver is an antique upright that has been modified to record, save, loop, and upload music to the internet. It does all of this through a simple and intuitive user interface and a Raspi 2. Quaver works a lot like a 4-track recorder, so up to four people can potentially contribute to a song.

The player sits down, cracks their knuckles, and presses our personal favorite part of the interface: the giant, irresistible record button. A friendly scrolling LED matrix display tells them to start playing. Once they are satisfied, they press the button again to stop the recording, and the notes they played immediately play back in a loop through a pair of salvaged Bose speakers from the 1980s. This is just the beginning of the fun as you play along with your looping recording, building up several voices worth of song!

Continue reading “It’s An Upright Piano, It’s A Looper, It’s A Pi Project”

RaspiDrums Uses Expensive Sensors

Piezoelectric sensors are great for monitoring mechanical impacts with a microcontroller. Whether you’re monitoring knocks on a door or watching a heartbeat, they are a cheap way to get the job done. They do have their downsides, though, so when [Jeremy] wanted to build an electronic drum set, he decided to use more expensive accelerometers to measure the percussive impacts instead.

Even though piezo sensors are cheap, they require a lot of work to get them working properly. The ADXL377 3-axis accelerometer that [Jeremy] found requires much less work, plus provides more reliable data due to a 1kHz low-pass filter at the output. In his setup, a Raspberry Pi handles all of the heavy lifting. An ADC on each drum sends data about each impact of the drum, and the Raspberry Pi outputs sound via the native Alsa driver and a USB sound card.

This project goes a long way to show how much simpler a project like this is once you find the right hardware for the job. [Jeremy]’s new electronic drums are very well documented as well if you are curious about using accelerometers on your newest project rather than piezo sensors. And, if you’re into drums be sure to see how you can have drums anywhere, or how you can build your own logic drums.

Continue reading “RaspiDrums Uses Expensive Sensors”

Ghost Guitar Plays Hendrix

Purple Haze all in my brain,
lately guitars they don’t seem the same,
[Josh] is playin’ funny but I don’t know why
‘scuse me while he electrifies.

[Josh] wanted to experiment with playing a guitar by different means. We’ve seen a few guitar hacks that use servos to play, and Arduino-based guitars that replace the strings with membrane potentiometers, but he decided to try a different approach. He’s using a permanent magnet and the electromagnetic effect to play the string.

Purple Haze all around,
all those amps are runnin’ up or down.
Are my strings all goin’ left or right?
Whatever it is, electromagnetism is pushin’ me outta sight.

To do this, he put a large permanent magnet next to the string and ran an alternating current through the string itself. When the current and the magnetic field interact, the string is pushed, like the bearing of a motor.  When the current goes the other way, the string is pushed in the opposite direction. Because he is using an alternating current (driven through a MOSFET tied into a frequency generator), he was able to control the frequency of this, and find the frequencies that made the string resonate, including the harmonics that give guitars their unique sound. It’s a pretty neat hack, but don’t forget that he is dealing with quite a lot of juice: if you were to inadvertantly touch the string and ground it to earth, there is enough current in the circuit to kill you.

Yeah, [Josh’s] hack is all about the right hand rule,
I know that he’s no hacking fool,
you’ve got my E string resonating, resonating so fine
just don’t touch it, or you’ll end your time
Help me, yeah, Purple Haze!

(with apologies to the ghost of [Jimi Hendrix], guitar hacker supreme)

Continue reading “Ghost Guitar Plays Hendrix”

Transmitting MIDI Signals With XBEE

What do you do when you want to rock out on your keytar without the constraints of cables and wires? You make your own wireless keytar of course! In order to get the job done, [kr1st0f] built a logic translator circuit. This allows him to transmit MIDI signals directly from a MIDI keyboard to a remote system using XBEE.

[kr1st0f] started with a MIDI keyboard that had the old style MIDI interface with a 5 pin DIN connector. Many new keyboards only have a USB interface, and that would have complicated things. The main circuit uses an optoisolator and a logic converter to get the job done. The MIDI signals are converted from the standard 5V logic to 3.3V in order to work with the XBEE.

The XBEE itself also needed to be configured in order for this circuit to work properly. MIDI signals operate at a rate of 31,250 bits per second. The XBEE, on the other hand, works by default at 9,600 bps. [kr1st0f] first had to reconfigure the XBEE to run at the MIDI bit rate. He did this by connecting to the XBEE over a Serial interface and using a series of AT commands. He also had to configure proper ID numbers into the XBEE modules. When all is said and done, his new transmitter circuit can transmit the MIDI signals wirelessly to a receiver circuit which is hooked up to a computer.

Combining Musical Hatred With Target Practice

Not everyone can agree on what good music is, but in some cases you’ll find that just about everyone can agree on what is awful. That’s what the people over at Neo-Pangea discovered when they were listening to Internet radio. When one of those terrible songs hits their collective eardrums, the group’s rage increases and they just need to skip the track.

This is how Engineers act if the song is super-awful

Rather than use a web app or simple push button to do the trick, they turned the “skip” button into a NERF target. They call their creation the Boom Box Blaster and made a fantastic demo film video about it which is found after the break.

Inspired by a painting in the office, the target takes the form of a small hot air balloon. The target obviously needed some kind of sensor that can detect when it is hit by a NERF dart. The group tried several different sensor types, but eventually settled on a medium vibration sensor. This sensor is connected to an Arduino, which then communicates with a Raspberry Pi over a Serial connection. The Pi uses a Python script to monitor the Arduino’s vibration sensor. The system also includes some orange LEDs to simulate flames and a servo attached to the string which suspends the balloon from the ceiling. Whenever a hit is registered, the flames light up and the balloon raises into the air to indicate that the shot was on target.

Continue reading “Combining Musical Hatred With Target Practice”

Hackaday Prize Entry: 3D Printed Modular Keyboard

There is a big community of people creating all kinds of synthesizers, but until now no one has attempted to make a keyboard controller like the one [Tim] created. Not only has he created the keyboard synthesizer, but he’s developed one that is modular and 3D printed so you can just expand on the synth you have rather than go out and buy or build a new one.

The design has a lot useful features. Since the design is modular, you can 3D print extra octaves of keys if you need, and simply build off of the existing keyboard. The interior has mounts that allow circuit boards to be screwed down, and the exterior has plenty of available places to put knobs or sliders. Anything that could possibly be built into a synthesizer is possible with this system, and if you decide you want to start small, that’s possible too!

All of the design files are available from Pinshape if you want to get started. The great thing about this controller is that you could use a 555-based synth in this keyboard controller, or a SID synth, or any other synth you could think of!

The 2015 Hackaday Prize is sponsored by:

Tiny Robot Jazz

Microcontroller-based projects don’t have to be fancy to be fantastic. Case in point: [r0d0t]’s “Musicomatic: the random jazz machine“. Clever programming and a nice case can transform a few servos and a microcontroller into something delightful.

musicomat_schematicsHardware-wise, there’s really nothing to see here; a speaker and some servos are hooked up to an ATmega328. We think it’s cute to have the microcontroller control its own power supply through a relay, but honestly a MOSFET in place of the relay or better still using the AVR’s shutdown sleep mode would be the way to go.

Nope, where this project shines is the programming. Technically, it might make some of you cringe — full of blocking delays and other coding “taboos”. But none of that matters, because [r0d0t] put his work in where it counts: the music. You simply must hear it for yourself in the clip after the break.

The basis of making music that humans like is rhythm, so [r0d0t] doesn’t leave this entirely to chance. The array “rhythms” has seven beat patterns that get randomly selected. The other thing humans like is predictability and repetition, so choruses and “improvs” repeat as well. All of the random notes are constrained to the pentatonic scale, which keeps it from ever sounding too bad. (The secret sauce of Kenny G.)

In short, [r0d0t] packs a lot of basic music theory into a very basic device, and comes up with something transcendent. We’re a bit reminded of the Yellow Drum Machine robot, and that’s high praise. Both projects are testaments to building something simple and then investing the time and effort into the code to make the project awesome.

For another slice of [r0d0t]’s excellent minimalist pie, check out his take on the classic Snake game: Twisted Snake.

Continue reading “Tiny Robot Jazz”