Split Keyboard Uses No PCB

When [daniely101] wanted a split keyboard, he decided to build his own. It wound up costing $25 to create a wireless board with no custom PCB required. Each half has its own microcontroller, and the whole thing connects via Bluetooth. While we don’t mind making a PCB, we can appreciate that you could change your mind easily with this wiring scheme.

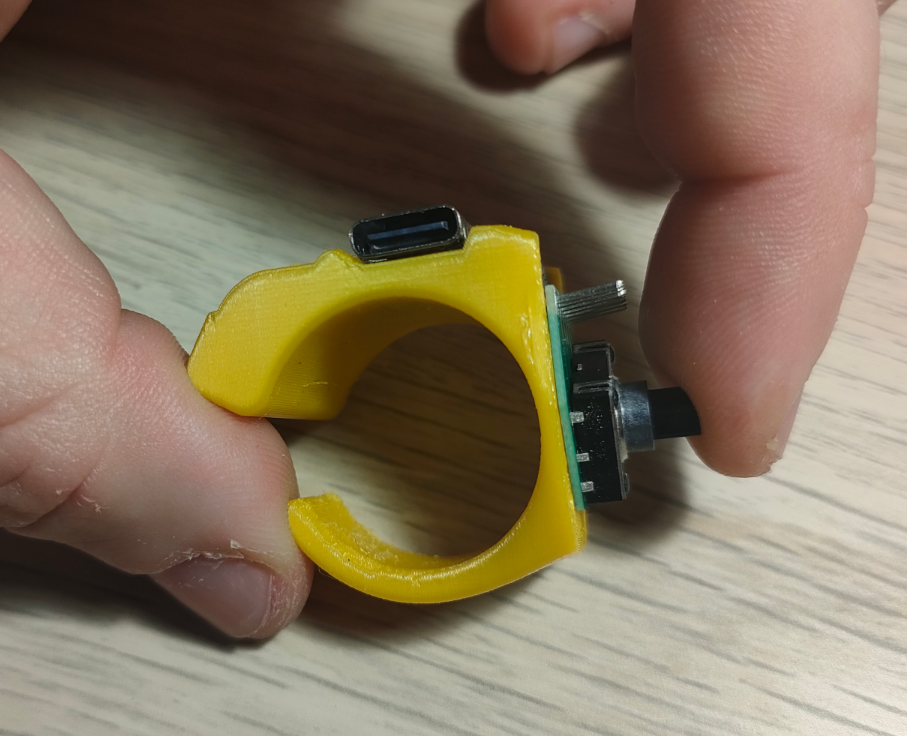
The 3D printed case holds the keys, and then it is just a matter of carefully soldering the keys to the microcontrollers. Of course, each side also has to have its own battery. The ZMK firmware is split in half, one part for each side of the keyboard. The nRF52840 CPUs have plenty of wireless connectivity. The keys are set in rows and columns, so the amount of soldering back to the controller is manageable.

While we applaud the wireless design, it does seem odd that you have to charge both halves and turn them on and off separately. But that’s the nice thing about a design like this — you could modify the design to not have a split. Or, you could allow one flexible wire pair to run across for power. Of course, you could modify the layout, including adding or deleting keys.

You might consider adding a pointing device. At least you don’t have to pull out a saw.

Continue reading “Split Keyboard Uses No PCB”

Nebula Mouse with sliced CAD view in the back

Nebula Mouse: The 6-DOF You Build Yourself

Let’s say your CAD workflow is starving for spatial awareness. Your fingers yearn to push, twist, and orbit – not just click. Enter the Nebula Mouse. A 6-DOF DIY marvel, blending 3D printing, magnets, and microcontroller wizardry into a handheld input device that emulates the revered 3DConnexion SpaceMouse – at a hacker price. It’s wireless, RGB-lit, powered by a chunky 1500 mAh cell, and fully configurable through standard apps. The catch? You print and build it yourself, with a little help of [DoTheDIY]’s design files.

This isn’t some half-baked enclosure on Thingiverse. The Nebula’s internals are crafted with the kind of precision that makes you file plastic for hours just to fit weights correctly. Hall effect sensors track real-world movement in all axes; a Seeed Xiao nRF52840 handles Bluetooth duty. It’s hefty (280 g), intentional, and smartly designed: auto-wake, USB-C, even a diffused LED bezel for night-time geek cred. Just beware that screw lengths matter. Misplace a 20 mm and you’ll hear the soft crack of PCB grief. No open firmware either – you’ll get compiled code only, unlocked per build via Discord.

In short: it’s not open source, but it is deeply open-ended. If your fingers itch after having seen the SpaceMouse teardown of last month, this might be what you’re looking for.

Building An NRF52840 And Battery-Powered Zigbee Gate Sensor

Recently [Glen Akins] reported on Bluesky that the Zigbee-based sensor he had made for his garden’s rear gate was still going strong after a Summer and Winter on the original 2450 lithium coin cell. The construction plans and design for the unit are detailed in a blog post. At the core is the MS88SF2 SoM by Minew, which features a Nordic Semiconductor nRF52840 SoC that provides the Zigbee RF feature as well as the usual MCU shenanigans.

Previously [Glen] had created a similar system that featured buttons to turn the garden lights on or off, as nobody likes stumbling blindly through a dark garden after returning home. Rather than having to fumble around for a button, the system should detect when said rear gate is opened. This would send a notification to [Glen]’s phone as well as activate the garden lights if it’s dark outside.

Although using a reed relay switch seemed like an obvious solution to replace the buttons, holding it closed turned out to require too much power. After looking at a few commercial examples, he settled for a Hall effect sensor solution with the Ti DRV5032FB in a TO-92 package.

Whereas the average person would just have put in a PIR sensor-based solution, this Zigbee solution does come with a lot more smart home creds, and does not require fumbling around with a smartphone or yelling at a voice assistant to turn the garden lights on.

An animated GIF of Engineer Bo's Precision Bluetooth Scroll Wheel wirelessly, and effortlessly scrolling down the Hack A Day blog with a single finger

Doomscroll Precisely, And Wirelessly

Around here, we love it when someone identifies a need and creates their own solution. In this case, [Engineer Bo] was tired of endless and imprecise scrolling with a mouse wheel. No off-the-shelf solutions were found, and other DIY projects either just used hacked mice scroll wheels, customer electronics with low-res hardware encoders, or featured high-res encoders that were down-sampled to low-resolution. A custom build was clearly required.

A photo of a 3D printed yellow plastic form with red marker drawn on the top of the support material and used in Engineer Bo's Precision Bluetooth Scroll Wheel

We loved seeing hacks along the whole process by [Engineer Bo], working with components on hand, pairing sensors to microcontrollers to HID settings, 3D printing forms to test ergonomics, and finishing the prototype device. When 3D printing, [Engineer Bo] inserted a pause after support material to allow drawing a layer of permanent marker ink that acts as a release agent that can later be cleaned with rubbing alcohol. 

We also liked the detail of a single hole inside used to install each of the three screws that secure the knob to the base. While a chisel and UV-curing resin cleaned up some larger issues with the print, more finishing was required. For a project within a project, [Engineer Bo] then threw together a mini lathe with 3D printed and RC parts to make sanding easy.

Scroll down with your clunky device to see the video that illustrates the precision with a graphic of a 0.09° rotation and is filled with hacky nuggets. See how the electronics were selected and the circuit designed and programmed, the use of PCBWay’s CNC machining in addition to board assembly services, and how to deal with bearings that spin too freely. [Engineer Bo] teases that a future version might use a larger bearing for less wobble and an anti-slip coating on the base. Will the board files and 3D models be released, too? Will these be sold as finished products or kits? Will those unused LED drivers be utilized in an upcoming version? We can’t wait to see what’s next for this project.

Continue reading “Doomscroll Precisely, And Wirelessly”

Illustrated Kristina with an IBM Model M keyboard floating between her hands.

Keebin’ With Kristina: The One With The Curvy Centerfold

What do you get when you combine a Raspberry Pi 4B, a Kaypro keyboard, and a 9″ Apple ], you get the coolest AVR development workstation I’ve seen in a while.

A Raspberry Pi-based AVR workstation that uses a Kaypro keyboard and 9" monochrome Apple ][c display.
Image by [John Anderson] via Hackaday.IO
As you may have guessed, I really dig the looks of this thing. The paint job on the display is great, but the stripes on the keyboard and badging on are on another level. Be sure to check out the entire gallery on this one.

About that keyboard — [John] started this project with two incomplete keyboards that each had a couple of broken switches. Since the two keyboards were compliments of each other parts-wise, they made a great pair, and [John] only had to swap out three switches to get it up and clacking.

In order to make it work with the Pi, [John] wrote a user-mode serial driver that uses the uinput kernel module to inject key events to the kernel. But he didn’t stop there.

Although the Pi supports composite video out, the OS doesn’t provide any way to turn off the chroma color signal that’s modulated on top of the basic monochrome NTSC signal, which makes the picture look terrible. To fix that, he wrote a command-line app that sets up the video controller to properly display a monochrome NTSC signal. Happy AVRing on your amazing setup, [John]! Continue reading “Keebin’ With Kristina: The One With The Curvy Centerfold”

A Bluetooth mouse in ring form.

Updated Mouse Ring Does It With A Joystick

Have you ever wished for easy mouse controls to go along with your VR headset experience? Or maybe you just want a cooler way to mouse in general. In any case, look no further than [rafgaj78]’s Bluetooth Mouse Ring project.

Side view of a Bluetooth mouse in ring form.This is version two, which of course comes with several improvements over version one. The biggest change is from tactile buttons to a joystick input. [rafgaj78] also did away with the power switch, using deep-sleep mode instead. Version two is easier to assemble and offers improved ergonomics, as well as a range of ring sizes.

Like the first version, this ring runs on a Seeed Xiao nRF52840 and is programmed in CircuitPython. There are two modes to choose from. In one mode, the joystick does left and right mouse click and wheel up and down, while the push action recovers the micro from deep sleep. In the other mode, the joystick axis is a mouse pointer mover, and you push down to left click.

We really like this sleek design, and [rafgaj78] has great instructions if you want to build your own. This isn’t the first cool mouse ring we’ve seen, and it certainly won’t be the last.

Cute Brass Lunar Lander Is A Neat Little Environment Monitor

Sometimes form can make a project more attractive than its simple function. [Mohit Bhoite]’s free-form builds are great examples of this. His latest effort is a gorgeous little device that displays environmental readings, and it’s shaped like a lunar lander. (Nitter) Just exquisite!

The device is based around a Seeedstudio XIAO nRF52840 dev board. It’s hooked up to a BME280 sensor which delivers temperature, humidity and air pressure readings from the immediate environment. These readings are displayed on a tiny 128×32 OLED display, along with the current time. Power is via a compact 14250 lithium cell.

So far, so simple, but the real magic is in the housing. It’s a wireframe lunar lander lookalike which [Mohit] put together using brass wire and some careful soldering. It adds so much to the build, which wouldn’t be nearly as attractive if just assembled on a PCB. It’s not his first rodeo, either. He previously built a cute device (Nitter) with an animated face in 2019 using similar techniques; it used a CCS811 gas sensor to detect air quality.

Often, we find ourselves falling most in love with devices that please the eye. [Mohit] certainly demonstrates a great skill in building things that fit this brief. Sometimes, it only takes a bit of thought and careful application of the mind to bring a beautiful aesthetic to your projects, and the results can be most rewarding. Try his Hackaday Supercon talk if you want to learn more. Continue reading “Cute Brass Lunar Lander Is A Neat Little Environment Monitor”