Measuring The Time Is A Breeze With This Air Flow Clock

If you’ve ever had surgery, and you’re over a certain age, chances are good you’re familiar with the dreaded incentive spirometer. It’s a little plastic device with one or more columns, each of which has a plastic ball in it. The idea is to blow into the thing to float the balls, to ensure that your lungs stay in good shape and reduce the chance of pneumonia. This unique air-powered clock reminds us a little of that device, without all the pain.

Like a spirometer, [Nir Tasher]’s clock has three calibrated tubes, each big enough to hold a foam ball loosely. At the bottom of each tube is a blower whose motor is under PWM control. A laser rangefinder sits below each ball and measures its height; the measurement is used by a PID loop to control the speed of each fan and thus the height of each ball. The video below shows that the balls are actually pretty steady, making the clock easy to read. It doesn’t, however, reveal what the clock sounds like; we’re going to go out on a limb here and guess that it’s pretty noisy. Still, we think it’s a fantastic way to keep time, and unique in the extreme.

[Nir]’s Air Flow clock is an early entry in the 2020 Hackaday Prize, the greatest hardware design contest on Earth. Everyone should enter something, or at least check out the cool things people are coming up with. It’s still early in the process, but there are so many neat projects already. What are you waiting for?

Continue reading “Measuring The Time Is A Breeze With This Air Flow Clock”

Go The Extra Mile For Your LED Driver

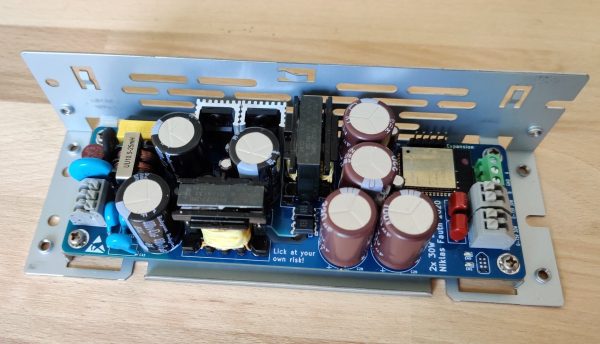
Addressable RGB LED strips may be all the rage, but that addressability can come at a cost. If instead of colors you expect to show shades of white you may the find less flickery, wider spectrum light from a string of single color LEDs and a nice supply desirable. Of course there are many ways to drive such a strip but this is Hackaday, not Aliexpressaday (though we may partake in the sweet nectar of e-commerce). [Niklas Fauth] must have really had an itch to scratch, because to get the smoothest fades for his single color LED strips, he built an entire software defined dual 50W switched-mode AC power supply from scratch. He calls it his “first advanced AC design” and we are suitably impressed.

Switched-mode power supplies are an extremely common way of converting arbitrary incoming AC or DC voltage into a DC source. A typical project might use a fully integrated solution in the form of a drop-in module or wall wart, or a slightly less integrated controller IC and passives. But [Niklas] went all the way and designed his from scratch. Providing control he has the ubiquitous ESP-32 to drive the control nodes of the supply and giving the added bonus of wireless connectivity (one’s blinkenlights must always be orchestrated). We can’t help but notice the PCBA also exposes RS485 and CAN transceivers which seem to be unused so far, perhaps for a future expansion into wired control?

Continue reading “Go The Extra Mile For Your LED Driver”

Thunder Pack Is A Bolt Of Lightning For Wearables

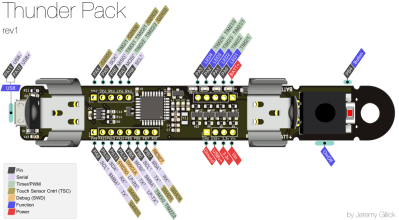
Do you need portable power that packs a punch? Sure you do, especially if you want to light up the night by mummifying yourself with a ton of LED strips. You aren’t limited to that, of course, but it’s what we pictured when we read about [Jeremy]’s Thunder Pack. With four PWM channels at 2.3 A each, why not go nuts? [Jeremy] has already proven the Thunder Pack out by putting it through its paces all week at Burning Man.

Click to embiggen!

After a few iterations, [Jeremy] has landed on the STM32 microcontroller family and is currently working to upgrade to one with enough flash memory to run CircuitPython.

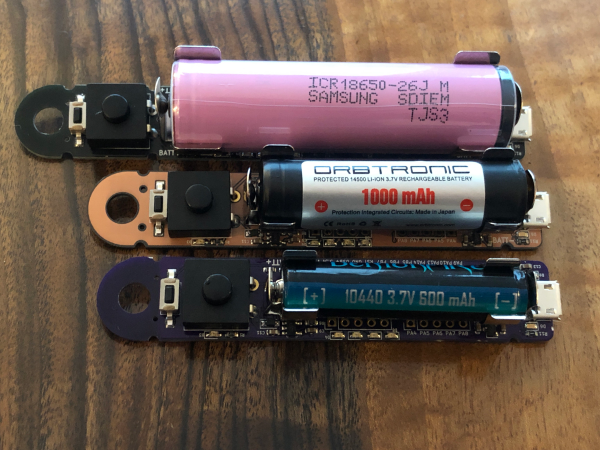
The original version was designed to run on a single 18650 cell, but [Jeremy] now has three boards that support similar but smaller rechargeable cells for projects that don’t need quite as much power.

We love how small and powerful this is, and the dongle hole is a great touch because it opens up options for building it into a wearable. [Jeremy] made a fantastic pinout diagram and has a ton of code examples in the repo. If you want to wade into the waters of wearables, let whimsical wearables wizard [Angela Sheehan] walk you through the waves.

A Smart Controller For Your DIY UV Cure Box

Resin 3D printers are finally cheap enough that peons like us can finally buy them without skipping too many meals, and what means we’re starting to see more and more of them in the hands of hackers. But to get good results you’ll also want a machine to cure the prints with UV light; an added expense compared to more traditional FDM printers. Of course you could always build one yourself to try and save some money.

An earlier prototype build of the interface.

To that end, [sjm4306] is working on a very impressive controller for all your homebrew UV curing needs. The device is designed to work with cheap UV strip lights that can easily be sourced online, and all you need to bring to the table is a suitable enclosure to install them in. Here he’s using a metal paint can with a lid to keep from burning his eyes out, but we imagine the good readers of Hackaday could come up with something slightly more substantial while still taking the necessary precautions to not cook the only set of eyes you’ll ever have.

Of course, the enclosure isn’t what this project is really about. The focus here is on a general purpose controller, and it looks like [sjm4306] has really gone the extra mile with this one. Using a common OLED display module, the controller provides a very concise and professional graphical user interface for setting parameters such as light intensity and cure time. While the part is cooking, there’s even a nice little progress bar which makes it easy to see how much time is left even if you’re across the room.

At this point we’ve seen a number of hacked together UV cure boxes, but many of them skip the controller and just run the lights full time. That’s fine for a quick and dirty build, but we think a controller like this one could help turn a simple hack into a proper tool.

Continue reading “A Smart Controller For Your DIY UV Cure Box”

Tool Writes Your PWM Code For You

The good thing about computers is they do your work for you, right? If you are a programmer, that doesn’t always seem to be a true statement. [Runtimemicro] has the answer, at least if you are writing PWM code for the Arduino. Their free application lets you set a few parameters, visually see the results, and then generates code for you. You can see a video of the tool in operation, below.

According to their site, the tool works for timers 1 through 5 on an Arduino Nano, Uno, or Mega2560. The app appears to work on Windows, but it doesn’t look like it would have any trouble running under Wine on other platforms.

Continue reading “Tool Writes Your PWM Code For You”

Flicker Detector Lets You Hear What You Can’t See

Have you ever looked at modern LED lighting and noticed, perhaps on the very edge of your perception, that they seemed to be flickering? Well, that’s because they probably are. As are the LEDs in your computer monitor, or your phone’s screen. Pulse width modulation (PWM) is used extensively with LEDs to provide brightness control, and if it’s not done well, it can lead to headaches and eyestrain.

Looking to quantify just how much flashing light we’re being exposed to, [Faransky] has created a simple little gadget that essentially converts flashing light into an audio tone the human ear can pick up. Those LEDs might be blinking on and off fast enough to fool our eyes, but your ears can hear frequencies much higher than those used in common PWM solutions. In the video after the break, you can see what various LED light sources sound like when using the device.

The electronics here are exceptionally simple. Just connect a small solar panel to an audio amplifier, in this case the PAM8403, and listen to the output. To make it a bit more convenient to use, there’s an internal battery, charger circuit and USB-C port; but you could just as easily run the thing off of a 9 V alkaline if you wanted to build one from what’s already in the parts bin.

Who knows? If you carry this thing around long enough, you might even hear the far less common binary code modulation in action (but probably not).

Continue reading “Flicker Detector Lets You Hear What You Can’t See”

OpenDog: Adding Force Sensitive Feet

[James Bruton] OpenDog remains one of the most impressive home-built robotics projects we’ve seen here on Hackaday, and it’s a gift that just keeps on giving. This time he’s working on adding force sensing capabilities to OpenDog’s legs to allow for more dynamic movement control.

The actuators in the legs are three-phase outrunner motors that drive ball-screws via a belt. This configuration is non-backdrivable, meaning the legs cannot be moved when an external force is, which could lead to mechanical failures. He as tested other backdrivable leg configurations with other robots, but did not want to rebuild OpenDog completely. The solution [James] went with is a redesigned foot with an inbuilt switch, to confirm that the foot is touching the ground, and a load cell attached in the middle of the bottom leg segment. The load cell is bolted rigidly onto the leg segment, which allows it to sense when the leg is carrying load, without damaging the load cell itself.

Unfortunately all the serial ports on OpenDog’s main Teensy 3.6 controller are already used, so he converted the signal from the load cell to PWM, to allow it to be read by a normal GPIO pin. This works well in isolation, but when [James] switches on the motors, the PWM signal from the load sensor gets flooded by interference, making it unreadable. To solve this problem, he wants to implement a CAN bus, which will allow for more inputs and outputs and hopefully solve the interference problem. However, [James] has no experience with the CAN protocol, so learning to use it is going to be a project on its own.

OpenDog is turning into a very lengthy, time-consuming project, [James] says that the lessons learned from it have been invaluable for a number of other projects. This is something to keep in mind with everything we tackle. Choose projects were the experience gained and/or relationships developed are worth it on their own, even when the project fails in a conventional sense. This way you can never really lose.