A RPI HAT For Synchronized Measurements

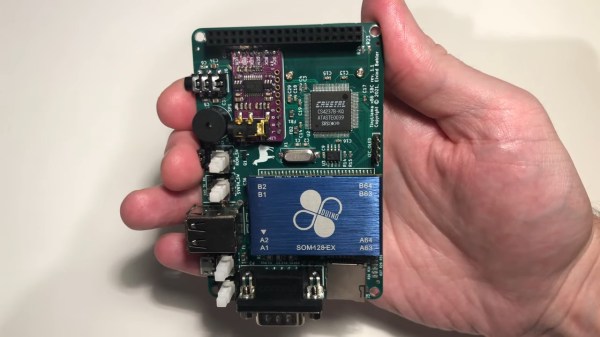
A team from the Institute for Automation of Complex Power System (ACS) at RWTH Aachen University have been working for a while on the analysis of widely distributed power systems. In a drive to move away from highly specialised (and expensive) electronics platforms, they have produced some instrumentation designed to operate with the Raspberry Pi platform, and an open source software stack. They call the platform the SMU (Synchronised Measurement Unit.) The SMU consists of a HAT sitting on an RPi3, inside a 3D printed box that is intended to attach to a DIN rail. After all, this is supposed to be an industrial platform.

Hardware wise, the star of the show is the Texas Instruments ADS8588S which is a 16-bit 8-channel simultaneous sampling ADC. This is quite a nice device, with 200 kSPS throughput and a per-channel programmable front end, packaged in a hacker-friendly 64-pin QFP. What makes this project interesting however, is how they solved the problem of controlling the sampled data acquisition and synchronisation.

1-PPS and BUSY edges converted to levels, then OR’d to trigger the DMA

By programming the ADC into byte-parallel mode, then using the BCM2837 Secondary Memory Interface (SMI) block together with the DMA, samples are transferred into memory with minimal CPU overhead. An onboard U-Blox Max-M8 GNSS module provides a 1PPS (top of second pulse) signal, which is combined with the ADC busy signal in a very simple manner, enabling both sample rate control as well as synchronisation between multiple units spread out in an installation. They reckon they can get synchronisation to within 180 ns of top-of-second, which for measuring relatively slow-changing power systems, should be enough. The HAT PCB was created in KiCAD and can be found in the SMU GitHub hardware section, making it easy to modify to your needs, or at least adjust the design to match the parts you can actually get your hands on.

Continue reading “A RPI HAT For Synchronized Measurements”

Pretty Pico Macropad Eases Transition Back To Office

[Thomas “Mel” Maillioux] is no stranger to the custom mechanical keyboard game — and faced with having to return to the office, they decided to whip up a sweet little macropad to both commemorate the occasion and make work a bit easier.

This cotton candy-colored block of beauty was designed to pay homage to [Mel]’s favorite joystick, the TRS-80 self-centering number with the single red, square button, and it looks fantastic. They started this journey by studying the key legends on their laptop to determine which macros might serve them best, based on which legends were the most worn.

Fortunately, all the macros they wanted to use — lock the workstation, save the current, active file, minimize/restore all windows, snap windows to the right or left, and volume control — are all macro’d already within Windows, so that made things rather easy.

Hardware-wise, it doesn’t get much easier than a Raspberry Pi Pico, some mechanical switches, an old USB cable, and donor CAT5 pairs so it looks pretty inside and out. Plus, the handy rotary encoder volume knob will mute and un-mute when pressed. We think the snap-fit enclosure looks great, and it needs no supports to boot. If you want to make your own, be sure to check out the repo.

Okay, we lied: macro pad making does get easier, provided you have access to a 3D-printer.

Via MKKC Discord

Hackaday Prize 2022: A Spring-Driven Digital Movie Camera

These days, most of us are carrying capable smartphones with high-quality cameras. It makes shooting video so easy as to take all the fun out of it. [AIRPOCKET] decided to bring that back, by converting an old spring-driven 8mm film camera to shoot digital video.

The camera in question is a magazine-fed Bell & Howell Model 172 from the 1950s. In its original spring-driven form, it could shoot for approximately 35 seconds at a (jerky) frame rate 16 fps.

In this build, though, the film is replaced with a digital imaging system designed to fit in the same space as the original magazine. A Raspberry Pi Zero 2 was pressed into service, along with a rechargeable battery and Pi camera module. The camera is timed to synchronise with the shutter mechanism via a photosensor.

Since it uses the original optics and shutter speed, the resulting video is actually very reminiscent of the Super 8 cameras of the past. It’s an impressive way to get a retro film effect straight into a digital output format. The alternative is to just shoot on film and scan it afterwards, of course! Video after the break.

Continue reading “Hackaday Prize 2022: A Spring-Driven Digital Movie Camera”

YouTube Like It’s 1970s France With This Minitel-VCR Mashup

When it’s not just sticking fake gears on things and calling it a day, the Steampunk look is pretty cool. Imagining technology in a world stuck with Victorian aesthetics is a neat idea, and one that translates to the look of other time periods — Fallout, anyone?

But what if you try to create a technological aesthetic based on a more recent and less celebrated time? That’s what [ghettobastler] has attempted with this somewhat bizarre Minitel-YouTube-VCR mash-up. Taking inspiration from a webcomic’s take on “Formicapunk,” modern tech based on the aesthetic of the wildly successful French videotex service of the 70s and 80s, the system uses a very cool Minitel 1B terminal and a Raspberry Pi 3.

A custom level-shifter for the Pi

With the help of a level-shifting circuit, the Mintel and the Pi talk over serial, allowing the terminal to be used as, well, a terminal for the Pi. Videos are downloaded from YouTube by the Pi, which sends the video to the VCR from its composite output, and controls the VCR with an IR LED that emulates the original remote. Come to think of it, just watch the video below — it’s probably easier than trying to describe it.

It’s weird, true, but we love the look of that Minitel terminal. Something about it just screams cyberdeck; if anyone has a spare one of these, get busy and put something together for our Cyberdeck Design Contest.

Continue reading “YouTube Like It’s 1970s France With This Minitel-VCR Mashup”

Machine Learning Gives Cats One More Way To Control Their Humans

For those who choose to let their cats live a more or less free-range life, there are usually two choices. One, you can adopt the role of servant and run for the door whenever the cat wants to get back inside from their latest bird-murdering jaunt. Or two, install a cat door and let them come and go as they please, sometimes with a “present” for you in their mouth. Heads you win, tails you lose.

There’s another way, though: just let the cat ask to be let back in. That’s the approach that [Tennis Smith] took with this machine-learning kitty doorbell. It’s based on a Raspberry Pi 4, which lives inside the house, and a USB microphone that’s outside the front door. The Pi uses Tensorflow Lite to classify the sounds it picks up outside, and when one of those sounds fits the model of a cat’s meow, a message is dispatched to AWS Lambda. From there a text message is sent to alert [Tennis] that the cat is ready to come back in.

There’s a ton of useful information included in the repo for this project, including step-by-step instructions for getting Amazon Web Services working on the Pi. If you’re a dog person, fear not: changing from meows to barks is as simple as tweaking a single line of code. And if you’d rather not be at the beck and call of a cat but still want to avoid the evidence of a prey event on your carpet, machine learning can help with that too.

[via Tom’s Hardware]

Multispectral Imaging System Built With Raspberry Pi

Multispectral imaging can be a useful tool, revealing all manner of secrets hidden to the human eye. [elad orbach] built a rig to perform such imaging using the humble Raspberry Pi.

The project is built inside a dark box which keeps outside light from polluting the results. A camera is mounted at the top to image specimens installed below, which the Pi uses to take photos under various lighting conditions. The build relies on a wide variety of colored LEDs for clean, accurate light output for accurate imaging purposes. The LEDs are all installed on a large aluminium heatsink, and can be turned on and off via the Raspberry Pi to capture images with various different illumination settings. A sheath is placed around the camera to ensure only light reflected from the specimen reaches the camera, cutting out bleed from the LEDs themselves.

Multispectral imaging is particularly useful when imaging botanical material. Taking photos under different lights can reveal diseases, nutrient deficiencies, and other abnormalities affecting plants. We’ve even seen it used to investigate paintings, too. Video after the break.

Continue reading “Multispectral Imaging System Built With Raspberry Pi”

Macintosh Classic II With E-Ink Display

As various antique computers age, it becomes increasingly hard to operate them as hardware begins to physically fail. Keeping these systems up and running often requires scavenging parts from other machines which are only becoming harder to find as time goes on. But if you throw out the requirement of using only era-appropriate components, there are some interesting ways to revive older devices with a few touches of modern tech, like this Mac Classic with a unique display.

The Macintosh Classic II was the successor to the first Macintosh computer Apple sold that had a price tag under $1000. As such, there were some lower specs for this machine such as the monochrome 512×342 display. This one has been retrofitted with an e-ink display which actually gives it some of the same grayscale aesthetic as the original. The e-ink display is driven by a Raspberry Pi which displays a replica System 7 environment and a set of photos.

While the only part of the computer that’s original is the shell at this point, the project’s creator [Dave] also built in support for the Apple Desktop Bus through an Arduino so the original Apple mouse and keyboard can be used. While it’s largely an illusion of a working Mac Classic, we still appreciate the aesthetic.

If you’re more of a classic Apple purist, though, take a look at this SE/30 which uses almost entirely original parts with the exception of a Raspberry Pi to allow it to communicate with the modern Internet.

Continue reading “Macintosh Classic II With E-Ink Display”