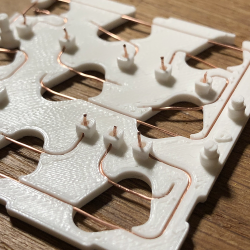
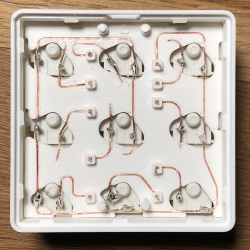
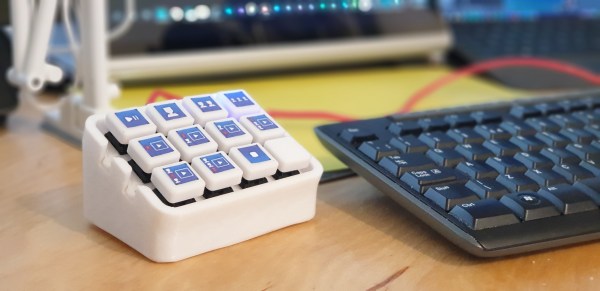
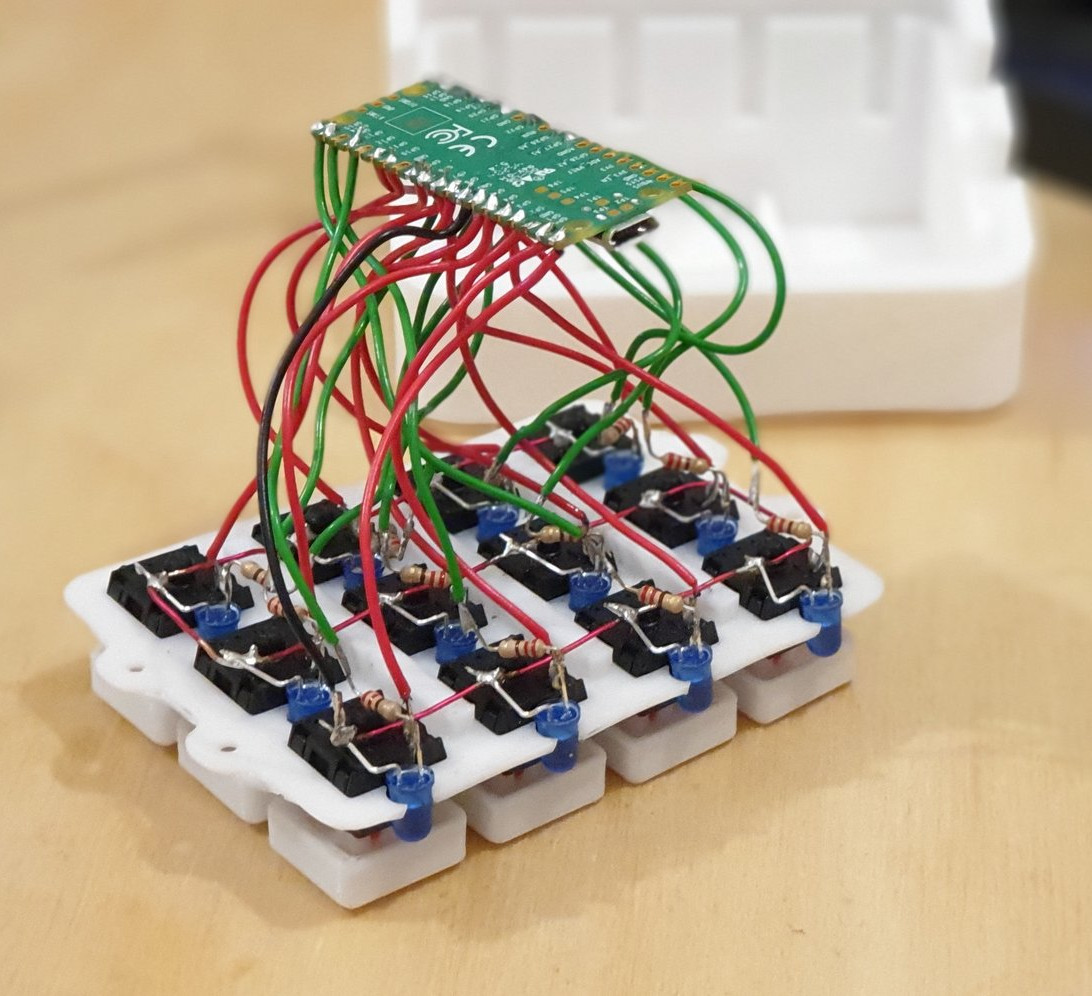
Reddit user [duzitbetter] showed off their design for a 3D-printed programmable macro keyboard that offers a different take on what can be thought of as a sort of 3D-printed PCB. The design is called the Bloko 9 and uses the Raspberry Pi PICO and some Cherry MX-style switches, which are popular in DIY keyboards.
The enclosure and keycaps are all 3D printed, and what’s interesting is the way that the enclosure both holds the components in place as well as providing a kind of wire guide for all the electrical connections. The result is such that bare copper wire can be routed and soldered between leads in a layout that closely resembles the way a PCB would be routed. The pictures say it all, so take a look.
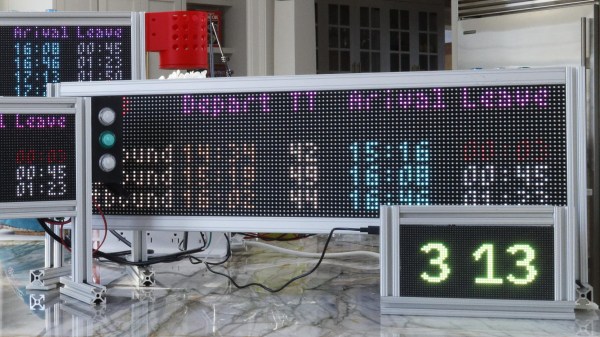
[NotLikeALeafOnTheWind] has created many LED-based display projects, and shares his method for making attractive LED panel frames and mounts. At first glance it may look as though slapping a rectangle of aluminum extrusion around a display is all it takes, there is also the mounting and management of wiring, power supply, and possibly a Raspberry Pi to deal with. The process of building an attractive frame also has a few hidden gotchas that can be avoided with a bit of careful planning.
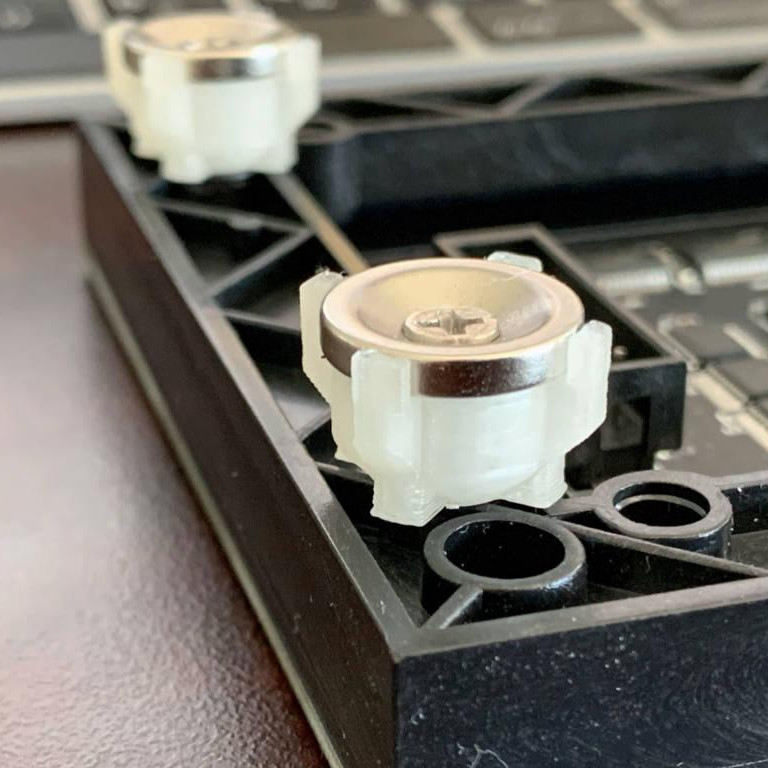
Magnetic feet on the LED panels makes mounting much easier and more flexible.
Here is one tip that will resonate with some readers: don’t rely on specified dimensions of parts; measure the actual parts yourself. There can be small differences between what a data sheet says to expect, and the dimensions of the actual part in one’s hands. It may not be much, but it can be the difference between an ideal fit, and something that looks like a bit of a hack job.
[NotLikeALeafOnTheWind] provides some basic frame layouts, and suggests using two- or three-channel extrusions to provide a flat bezel around the display edge if desired. Mounting the LED panel itself is done with magnetic feet and providing a length of steel bar to which the display can attach. This can provide a flush mount while avoiding the whole issue of screw-mounting the display panels themselves, or sliding them into channels. For mounting all the other hardware, a piece of DIN rail and some 3D-printed parts takes care of that.
The result looks slick and sturdy, and some of the tips are sure to be useful even if the whole process isn’t applied. We like the way the basic design scales and is flexible about the thickness and size of the LED panels themselves, making it a promising way to accommodate perfectly functional oddball panels that end up in the trash.
Whether it’s for work, school, fun, or profit, nearly everyone is a content-creating video producer these days. And while OBS has made it easier to run the show, commanding OBS itself takes some hotkey finesse. Fortunately, it just keeps getting easier to build macro keyboards that make presenting a breeze. That includes the newest player to the microcontroller game — the Raspberry Pi Pico, which [pete_codes] used to whip up a nice looking OBS stream deck.
Sometimes you just need something that works without a lot of fuss — you can always save the fuss for version two. [pete_codes]’ Pico Producer takes advantage of all those I/O pins on the Pico and doesn’t use a matrix, though that is subject to change in the future. [pete_codes] likes the simplicity of this design and we do, too. You can see it in action after the break.
In reply to the Twitter thread, someone mentions re-legendable keycaps instead of the current 3D-printed-with-stickers keycaps, but laments the lack of them online. All we can offer is that re-legendable Cherry MX-compatible keycaps are definitely out there. Maybe not in white, but they’re out there.
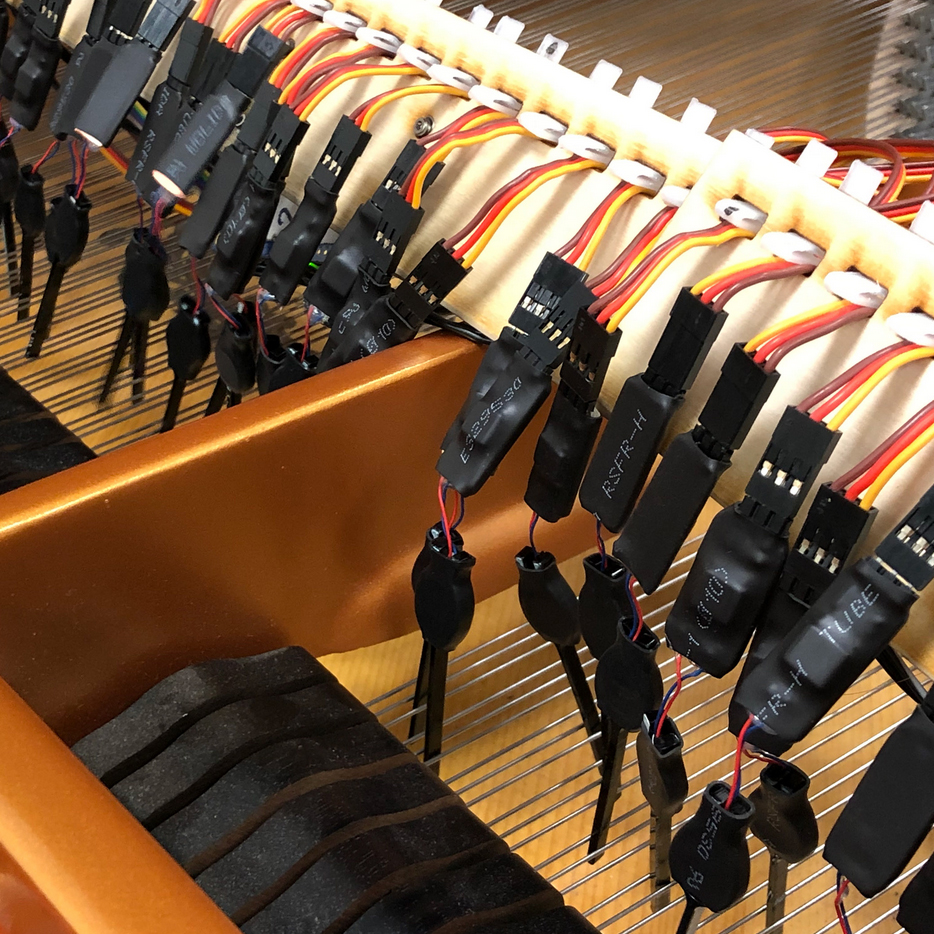
It’s not every day we see a grand piano with a Raspberry Pi inside, let alone one with 96 motors, but sometimes we get lucky. The contraption in question is one developed by [Konstantin Leonenko], as part of a collaboration with composer [Patricia Alessandrini] for a piece she created inspired by Ada Lovelace. Specifically, [Patricia] was inspired by Ada’s idea that an “analytical machine” would, someday, be able to create music on its own. [Konstantin] and [Patricia] worked together to make a machine that would learn from it’s human co-performers and create music with them.
Their creation, rather than just one tricked-out keyboard, is actually a portable attachment that can be easily fitted to any grand piano. Each of the device’s 96 motors drives a plastic “finger” that excites the piano’s strings. The result is a sound unlike any other — and you really need to experience it so click through that link at the top for the demo video.
Rather cleverly, the fingers are designed such that their dynamics help to mask the sound of the motor (a must for performances) while simultaneously enhancing the string’s timbre. Like any project, this one went through a number of iterations over the two-year design process, and even spun off into an entirely new, glove-based version.
We’ve seen some awesome music tech hacks, and this one fits right in with the rest. It’s always exciting to see an instrument as ubiquitous as the piano be used in new and refreshing ways. Be sure to check out the link at the top for a video of this incredible instrument in action!
If you’ve ever pushed the needle a bit on your Raspberry Pi, there’s a good chance you’ve been visited by the dreaded lightning bolt icon. When it pops up on the corner of the screen, it’s a warning that the input voltage is dipping into the danger zone. If you see this symbol often, the usual recommendation is to get a higher capacity power supply. But experienced Pi wranglers will know that the board can still be skittish.
Sick of seeing this icon during his MAME sessions, [Majenko] decided to attack the problem directly by taking a close look at the power supply circuitry of the Pi 4. While the official schematics for everyone’s favorite single-board computer are unfortunately incomplete, he was still able to identify a few components that struck him as a bit odd. While we wouldn’t necessarily recommend you rush out and make these same modifications to your own board, the early results are certainly promising.
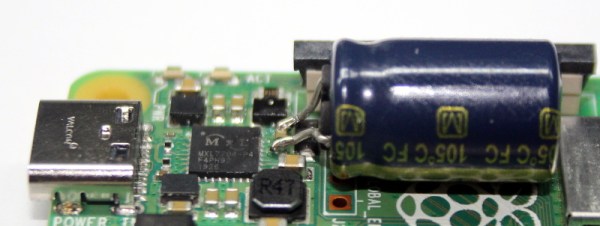
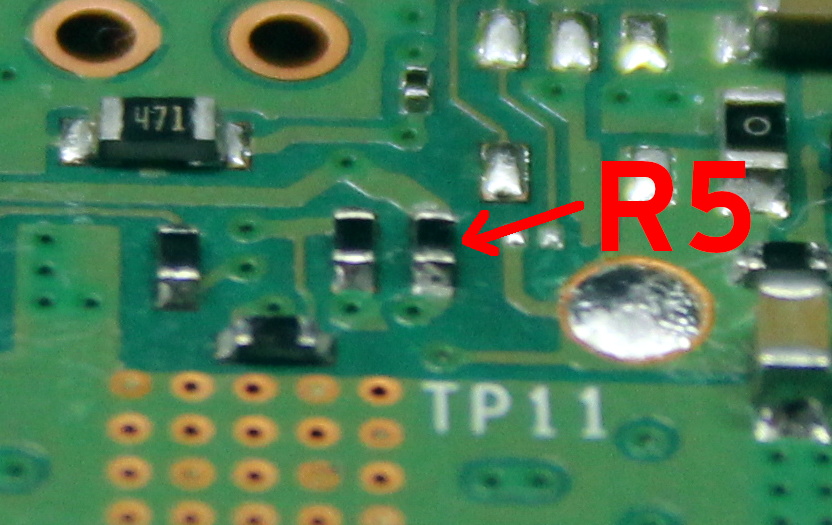
The first potential culprit [Majenko] found was a 10 ohm resistor on the 5 V line. He figured this part alone would have a greater impact on the system voltage than a dodgy USB cable would. The components aren’t labeled on the Pi’s PCB, but with a little poking of the multimeter he was able to track down the 0402 component and replace it with a tiny piece of wire. He powered up the Pi and ran a few games to test the fix, and while he definitely got fewer low-voltage warnings, there was still the occasional brownout.
Do we really need this part?
Going back to the schematic, he noticed there was a 10 uF capacitor on the same line as the resistor. What if he bumped that up a bit? The USB specifications say that’s the maximum capacitive load for a downstream device, but he reasoned that’s really only a problem for people trying to power the Pi from their computer’s USB port.
Tacking a 470 uF electrolytic capacitor to the existing SMD part might look a little funny, but after the installation, [Majenko] reports there hasn’t been a single low-voltage warning. He wonders if the addition of the larger capacitor might make removing the resistor unnecessary, but since he doesn’t want to mess with a good thing, that determination will be left as an exercise for the reader.
The Z80 was a big deal in the 1970s and 1980s, and while its no longer a dominant architecture today, its legacy lives on. [James Andrew Fitzjohn] is a fan of the Z, and decided to interface the real silicon with the Raspberry Pi, by and large for the fun of it!
The Z80’s address and data lines, as well as the clock, are hooked up to the Raspberry Pi through several MCP23017 GPIO expanders. The Pi’s GPIO lines aren’t known for their speed, of course, and using expanders through I2C isn’t exactly quick either. However, speed isn’t necessary, as the clock only goes as fast as the Raspberry Pi desires, since it’s controlling the clock along with everything else. There’s also an LCD for viewing the Z80s status, along with some era-appropriate blinkenlights.
This setup allows the Pi to run code directly on the Z80 itself, while managing the CPU’s RAM in its own memory, all through a Python script. It’s a fun hack that lets you run retro code on retro silicon without using an emulator. Techniques like these are useful for finding undocumented or edge case performance of a processor. If this hack isn’t enough Zilog for your liking, consider throwing one in your pocket as well!
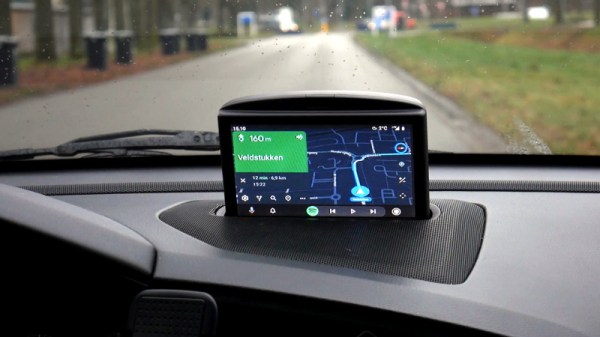
As [Luuk Esselbrugge] explains in a recent blog post, his 2002 Volvo S60 had an optional GPS navigation system and backup camera that used a motorized display that would rise out of the dashboard when needed. His particular car didn’t come with the hardware installed, but after getting his hands on a display module and doing some research, he figured out how he could drive it with the Raspberry Pi and a couple of microcontrollers.
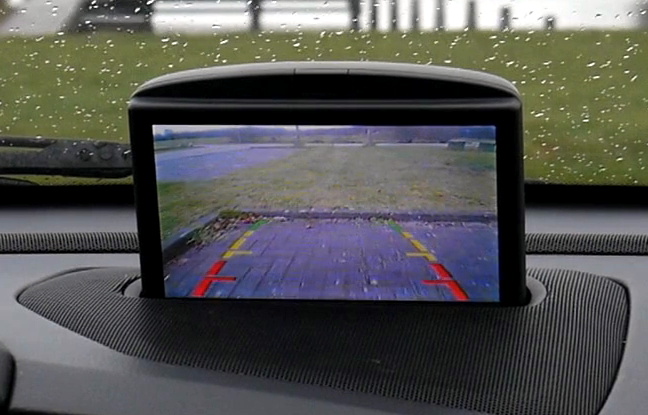
Given the age of the display, you probably won’t be surprised to hear that it uses composite video. Not exactly high resolution, but in the demonstration after the break, we have to admit it looks more than up to the task. [Luuk] is running Android Auto on the Raspberry Pi 3 through the openauto project, which gives him a nice big display and access to all the navigation and media applications you’d expect. The display doesn’t support touch, but thanks to an ESP32 plugged into the CAN bus, he’s able to control the software by reading the buttons built into the Volvo’s steering wheel.
Composite video sources are switched with a simple relay.
To actually raise and lower the display, [Luuk] found you just need to fire a few bytes down the 1,200 baud serial bus that’s built into the display’s wiring harness. The ESP32 handles this duty as well, at least partly because it’s already plugged into the CAN bus and can tell when the vehicle is in reverse. This lets it bring up the screen to show the video feed from the newly installed backup camera in the event that the Pi hadn’t already asked to raise the display. Incidentally plugging in the phone normally triggers the system to wake up and raise the screen, and disconnecting it will command the screen to lower back into the stowed position.
The attentive reader or Volvo aficionado may be wondering how [Luuk] got the audio working. Since his car’s sound system doesn’t feature an auxiliary input, he’s using an Arduino to spoof the existence of a CD changer, which allows him to inject an audio signal into one of the pins on the back of the radio. Eventually he wants to move this task over to the ESP32, but he says a big change like that will have to wait until warmer weather.
This isn’t the first time we’ve seen the Raspberry Pi used to add enhanced features to a somewhat older vehicle. While some bemoan the increased complexity of modern vehicles, it seems some hackers can’t get enough of it.