Queue Up Your Tracks With A Well Placed Hexagon

Besides a few stalwart holdouts, most of us have have switched over listening to music in digital form, often via an online stream. As long as no data caps stand in your way, it’s a quick and easy way to listen to your favorite artists or discover new ones. But there’s something visceral about act of loading a piece of physical media into a player that can’t be replicated by just clicking or tapping on a screen.

Which is why [InfiniteVideo] put together this RFID playlist launcher peripheral. There’s an important distinction to be made here, as this device isn’t actually playing or even storing audio. A nearby Raspberry running Volumio handles the actual playback. This device is just an RFID reader with some clever tokens that the listener can use to select their favorite artists and albums with physical tokens. It’s certainly not a new concept, but we think the nuances of this particular build warrant a closer look.

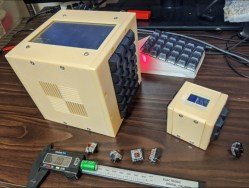
The “player” consists of a ESP8266 with a MFRC522 RFID reader wired directly to the GPIO pins. The pair are housed in a rather large 3D printed enclosure, which at first might seem a bit excessive. But it turns out that [InfiniteVideo] is actually trying to replicate a crowd sourced project called Qleek which is based around a similarly chunky reader.

Likewise, the hexagon tiles are also lifted from the Qleek concept. But rather than being made out of wood as in the original, [InfiniteVideo] is printing those as well. Halfway during the process, the print is paused and an RFID sticker is placed in the middle of the hexagon. Once resumed, the RFID tag becomes permanently embedded in the tile with no visible seams to reveal how the trick was pulled off. With the addition of a suitable label, each printed hexagon gets associated with the desired album or artist in software.

This project is notable for its convenience and visual flair, but using RFID tags for media identification can also be a practical choice. It can be used as an assistive technology, or as a way for young children to easily interact with devices.

Coffee Maker Gives Plants An Automatic Drip

Somehow, [Jeremy S   Cook]’s wife was able to keep a Keurig machine going for 10 years before it quit slinging caffeine. [Jeremy] got it going again, but decided to buy a new one when he saw how it was inside from a decade of water deposits.

But why throw the machine out like spent coffee grinds? Since the pump is still good, he decided to turn it into an automatic plant watering machine. Now the Keurig pumps water using a Raspberry Pi Zero W and a transistor. [Jeremy] can set up watering cron jobs with PuTTY, or push water on demand during dry spells. We love that he wired up a soil moisture sensor to the red/blue LEDs around the brew button — red means the plant is thirsty, purple means water is flowing, and no light means the plant is quenched and happy.

This project is wide open, but cracking into the Keurig is up to you. Fortunately, that part of the build made it into the video, which is firmly planted after the break.

Old coffee makers really do seem suited to taking up plant care in retirement. Here’s a smart garden made from an espresso machine.

Continue reading “Coffee Maker Gives Plants An Automatic Drip”

Rock Out With Toilet Paper Rolls

Singing in the shower is such a common phenomenon, rarely anyone ever bats an eye about it. Singing in the toilet on the other hand is probably going to raise an eyebrow or two, and it’s not for nothing that the Germans euphemistically call it “stilles Örtchen”, i.e. the little silent place. But who are we to judge what you do in the privacy of your home? So if you ever felt a lack of instrumental accompaniment, or forgot to bring your guitar, [Max Björverud] has just the perfect installation for you. (Video, embedded below.)

Inspired by the way bicycle computers determine your speed, [Max] took a set of toilet paper holders, extended each roll holding part with a 3D-printed attachment housing a magnet, and installed a Hall-effect sensor to determine the rolling activity. The rolls’ sensor data is then collected with an Arduino Mega and passed on to a Raspberry Pi Zero running Pure Data, creating the actual sounds. The sensor setup is briefly shown in another video.

Before you grab your pitchforks, [Max] started this project a little while back already, long before toilet paper became an object of abysmal desire. Being an artist in the field of interactive media, this also isn’t his first project of this kind, and you can find some more of his work on his website. So why of all things did we pick this one? Well, what can we say, we definitely have a weakness for strange and unusual musical instruments. And maybe there’s potential for some collaboration here?
Continue reading “Rock Out With Toilet Paper Rolls”

Automatic Timelapses, Made Educational And Easy

Timelapse fragment from an infrared sky camera watching cloud patterns.

There are plenty of ways to create timelapse videos, but [Andy] has an efficient method for ensuring up-to-date ones exist for his infrared sky camera, and he has it running thanks to some well-documented shell scripts on a spare Raspberry Pi. The resulting timelapse video is always available from the web, and always up-to-date for the current day.

The idea is to automatically fetch images from a remote source (in his case, an infrared sky camera) and turn them into a cumulative video that is regularly updated for the day in question. The resulting video file is either served from the same machine, or sent elsewhere. All that’s needed besides a source for the stills are two shell scripts and some common Linux utilities.

Since [Andy] is mainly interested in tracking clouds his system only runs during daylight hours, but it can be easily changed. In fact, [Andy]’s two shell scripts are great project resources, not only because they are easily modified and well documented, but because he doesn’t make assumptions about how well one might know the command line. He also provides tips from experience; for example he has found that a 120 second interval makes for the best timelapses.

[Andy] runs his scripts on an Raspberry Pi 4, but any Linux system will do. For those who might prefer a more embedded approach, the ESP32-CAM can make a great time lapse camera with remarkably little effort.

Quarantine Clock Focuses On The Essential

In these dire times of self quarantining, social distancing, and life as know it coming to a halt, time itself can become rather blurry, and even word clocks may seem unnecessarily precise — especially if you happen to have a more peculiar circadian rhythm. And let’s face it, chances are your usual schedule has become somwehat irrelevant by now, so why bother yourself with dates or an exact time anyway? If you can relate to this, then [mwfisher3] has the perfect clock for you, displaying only the day of the week and a rough estimate of how far that day has progressed.

Using a Raspberry Pi and a spare touch screen, [mwfisher3] had an easy game to begin with, so the clock itself is just Chrome running in Kiosk mode, displaying a local web site with the hours of the day mapped to an array of their textual representation. A few lines of JavaScript are then updating the web site content with the current day and “time”, and a Python script is handling the screen’s back light based on the readings from a Philips Hue motion sensor, using the phue library.

While this is definitely one of the simpler clock projects we’ve seen, this simplicity offers actually a great introduction to some easy JavaScript-based web displays on a Raspberry Pi without much fuzz and distraction. But if that’s not your thing, and you like things more mechanical, we’ve recently covered this day clock that follows the same idea, and then there’s also this light box for an artistic approach of getting a rough estimate of the time.

Warm Up To Cooking With A Recipe-Randomizing Toaster

Did you get a thermal printer when they were hot stuff, but then your interest cooled when you couldn’t decide what to do with it? Something similar happened to [Sunyecz22], and the poor printer sat unused until that magical day when the perfect use for it popped up — a random recipe receiver in the form of a toaster.

[Sunyecz22] was tired of searching for recipes every week before going to the grocery store. Between the millions of recipe options on the internet and the 1000-word essays that precede them all, the process was like a part-time job. Now all they have to do is push the little lever down and wait for a recipe to get toasted into some thermal paper. It doesn’t print the full recipe, only the essentials, and we love that. You get the name, the prep time, a rating, and a QR code that links to the recipe page.

This toaster runs on a Raspberry Pi Zero W that fetches recipes using the Spoonacular API and sends the deets to the printer. The lever makes use of some old pen springs to activate a limit switch and start the recipe-getting process. We think it would be extra cool if it stayed down until the recipe popped up. Butter your way past the break to see a short demo video.

We must say, this toaster is way more helpful than the talkie toaster from Red Dwarf.

Continue reading “Warm Up To Cooking With A Recipe-Randomizing Toaster”

Handheld 3D Scanning, Using Raspberry Pi 4 And Intel RealSense Camera

Raspberry Pi 4 (with USB 3.0) and Intel RealSense D415 depth sensing camera.

When the Raspberry Pi 4 came out, [Frank Zhao] saw the potential to make a realtime 3D scanner that was completely handheld and self-contained. The device has an Intel RealSense D415 depth-sensing camera as the main sensor, which uses two IR cameras and an RGB camera along with the Raspberry Pi 4. The Pi uses a piece of software called RTAB-Map — intended for robotic applications — to take care of using the data from the camera to map the environment in 3D and localize itself within that 3D space. Everything gets recorded in realtime.

This handheld device can act as a 3D scanner because the data gathered by RTAB-Map consists of a point cloud of an area as well as depth information. When combined with the origin of the sensing unit (i.e. the location of the camera within that area) it can export a point cloud into a mesh and even apply a texture derived from the camera footage. An example is shown below the break.
Continue reading “Handheld 3D Scanning, Using Raspberry Pi 4 And Intel RealSense Camera”