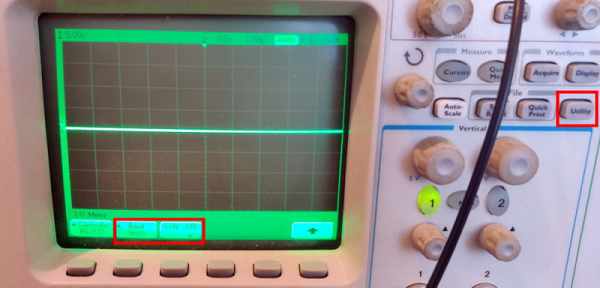
Behold The WT-220: A ‘Clever’ VT-220 Terminal

[John Whittington] failed to win a bid for an old VT-220 serial terminal on eBay, so he decided to make his own version and improve it along the way. The result is the Whitterm-220 (or WT-220) which has at its core a Raspberry Pi and is therefore capable of more than just acting as a ‘dumb’ serial terminal.

Rear of the WT-220 with paint-filled laser engraving and all necessary connectors.

The enclosure is made from stacked panels of laser-cut plywood with an acrylic plate on the back for labels and connectors, where [John] worked paint into the label engravings before peeling off the acrylic’s protective film. By applying paint after laser-engraving but before peeling off the film, it acts as a fill and really makes the text pop.

Near the front, one layer of clear acrylic among the plywood layers acts as a light guide and serves as a power indicator, also doing double duty as TX/RX activity lights. When power is on, that layer glows, serving as an attractive indicator that doesn’t interfere with looking at the screen. When data is sent or received, a simple buffer circuit tied to the serial lines lights up LEDs to show TX or RX activity, with the ability to enable or disable this functionality by toggling a GPIO pin. A video overview is embedded below, where you can see the unit in action.

Continue reading “Behold The WT-220: A ‘Clever’ VT-220 Terminal”

Easy Portable Serial Ports

Modern operating systems insulate us — as programmers, especially — from so much work. Depending on how far back you go, programmers had to manage their own fonts, their own allocation space on mass storage, or even their own memory allotments. Every year, though, it seems like things get easier and easier. So why is it so annoying to open a simple serial port? It isn’t hard, of course, but on every operating system it seems to be painful — probably in an attempt to be flexible. And it is even worse if you want portability. I needed to write some C code that read data from an FPGA’s embedded logic analyzer, and I was annoyed at having to write yet more serial port code. I have my own shim library, but it isn’t well tested and isn’t all that flexible — it does what I need, but I wanted something better. What I wound up with the serial library from Sigrok. You know Sigrok? The logic analyzer software.

 You might counter that the serial port is old hat, so no one wants to support it with modern systems. While the physical serial port might be on life support, there’s no shortage of equipment that connects via USB that appears to be a serial port. So while I was talking to an FTDI chip on an FPGA board, you could just as well be talking to an Arduino or a USB voltmeter or anything.

I guess the Sigrok developers had the same problem I did and they took the time to write a nice API and port it to major platforms. Although Sigrok uses it, they maintain it as a separate project and it was just what I needed. Sort of. I say sort of because the version installed with Ubuntu was old and I needed some features on the newest release, but — as usual — the Internet came to the rescue. A quick Git command, and four lines of build instructions and we were ready to go.

Continue reading “Easy Portable Serial Ports”

New Life For An Obscure Apple Plotter

We’ve all at some point or other seen something done online by somebody else, and thought “I’d like to have a go at that!”. When [Phooky] saw the artwork on the #PlotterTwitter hashtag, he remembered a past donation of a plotter to the NYC Resistor hackerspace. Some searching through the loft revealed a dusty cardboard box containing not the lovely Hewlett-Packard he’d hoped for, but instead an Apple 410 Color Plotter. This proved to be such an obscure part of the legacy Apple product line that almost no information was available for it save for a few diagrams showing DIP switch settings for the serial port.

Undeterred, he took a look inside and found a straightforward enough control board featuring a Z80 processor and support chips with 1983 date codes. The ROMs were conveniently socketed, so after dumping their contents, he was able to identify the routine for the plotter’s test program, and thus work from there to deduce its command set.  A small matter of the plotter using hardware handshaking lines to signal a full buffer later, and he was able to use it to produce beautiful plots. Should you be one of the lucky few remaining Apple 410 owners, you may find his software library for it to be of some use.

If you’d like to see some more aged plotter action on these pages, we’ve had an analog Hewlett Packard here in the past, as well as a vintage drum plotter.

Thanks [Sophi] for the tip.

A Converter You Won’t Have: PS/2 Mouse To Serial Mouse

When did you last buy a mouse? Did it have a little adapter in the box? There was a time when if you bought a USB mouse, in the box was also an adapter to allow it to be used with the older PS/2 interface. And if you were to go back a few more years into the past, you’d have found when you bought a mouse with a PS/2 connector fitted, it may well have come with an adapter for a 9-pin RS232 serial port. Those mice from a decade or more ago would have contained the software to recognise the interface into which they were plugged, and emulate it accordingly. It is unlikely then that you could take a modern USB-only device and an unholy chain of USB-to-PS/2-to-serial adapters, and have it work as a serial mouse. Want to run Windows 3.1 on a 386DX? You need a serial mouse.

Happily, [matze525] has come along with a solution for those of you with a need to drive an ancient PC with a serial mouse. He’s created a PS/2 to RS232 mouse converter, and it takes the form of a little PCB with an AT90S2313P microcontroller to do the translation and an RS232 level converter chip.

It might sound like a rather unexpected device to produce, but we can see it fills an important niche. In the early 1990s mice were not the reliable optical devices we have today, instead they had nasty mechanical connections inside, or if you were extremely lucky, optical encoder wheels. The supply of still-reliable RS232 mice must therefore be dwindling, and if you have a Windows 3.1 PC to keep alive then we can see the ability to use a more modern pointing device has a lot going for it.

If you have one of those machines from that era that came with proprietary interfaces, maybe you can make use of a USB to quadrature converter.

Hacking A KVM: Teach A Keyboard Switch To Spy

When it comes to large systems, there are a lot more computers than there are people maintaining them. That’s not a big deal since you can simply use a KVM to connect one Keyboard/Video/Mouse terminal up to all of them, switching between each box simply and seamlessly. The side effect is that now the KVM has just as much access to all of those systems as the human who caresses the keyboard. [Yaniv Balmas] and [Lior Oppenheim] spent some time reverse engineering the firmware for one of these devices and demonstrated how shady firmware can pwn these systems, even when some of the systems themselves are air-gapped from the Internet. This was their first DEF CON talk and they did a great job of explaining what it took to hack these devices.

Continue reading “Hacking A KVM: Teach A Keyboard Switch To Spy”

Remote Tester

A Simple Circuit For Testing Infrared Remote Controls

Every now and then a remote control acts up. Maybe you are trying to change the channel on your television and it’s just not working. A quick way to determine if the remote control is still working is by using a cell phone camera to try to see if the IR LED is still lighting up. That can work sometimes but not always. [Rui] had this problem and he decided to build his own circuit to make it easier to tell if a remote control was having problems.

The circuit uses a Vishay V34836 infrared receiver to pick up the invisible signals that are sent from a remote control. A Microchip 12F683 processes the data and has two main output modes. If the remote control is receiving data continuously, then a green LED lights up to indicate that the remote is functioning properly. If some data is received but not in a continuous stream, then a yellow LED lights up instead. This indicates that the batteries on the remote need to be replaced.

The circuit also includes a red LED as a power indicator as well as RS232 output of the actual received data. The PCB was cut using a milling machine. It’s glued to the top of a dual AAA battery holder, which provides plenty of current to run the circuit.

Bit Banging Through A USB Parallel Port Adapter

If you’ve ever looked into low-level parallel port access you may have learned that it only works with actual parallel port hardware, and not with USB parallel port adapters. But here’s a solution that will change your thinking. It borrows from the way printers communicate to allow USB to parallel port bit banging without a microcontroller (dead link, try Internet Archive).

Sure, adding a microcontroller would make this dead simple. All you need to do is program the chip to emulate the printer’s end of the communications scheme. But that’s not the approach taken here. Instead the USB to RS232 (serial) converter also pictured above is used as a reset signal. The strobe pin on the parallel port drives an inverter which triggers a thyristor connected to the busy pin. Thyristors are bistable switches so this solution alone will never clear the busy pin. That’s where the serial connection comes into play. By alternating the data transmitted from the computer between the bit-bang values sent to LP0 and 0xF0 sent to the serial connector the eight parallel data bits become fully addressable. See the project in action in the clip after the break.