Linear Clock Slows The Fugit Of The Tempus

We feature a lot of clocks here on Hackaday, and lately most of them seem to be Nixie clocks. Not that there’s anything wrong with that, but every once in a while it’s nice to see something different. And this electromechanical rack and pinion clock is certainly different.

[JON-A-TRON] calls his clock a “perpetual clock,” perhaps in a nod to perpetual calendars. But in our opinion, all clocks are perpetual, so we’ll stick with “linear clock.” Whatever you call it, it’s pretty neat. The hour and minute indicators are laser cut and engraved plywood, each riding on a rack and pinion. Two steppers advance each rack incrementally, so the resolution of the clock is five minutes. [JON-A-TRON] hints that this was a design decision, in part to slow the perceived pace of time, an idea we can get behind. But as a practical matter, it greatly simplified the gear train; it would have taken a horologist like [Chris] at ClickSpring to figure out how to gear this with only one prime mover.

In the end, we really like the look of this clock, and the selection of materials adds to the aesthetic. And if you’re going to do a Nixie clock build, do us a favor and at least make it levitate.

Continue reading “Linear Clock Slows The Fugit Of The Tempus”

Power Sipping Master Keeps Slave Clock On Time

Few things are as infuriating as clocks that are not synchronized. It’s frustrating when the clock on the range and the clock on the microwave act like they’re in time zones that are one minute apart. Now picture that same issue over dozens of clocks in a train station, or hundreds in a school or factory. It’s no wonder that slave clocks, which advance on signals from a master clock, were developed.

When a pair of vintage Lepaute slave clocks made their way to [melka], he knew just what to do – build his own master clock to keep the slave on track. This particularly stylish slave clock uses pulses of alternating polarity every 30 seconds and will work on 1.5-volt pulses, which let [melka] meet his design goal of running for a year off a single AA battery. To keep the power needs low, [melka] relies on the RTC to wake up the MSP430 every second to increment a counter. When it hits 30, a pulse is sent to the clock’s motor through an H-bridge; the MCU alternates the polarity of every other pulse to advance the clock.

It’s not immediately clear how the clock is set; we recall the slave clocks in high school rapidly advancing for Daylight Saving adjustments, so we assume [melka] has provided some way of pulsing the clock quickly to set the time. Regardless, it’s a good lesson in low-power design. And be sure to check out this PIC-based master clock replacement, too.

Beautiful Linear RGB Clock

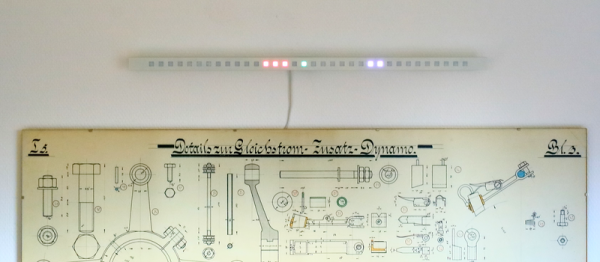
Yup, another clock project. But here, [Jan] builds something that would be more at home in a modern art museum than in the dark recesses of a hacker cave. It’s not hard to read the time at all, it’s accurate, and it’s beautiful. It’s a linear RGB LED wall clock.

7512951486134540347You won’t have to learn the resistor color codes or bizarre binary encodings to tell what time it is. There are no glitzy graphics here, or modified classic timepieces. This project is minimal, clean, and elegant. Twelve LEDs display the hours, six and nine LEDs take care of the minutes in add-em-up-coded decimal. (It’s 3:12 in the banner image.)

The technical details are straightforward: WS2812 LEDs, an Arduino, three buttons, and a RTC. You could figure that out by yourself. But go look through the log about building the nice diffusing plexi and a very clean wall-mounting solution. It’s the details that separate this build from what’s hanging on our office wall. Nice job, [Jan].

Keep An Old Real Time Clock Module Ticking

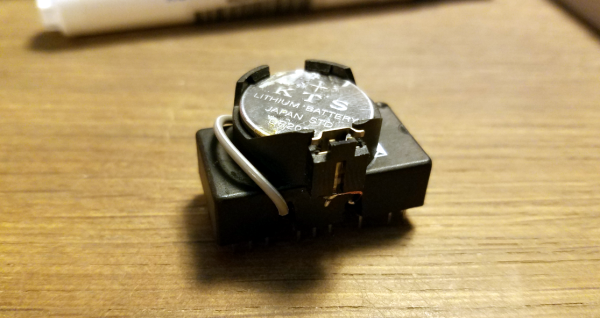
Sometimes we run into real problems restoring old machines. [RedruM69] recently ran into a system with a dead Real Time Clock (RTC) module. These modules were used on computers and all sorts of other equipment, storing time, date, and 100 or so bytes of battery backed SRAM (before the days of cheap, plentiful flash memory). Often an external coin cell would supply power to the module. In some cases though, cost savings would take over, and the battery would be incorporated into the module. Such is the case with many Dallas Semiconductor models, and the benchmarq bq3287 module [RedruM69] was working with. If we’re reading the date code right, the module was produced in mid 1995 so we’re well past the advertised 10 year battery life.

Apparently Texas Instruments is the current owner of this design, and they even have a datasheet online. (PDF link). It turns out that the bq3287 is a descendant of the bq3285, except that the battery pin is internally disconnected. For most people this would mean a search for a compatible replacement. An industrious hacker might even whip up something compatible from modern components. Not [RedruM69] though. He broke out his Dremel tool and cut into the potted case. Exposing the internal connections above pins 16 and 20 allowed him to solder two wires on. Connecting these wires to an external coin cell brought the module back to life.

[RedruM69] isn’t the first one to perform this hack. Sun computers kept their MAC address in chips like this. When the battery went dead, the computer was off the network. Hackers have been cutting the modules open and adding batteries for years. You could always forgo RTC modules completely and use the power grid as your timebase.

DIY Smartwatch Based On ESP8266 Needs Classification

Building your own smartwatch is a fun challenge for the DIY hobbyist. You need to downsize your electronics, work with SMD components, etch your own PCBs and eventually squeeze it all into a cool enclosure. [Igor] has built his own ESP8266-based smartwatch, and even though he calls it a wrist display – we think the result totally sells as a smartwatch.

His design is based on a PCB for a wireless display notifier he designed earlier this year. The design uses the ESP-12E module and features an OLED display, LEDs, tactile switches and an FT232R USB/UART interface. Our beloved TP4056 charging regulator takes care of the Lithium-ion cell and a voltage divider lets the ESP8266’s ADC read back the battery voltage. [Igor] makes his own PCBs using the toner transfer method, and he’s getting impressive results from his hacked laminator.

Together with a hand-made plastic front, everything fits perfectly into the rubber enclosure from a Jelly Watch. A few bits of Lua later, the watch happily connects to a WiFi network and displays its IP configuration. Why wouldn’t this be a watch? Well, it lacks the mandatory RTC, although that’s easy to make up for by polling an NTP time server once in a while. How would our readers classify this well-done DIY build? Let us know in the comments!

Wake Up With A NeoPixel Sunrise Alarm Clock

Like many of us, [Lee] wakes up every morning grumpy and tired. Once he decided to try to do something about it, he settled on making a sunrise alarm clock using NeoPixels. Over the course of thirty minutes the clock illuminates 60 NeoPixels one by one in blue mode to simulate a sunrise.

The clock has three modes: 30-minute sunrise, analog time display, and a seconds counter that uses the full RGB range of the LEDs to light up one for each passing second. It runs on an Arduino Pro Mini knockoff and an RTC module for the sake of simplicity. [Lee] chained NeoPixel strips together in five rows of eight, which allowed him to use a 3×5 font to display the time. The only other electronics are passives to protect the LEDs.

NeoPixels are great, but powering them becomes an issue pretty quickly. [Lee] did the math and figured that he would need 3.4 A to drive everything. He found a 3-outlet USB power adapter that delivers 3.4 A total while shopping at IKEA for an enclosure. [Lee] took his first Instructable from beginner to intermediate level by cracking the adapter open and using two of the USB ports wired in parallel to provide 5 V at 3.4 A. [Lee] has the code available along with detailed instructions for replicating this build. Be sure to check out the demo after the break.

We love a good clock build around here, especially when they involve Blinkenlights. For those less interested in building an alarm clock, here’s a word clock that pulls time and weather data with an ESP8266.

Continue reading “Wake Up With A NeoPixel Sunrise Alarm Clock”

Current Meter Shows Current Time

This isn’t the first of its type, but [Daniel]’s MSP430 based Analog Gauge Clock certainly ticks off the “hack” quotient. He admits an earlier Voltmeter Clock we featured a while back inspired him to build his version.

[Daniel] was taking an Embedded systems class, and needed to build an MSP430G2553 microcontroller based final project. Which is why he decided to implement the real time clock using the micro-controller itself, instead of using an external RTC module. This also simplified the hardware used – the microcontroller, a crystal, three analog ammeters, and a few passives were all that he needed. Other than the Ammeters, everything else came from his parts bin. Fresh face plates were put on the ammeters, and the circuit was assembled on a piece of strip board. A piece of bent steel plate served as the housing.

The interesting part is the software. He wrote all of it in bare C, without resorting to using the Energia IDE. He walks through all of the important parts of his code on his blog post. Setting load capacitance for the timing crystal was important, so he experimented with an oscilloscope to see which value worked best. And TI’s Application Note on MSP430 32-kHz Crystal Oscillators (PDF) proved to be a useful resource. Three PWM output’s run the three ammeters which indicate hours, minutes and seconds. Push-button switches let him set the clock. See a short demo of the clock in the video below.

Continue reading “Current Meter Shows Current Time”