Using A Smartphone As A Touchscreen For Arduino

If you want a good display and interface device for an embedded project, it’s hard to look past an old smartphone. After all, you’ve got an excellent quality screen and capacitive touch interface all in the same package! [Doctor Volt] explains how to easily set up your old smartphone to work as a touchscreen for your Arduino.

[Doctor Volt] demonstrates the idea with a 2018 Samsung Galaxy A8, though a wide variety of Android phones can be put to use in this way. The phone is connected to the Arduino via a USB-to-serial converter and an OTG cable. Using a USB-C phone with Power Delivery is ideal here, as it allows the phone to be powered while also communicating with the Arduino over USB.

The RemoteXY app is built specifically for this purpose. It can be installed on an Android phone to allow it to communicate effectively with Arduino devices, which run the RemoteXY library in turn. Configuring the app is relatively straightforward, with a point-and-click wizard helping you designate what hardware you’re using and how you’ve got it hooked up. [Doctor Volt] does a great job of explaining how to hook everything up, and how to build some simple graphical interfaces.

There are a ton of display and interface options in the embedded space these days, many of which can be had cheaply off the shelf. Still, few compete with the resolution and quality of even older smartphones. It’s a neat project that could come in very handy for your next embedded build! Video after the break.

Continue reading “Using A Smartphone As A Touchscreen For Arduino”

How To Find Replacement Parts When Model Numbers Don’t Match

[Sharad Shankar] repaired a broken TV by swapping out the cracked and malfunctioning image panel for a new one. Now, part-swapping is a great way to repair highly integrated modern electronics like televisions, but the real value here is something else. He documented his fix but the real useful part is his observations and guidance on how to effectively look for donor devices when the actual model of donor device can’t be found.

The usual approach to fixing a device by part swapping is to get one’s hands on two exact same models that are broken in different ways. But when it comes to consumer electronics with high turnovers — like televisions — it can be very difficult to actually locate any particular model once it’s no longer on shelves. [Sharad Shankar]’s broken TV was a 65″ TCL R646 purchased in 2021, and searching for a second 65″ TCL R646 was frankly like looking for a needle in a haystack. That’s when he got a visit from the good ideas fairy. Continue reading “How To Find Replacement Parts When Model Numbers Don’t Match”

ESP32 Oscilloscope Skips Screen For The Browser

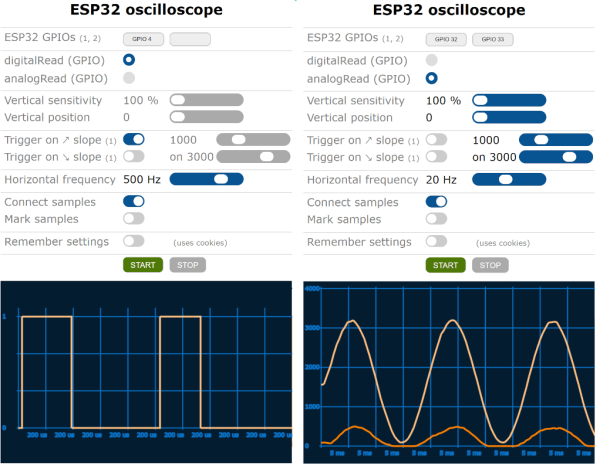
An oscilloscope can be an expensive piece of equipment, but not every measurement needs four channels and gigahertz sampling rates. For plenty of home labs, old oscilloscopes with CRTs can be found on the used marketplace for a song that are still more than capable of getting the job done, but even these can be overpowered (not to mention extremely bulky). If you’re looking for something even cheaper, and quite a bit smaller, this ESP32 scope from [BojanJurca] might fit the bill.

The resulting device manages to keep costs extremely low, but not without a trade-off. For this piece of test equipment, sampling is done over the I2C bus on the ESP32, which can manage a little over 700 samples per second with support for two channels. With the ESP32 connected to a wireless network, the data it captures can be viewed from a browser in lieu of an attached screen, which also keeps the size of the device exceptionally small. While it’s not a speed demon, that’s more than fast enough to capture waveforms from plenty of devices or our own circuit prototypes in a form factor that can fit even the smallest spaces.

Of course for work on devices with faster switching times, it’s always good to keep a benchtop oscilloscope around. But as far as we can tell this one is the least expensive, smallest, and most capable we’ve come across that would work for plenty of troubleshooting or testing scenarios in a pinch. We’ve seen others based on slightly more powerful microcontrollers like this one based on the STM32 and this other built around the Wio Terminal with a SAMD51, both of which also include built-in screens.

Why Game Boy IPS Screens Flicker

The Nintendo Game Boy was a very popular handheld in its time, but its display technology has not aged gracefully. Ripping out the original screen and dropping in a modern IPS LCD is a popular mod, but that often comes with a weird flicker now and then. [makho] is here to explain why.

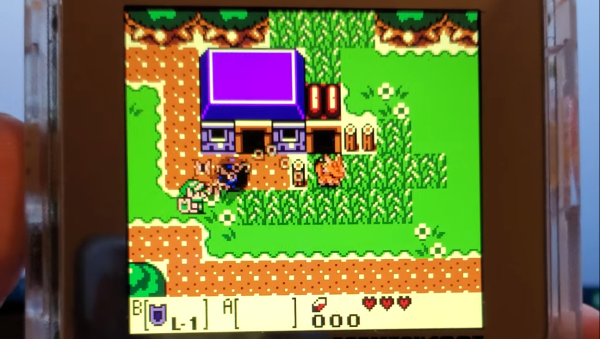
The problem was that the Game Boy didn’t have any way to do transparency in the original hardware. Instead, sprites that were supposed to be a little bit transparent were instead flickered on and off rapidly. The original LCD was so slow that this flicker would be largely hidden, with the sprites in question looking suitably transparent. However, switch to a modern IPS LCD with its faster refresh rate, and the flickering will be readily visible. So it’s not a bug — it’s something that was intentionally done by developers that were designing for the screen technology of the 1980s, not the 2020s.

IPS screens have become the must-have upgrade for modern Game Boy users. Most would tell you the improved image quality and rich color is worth a little flicker here and there.

Continue reading “Why Game Boy IPS Screens Flicker”

Ultimate Game And Watch Has Support For NES

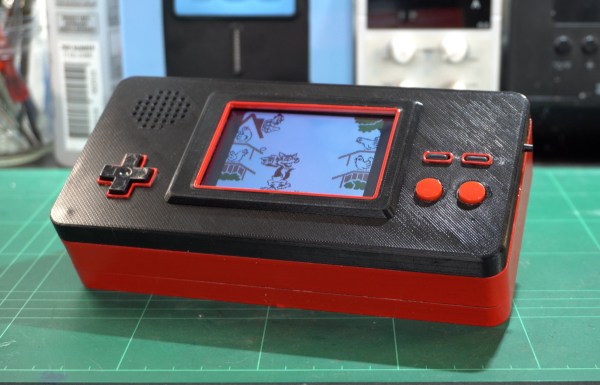
We’ve talked about feature creep plenty of times around here, and it’s generally regarded as something to be avoided when designing a prototype. It might sound good to have a lot of features in a build, but this often results in more complexity and more difficulty when actually bringing a project to fruition. [Brendan] has had the opposite experience with this custom handheld originally designed for Game and Watch games, though, and he eventually added NES and Game Boy functionality as well.

As this build was originally intended just for Game and Watch games, the screen is about the size of these old games, and while it can easily mimic the monochrome LCD-style video that would have been present on these 80s handhelds, it also has support for color which means that it’s the perfect candidate for emulating other consoles as well. It’s based around a Raspberry Pi Zero 2W and the enclosure is custom printed and painted. Some workarounds for audio had to be figured out, though, since native analog output isn’t supported, but it still has almost every feature for all of these systems.

While we’ve seen plenty of custom portable builds from everything from retro consoles to more modern ones, the Game and Watch catalog is often overlooked. There are a few out there, but in this case we appreciate the feature creep that allowed this build to support Game Boy and NES games as well.

Play DOOM On Seven-Segment Displays

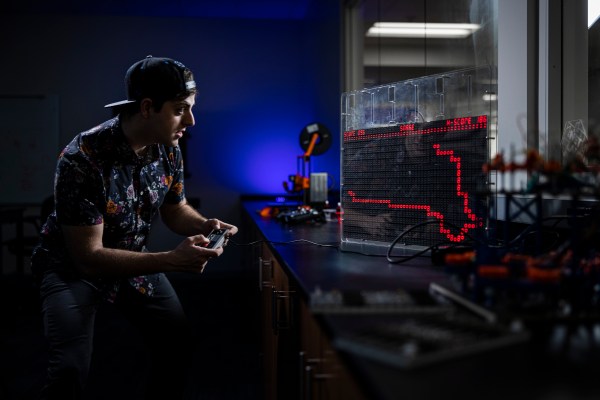
Getting DOOM to run on a computer it was never meant to run on is a fun trope in the world of esoteric retro computers. By now we’ve seen it run on everything from old NES systems to microwaves, treadmills, and basically anything with a computer inside of it. What we don’t often see are the displays themselves being set up specifically to run the classic shooter. This build might run the game itself on ordinary hardware, but the impressive part is that it’s able to be displayed on this seven-segment display.

This build makes extensive use of multiplexers to drive enough seven-segment displays to use as a passable screen. There are 1152 seven segment digits arranged in a 48 by 24 array, powered by a network of daisy-chained MAX7219 chips. A Python script running on a Raspberry Pi correlates actual image data with the digit to be displayed on each of the segments, and the Raspberry Pi sends all of that information out to the screen. The final result is a display that’s fast enough and accurate enough to play DOOM in a truly unique way.

There is much more information available about this project on their project page, and they have made everything open source for those who wish to follow along as well. The project includes more than just the ability to play DOOM, too. There’s a built-in video player and a few arcade programs programmed specifically to make use of this display. Perhaps one day we will also see something like this ported to sixteen-segment displays instead of the more common seven-segment.

A ’70s TV With ’20s Parts

Keeping older technology working becomes exponentially difficult with age. Most of us have experienced capacitor plague, disintegrating wire insulation, planned obsolescence, or even the original company failing and not offering parts or service anymore. To keep an antique running often requires plenty of spare parts, or in the case of [Aaron]’s vintage ’70s Sony television set, plenty of modern technology made to look like it belongs in a machine from half a century ago.

The original flyback transformer on this TV was the original cause for the failure of this machine, and getting a new one would require essentially destroying a working set, so this was a perfect candidate for a resto-mod without upsetting any purists. To start, [Aaron] ordered a LCD with controls (and a remote) that would nearly fit the existing bezel, and then set about integrating the modern controls with the old analog dials on the TV. This meant using plenty of rotary encoders and programming a microcontroller to do the translating.

There are plenty of other fine details in this build, including audio integration, adding modern video and audio inputs like HDMI, and adding LEDs to backlight the original (and now working) UHF and VHF channel indicators. In his ’70s-themed display wall, this TV set looks perfectly natural. If your own display wall spotlights an even older era, take a look at some restorations of old radios instead.

Continue reading “A ’70s TV With ’20s Parts”