Vine App Hack On IPhone Makes Time-lapse Movies

time-lapse-with-smashed-iphone

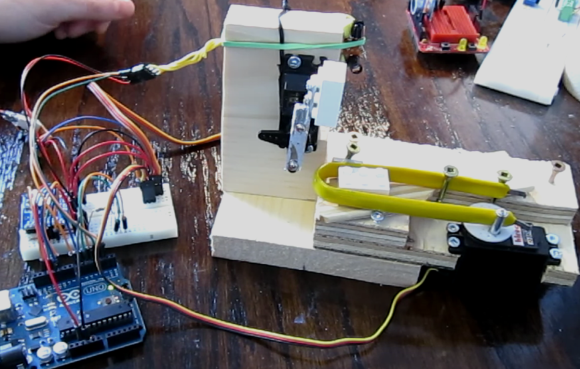
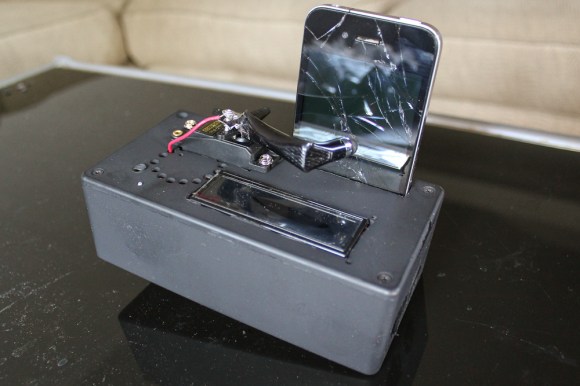
The Vine app is all the rage these days. It lets you shoot six-second videos on your iPhone and easily post them on the Internet. The problem is that [Sean Hodgins] doesn’t find the time limit to be useful for traditional video. But you can cram a lot more info into a half-dozen seconds if you make it a time-lapse video. The rig above is his solution to making the Vine app act as a time-lapse recorder.

The trick is in how the app itself works. It only records video when you’re touching the screen. So you record one second of video, then remove your finger and it ‘pauses’ the recording until you’re ready for the next scene. [Sean] automated this by adding a servo motor and a stylus. An Arduino drives the servo, making quick taps on the screen to get as many different frames into the six seconds as possible. He had a bit of trouble registering quick taps at first. His solution was to inject 3.3V into the stylus he gutted for the project. Click through the link above to see some example videos, or watch this embedded video to see the hardware at work:

Continue reading “Vine App Hack On IPhone Makes Time-lapse Movies”

Weather-O-Matic Displays Digital Weather On An Analog Face

SANYO DIGITAL CAMERA

This clean-looking readout uses analog dials to display the weather. [Nuno Martins] calls it the Weather-O-Matic and after the jump he explains what went into the project.

The hardware is about as simple as it gets. Each hand has a servo motor attached to it. An MSP430 gets the weather via a serial connection to a computer (data is scraped by a Python script) and sets the dials accordingly. The microcontroller also takes user input in the form of a single button on the side of the frame. The words on the left side of the dial are Portuguese for Today, Tomorrow, and After (meaning the day after tomorrow). Pressing the button multiple times will scroll through these three words, followed by the forecast temperature high and low for that day being displayed.

The nice thing about this is that the servo motors will stay in place if you cut the power to them. We bet if he wanted to make this a permanent fixture in his house he could get it to run well on batteries by using the sleep function of the microcontroller and adding an RF transceiver to communicate with the server.

Continue reading “Weather-O-Matic Displays Digital Weather On An Analog Face”

Acrobatic Tricopter Inspired By The Oblivion Movie Trailer

tricopter

There have been a ton of commercials for the new [Tom Cruise] movie called Oblivion. One of the main points in every clip we remember seeing is the Top Gun meets Star Trek vehicle he does some tricks in. [James Cotton] loved that footage and ended up building his own RC version of the vehicle.

Three propellers give it lift, with directional control facilitated by servo motors which can pivot the motors attached to the two orange propellers. This design produces remarkably responsive controls as shown in the video after the break. That being said it’s still not immune to operator error. At the end of the clip [James] crashes it hard, stripping out the gears on the servo motors.

He has a few things in mind for the future of the device (and he’ll have plenty of time to plan while he waits for replacement servos to arrive). The aircraft should be able to carry a camera long with it. He discusses the issues involved with where the camera ends up pointing based on what the tilting motors are doing. But we figure he could always build a base that lets the camera pan and tilt separately from the chassis.

You can find a few tricopter projects around here but we’ve always like the one made of cardboard.

Continue reading “Acrobatic Tricopter Inspired By The Oblivion Movie Trailer”

Measuring The Lifespan Of LEGO

lifespan-of-LEGO

How many times can you put two LEGO pieces together and take them apart again before they wear out? The answer is 37,112. At least that’s the number established by one test case. [Phillipe Cantin] was interested in this peculiar question so he built the test rig above to measure a LEGO’s lifespan.

The hacked together apparatus is pretty ingenious. It uses two servo motors for testing, each driven by the Arduino which is logging the count on an SD card. One of the two white LEGO parts has been screwed onto an arm of the upper servo. That servo presses down onto the mating piece which is sitting inside that yellow band. Look close and you’ll realize the yellow is the handle end of an IC puller. When the post on the lower servo is moved toward one arm of the puller it grips the lower LEGO piece tightly so that the upper servo can pull the two apart. In addition to the assembly and disassembly step there’s a verification step which raises the mated parts so that a reflectance sensor can verify that they’re holding together. [Phillipe] let the rig run for ten days straight before the pieces failed.

Don’t miss his video description of the project after the break.

Continue reading “Measuring The Lifespan Of LEGO”

Hidden Servo Automates Slat-style Window Blinds

slat-blind-automation

[Home Awesomation] has been working on automating his slat-style window blinds. His focus has been on adjusting the angle of the slats, not on completely retracting the shades. Since the slat angle adjustment requires little torque a servo motor turns out to be just perfect for the job. The good news is that the existing blinds in his house have room in the top enclosure to completely hide his add-on hardware.

The image above is a screenshot from the demo which you can watch after the break. The top enclosure for the blinds is just shown at the top of the frame. Here [HA] is demonstrating a few different control designs which he has been trying out. You can see what looks like a Molex connector with some type of component attached to it. That’s an IR motion sensor and he’s really happy with its performance. He feels the same way about the black momentary push switch sticking down next to the power cable. But his DIY solution that works quite well is the pull string attached to a flexible piece of metal. When that metal bends enough to touch a stationary conductor it completes the circuit, telling the Arduino to start driving the servo.

The main idea behind the project is to poll a temperature sensor, closing the blind automatically to help keep the place cool during the day. We figure if he’s already using a microcontroller to drive the project he might as well throw a cheap Bluetooth in module there and make it controllable with a smart phone.

Continue reading “Hidden Servo Automates Slat-style Window Blinds”

Laser Toting Robot Taunts House Cat

laser-toting-robot-taunts-house-cat

[Rodney Lederer] and his cat were bored after moving to a new city. He fixed that for both of them by taking on this project which turns a Wowwee robot into feline entertainment.

It’s no secret that cats have a weakness for the little red dot produced by a laser pointer. [Rodney] put that trait to work by automating the movement of a red laser pointer. After mounting it on a servo motor he got down to work programming an Arduino to move it in a playful manner. But it wouldn’t have been much fun if the this was only capable of preprogrammed patterns, so he also included an IR proximity sensor to help give the thing interactivity. Add to that the treaded robot base and you’ve got mobile cat entertainment. The proof is in the video after the break… the cat is certainly having fun chasing the dot. [Rodney] plans to work a bit more on his code so that the motions of the laser dot include a lot of different patterns to keep things exciting.

Continue reading “Laser Toting Robot Taunts House Cat”

Add Speed Control To A DIY CNC Machine

adding-speed-control-to-diy-cnc

[Jesse Merritt] bought a manual speed controller for his router. It’s used in the CNC mill he build and he figured, why not add the ability for the computer to control the speed.

The speed controller is a $20 unit from Harbor Freight. It comes with an On/Off switch and knob which adjusts the power going to the router. [Jesse] pulled off the knob and milled a gear which takes its place. The second gear is attached to the horn of a hobby servo mounted on the side of the speed controller. The video after the break demonstrates an Arduino driving the servo based on a potentiometer input as well as commands from the CNC controller board he’s using.

Design files for the gears and the Arduino code which drives the servo is available from his Github repository.

Continue reading “Add Speed Control To A DIY CNC Machine”