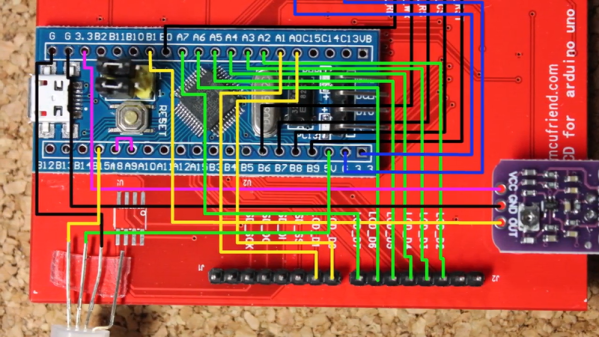
You really should learn to read Morse code. But if you can’t — or even if you can, and just want a break — you can always get a computer to do it. For example, [jmharvey1] has a decoder that runs on a cheap Bluepill dev board.
The device uses a touchscreen and a few common components. The whole thing cost about $16. You can see it at work along with a description of the project in the video below.
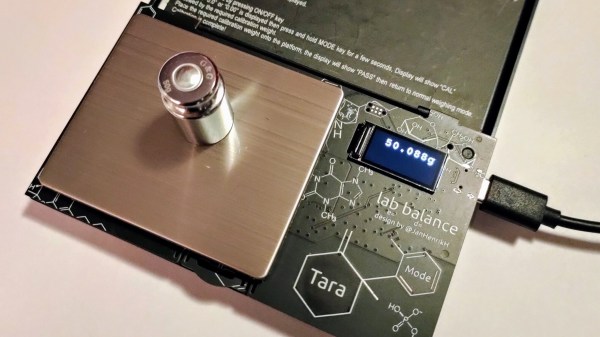
What is this world coming to when you spend seven bucks on a digital scale and you have to completely rebuild it to get the functionality you need? Is nothing sacred anymore?
Such were the straits [Jana Marie] found herself in with his AliExpress special, a portable digital scale that certainly looks like it’s capable of its basic task. Sadly, though, [Jana] was looking for a few more digits of resolution and a lot more in the way of hackability. And so literally almost every original component was ripped out of the scale, replaced by a custom PCB carrying an STM32 microcontroller and OLED display. The PCB has a complicated shape that allows the original lid to attach to it, as well as the stainless steel pan and load cell. [Jana] developed new firmware that fixes some annoying traits, for example powering down after 30 seconds, and adds new functionality, such as piece-counting by weight. The video below shows some of the new features in action.
Alas, [Jana] reports that even the original load cell must go, as it lacks the accuracy her application requires. So she’ll essentially end up building the scale from scratch, which we respect, of course. At this rate, she might even try to build her own load cell from SMD resistors too.
Feeling the cost of commercial options like the YubiKey and Nitrokey were too high, [TheStaticTurtle] started researching DIY alternatives. He found an open source project allows the STM32F103 to act as a USB cryptographic token for GNU Privacy Guard, which was a start. All he had to do was build a suitable device to install it on.
Blue Pill proof of concept
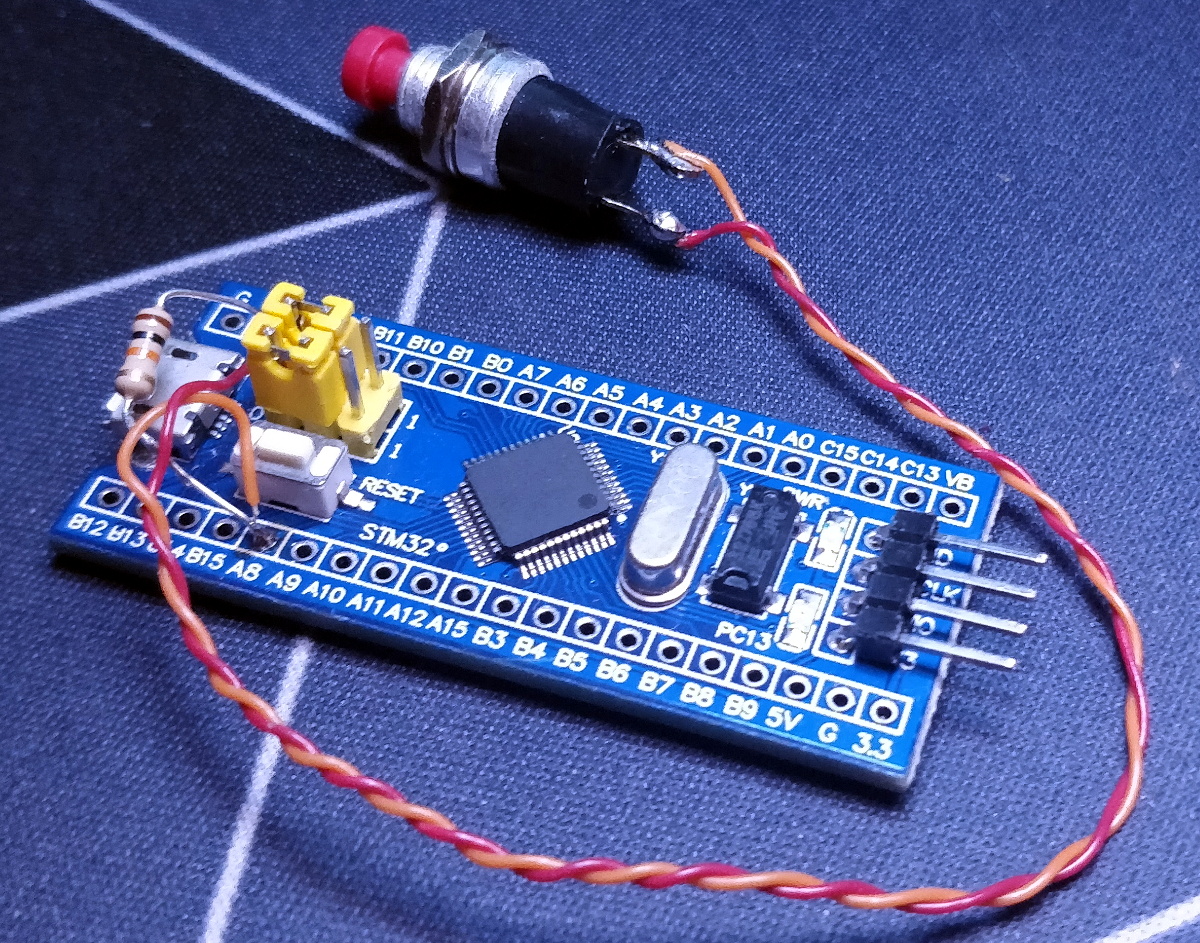
The first step was to test the software out on the popular “Blue Pill” development board, which [TheStaticTurtle] documents in the write-up should anyone want to give it a try themselves. The ST-Link V2 was already a supported target, so it only took some relatively minor tweaks to get running and add support for a simple push button. The output of gpg --card-status showed the device was working as expected, so with the software sorted, it was time to take a closer look at the hardware.
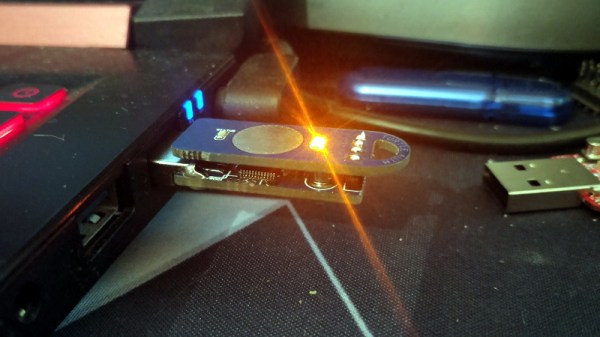
To create his “TurtleAuth” dongle, [TheStaticTurtle] started with the basic layout of the Blue Pill and added in a TTP223E touch control IC. The original Micro USB port was also swapped for a male USB-A connector so the device could be plugged directly into a computer. An upper PCB, containing the status LEDs and touch pad, was then designed so it would fit over the main board as an enclosure of sorts. While the sides are still open, the device looks robust enough to handle life in a laptop bag at least.
While it’s not exactly a common project, this isn’t the first time we’ve seen somebody spin up their own hardware token. More evidence of what the dedicated individual can accomplish these days on a relatively limited budget.
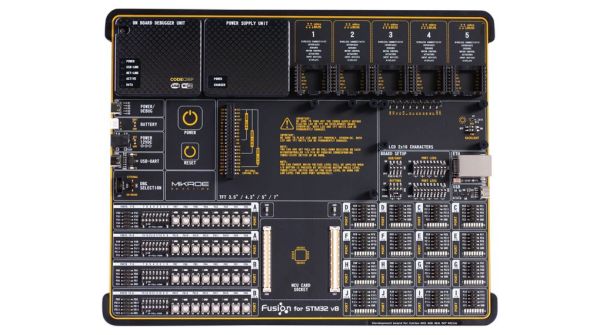
Clearly profiling itself as the Lamborghini or Ferrari of the STM32 development board world, MikroElektronika’s current (8th) revision of their Fusion development board was released last year with support for not only flashing but also debugging the attached STM32 MCU via the onboard WiFi module. The Serbian company’s pricing for the bare board without MCU modules or any other peripherals appears to be around 300 USD/Euro. Additional MCU boards cost between $28 – $60 each.
As the official product page explains, the board is combined with the CodeGrip software to manage the board either via USB-C (driver-free) – which also allows one to configure the WiFi option – and via WiFi. Peripheral boards are added via the 5 onboard MikroBUS expansion slots, either with existing boards, or custom MikroBUS boards. The power supply is also onboard, powered via USB, a barrel jack connector, or an external battery.
The use of WiFi to connect to the board would allow for it to be easily managed and debugged when it’s in a less convenient location than one’s desk, which would seem like a major boon.
Obviously it’s not a cheap board, and the MCU cards each cost about as much as a Nucleo or Discovery board from ST would cost, making it hard to justify purchasing it for anything but a professional environment. However, the tantalizing thing here is probably that so much of the design details are available, from the expansion bus to the pin-out and schematic of the MCU cards (STM32F767ZG version).
The MCU cards use the Hirose FX10A-168S-SV and FX10A-168P-SV(71) connectors, all readily available. This opens the possibility of developing compatible MCU cards. An MCU card template project can for example be found here.
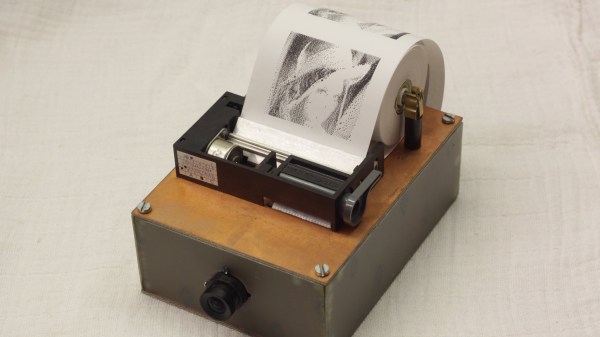
Randomly buying some hackable gadgets just because they are cheap and seem potentially interesting for future projects is something that most of us can relate to. It also happened to [fruchti] when he bought five thermal printer modules without any specific purpose for them in mind. It was not until several years later that he put them to good use for his inverse thermal camera project.
The name perfectly summarizes the device’s function which is to convert images to heat instead of the other way around. To put it in a less cryptic manner, [fruchti] built a selfie camera that instantly prints out pictures on thermochromic paper. The project would have been easy to implement on a Raspberry Pi but instead, he chose a more minimalist approach by using an STM32 microcontroller. This involved some challenges because the MCU didn’t have enough RAM to store an entire frame and the camera module came without a FIFO buffer. To capture and store the image data [fruchti] applied a line-by-line dithering algorithm which is described in detail in his accompanying blog post while the corresponding code is available on GitHub. Even though the case was improvised from scrap PCB materials the finished device still looks great. In particular, the fuse holders that are being used to hold the paper roll make it almost steampunk.
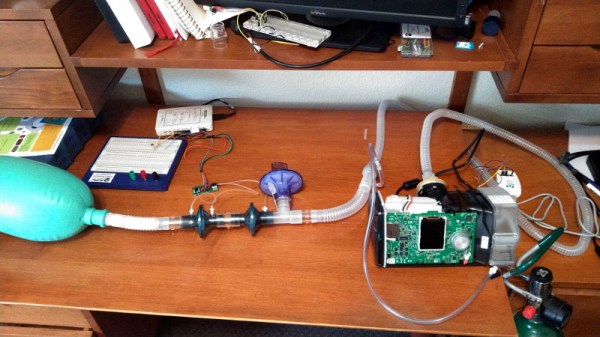
Operating under the idea that a Constant Positive Airway Pressure (CPAP) machine isn’t very far removed electrically or mechanically from a proper ventilator, [Trammell Hudson] has performed some fascinating research into how these widely available machines could be used as life support devices in an emergency situation. While the documentation makes it clear the project is a proof of concept and is absolutely not intended for human use in its current state, the findings so far are certainly very promising.
For the purposes of this research, [Trammell] has focused on the Airsense S10 which currently retails for around $600 USD. Normally the machine is used to treat sleep apnea and other disorders by providing a constant pressure on the lungs, but as this project shows, it’s also possible for the S10 to function in what’s known as Bi-level Positive Airway Pressure (BiPAP) mode. Essentially this means that the machine detects when the user is attempting to inhale, and increases the air pressure to support their natural breathing.
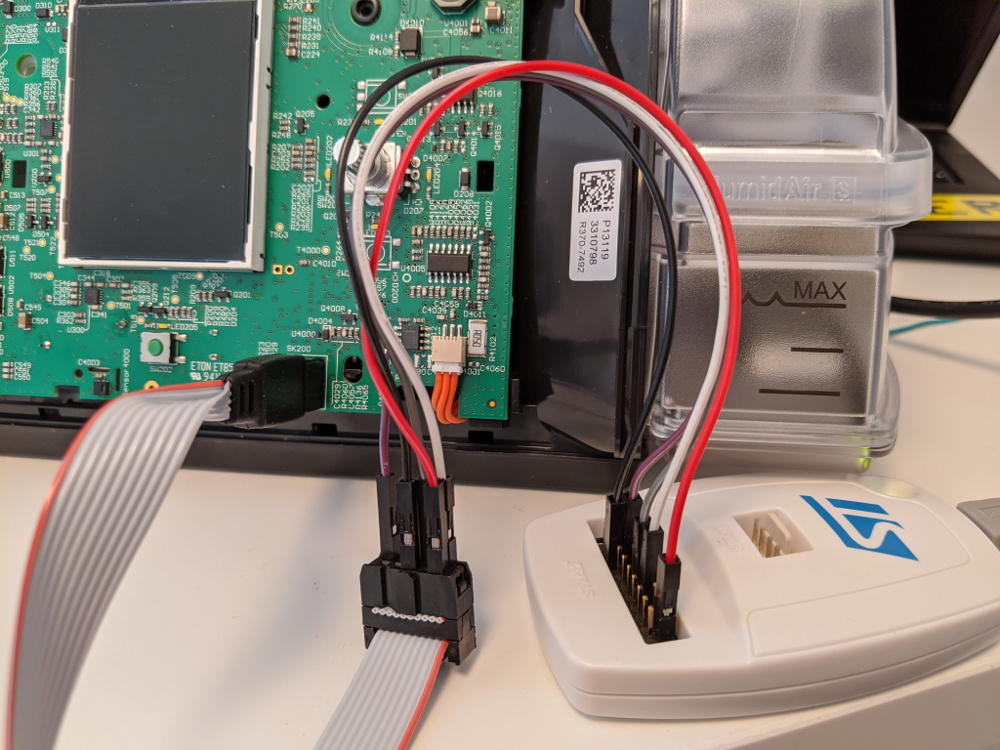
Reflashing the firmware on the S10 CPAP
Critically, this change is made entirely through modifications to the S10 firmware. No additional hardware is required, and outside of opening up the device to attach an STM32 programmer (a process which [Trammell] has carefully documented), there’s nothing mechanically that needs to be done to the machine for it to operate in this breathing support function. It seems at least some of the functionality was already included via hidden diagnostic menus which can be enabled through a firmware patch.
As many of these CPAP machines feature cellular data connections for monitoring and over-the-air updates, [Trammell] believes it should be possible for manufacturers to push out a similarly modified firmware on supported devices. Of course, the FDA would have to approve of something like that before the machines could actually be used as emergency, non-invasive ventilators. They would also need to have viral filters installed and some facility for remote control added, but those would be relatively minor modifications.
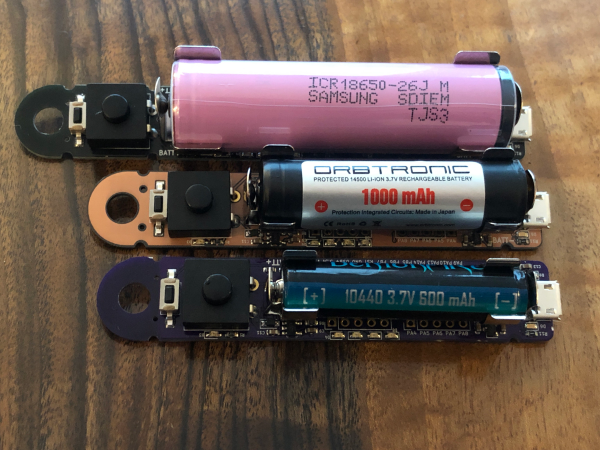
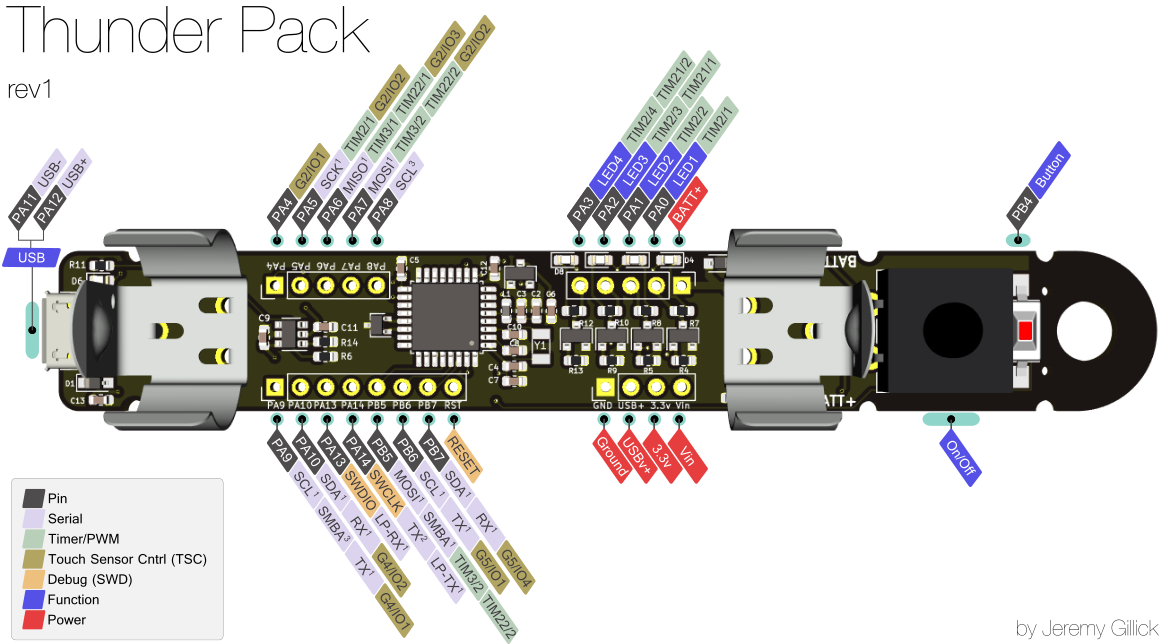
Do you need portable power that packs a punch? Sure you do, especially if you want to light up the night by mummifying yourself with a ton of LED strips. You aren’t limited to that, of course, but it’s what we pictured when we read about [Jeremy]’s Thunder Pack. With four PWM channels at 2.3 A each, why not go nuts? [Jeremy] has already proven the Thunder Pack out by putting it through its paces all week at Burning Man.
Click to embiggen!
After a few iterations, [Jeremy] has landed on the STM32 microcontroller family and is currently working to upgrade to one with enough flash memory to run CircuitPython.
The original version was designed to run on a single 18650 cell, but [Jeremy] now has three boards that support similar but smaller rechargeable cells for projects that don’t need quite as much power.