Magnetic Bubble Memory Farewell Tour

There’s something both satisfying and sad about seeing an aging performer who used to pack a full house now playing at a local bar or casino. That’s kind of how we felt looking at [Craig’s] modern-day bubble memory build. We totally get, however, the desire to finish off that project you thought would be cool four decades ago and [Craig] seems to be well on the way to doing just that.

If you don’t recall, bubble memory was going to totally wipe out the hard drive industry back in the late 1970s and early 1980s. A byproduct of research on twistor memory, the technology relied on tiny magnetic domains or bubbles circulating on a thin film. Bits circulated to the edge of the film where they were read using a magnetic pickup. Then a write head put them back at the other edge to continue their journey. It was very much like the old delay line memories, but with tiny magnetic domains instead of pressure waves through mercury.

We don’t know where [Craig] got his Intel 7110 but they are very pricey nowadays thanks to their rarity. In some cases, it’s cheaper to buy some equipment that used bubble memory and steal the devices from the board. You can tell that [Craig] was very careful working his way to testing the full board.

Because these were state-of-the-art in their day, the chips have extra loops and would map out the bad loops. Since the bubble memory is nonvolatile, that should be a one time setup at the factory. However, in case you lost the map, the same information appears on the chip’s label. [Craig’s] first test was to read the map and compare it to the chip’s printed label. They matched, so that’s a great sign the chip is in good working order and the circuit is able to read, at least.

We’ve talked about bubble memory before along with many other defunct forms of storage. There were a few military applications that took advantage of the non-mechanical nature of the device and that’s why the Navy’s NEETS program has a section about them.

Microbatteries On The Grid

Not everybody has $6500 to toss into a Tesla Powerwall (and that’s a low estimate), but if you want the benefits of battery storage for your house, [Matt]’s modular “microbattery” storage system might be right up your alley. With a build-as-you-go model, virtually any battery can be placed on the grid in order to start storing power from a small solar installation or other power source.

The system works how any other battery installation would work. When demand is high, a series of microinverters turn on and deliver power to the grid. When demand is low, the batteries get charged. The major difference between this setup and a consumer-grade system is that this system is highly modular and each module is networked together to improve the efficiency of the overall system. Its all tied together with a Raspberry Pi that manages the entire setup.

While all of the software is available to set this up, it should go without saying that working with mains power is dangerous, besides the fact that you’ll need inverters capable of matching phase angle with the grid, a meter that handles reverse power flow, a power company that is willing to take the power, and a number of building code statutes to appease. If you don’t have all that together, you might want to go off-grid instead.

Light The Way To Every Component

How do you organize your stock of components and modules? If an unruly pile of anti-static bags and envelopes from China stuffed into a cardboard box sounds familiar, then you need help from [Dimitris Tassopoulos]. He’s organized his parts into drawers and created a database, then linked it via an ESP8266 and a string of addressable LEDs to light up the individual drawer in which any given component resides. It’s a genius idea, as you can see in action in the video below the break.

Behind the scenes is a web server sitting atop an SQL database, with a PHP front end. It’s running on a Banana Pi board, but it could just as easily be running on any other similar SBC. The ESP8266 has a REST API to which the webserver connects when a component is sought, and from that it knows which LED to light.

The LED strip is not the tape with which most readers will be familiar, but a string of the type we might be more used to as Christmas lights. These have a 100mm spacing between LEDs, allowing them to be easily positioned behind each drawer. The result is a very effective parts inventory system. We’re not entirely sure that it would entirely banish the tide of anti-static bags here, but we’re impressed nevertheless.

Continue reading “Light The Way To Every Component”

DIY Photo Backup In The Field

They say a file isn’t backed up if it isn’t backed up twice. This is easy enough to do if you have access to your computer and a network, but if you’re a photographer you might end up in a place without either of these things and need a way to back up the files you just created. For that you’ll need a specialized photo backup tool which you can easily build yourself.

While commercial offerings are available which back up files locally from a camera’s SD card to another medium, they suffer from a high price. [André]’s solution can be had for a fraction of that cost. Using a Raspberry Pi Zero, a tiny USB hub, and a high capacity jump drive, a photographer can simply plug in an SD card and the Pi will handle the backups with varying levels of automation. The software that [André] made use of is called Little Backup Box written by [Dmitri Popov] and can be used typically as an automatic backup for any other device as well.

This is a great solution to backing up files on the go, whether they’re from a camera or any device that uses an SD card. Removable storage is tiny and easily lost, so it’s good to have a few backups in case the inevitable happens. Raspberry Pis are an ideal solution to data backup, and can even be battery powered if you’re really roughing it for a few days.

3D-Printed Magazines Tame The SMD Tape Beast

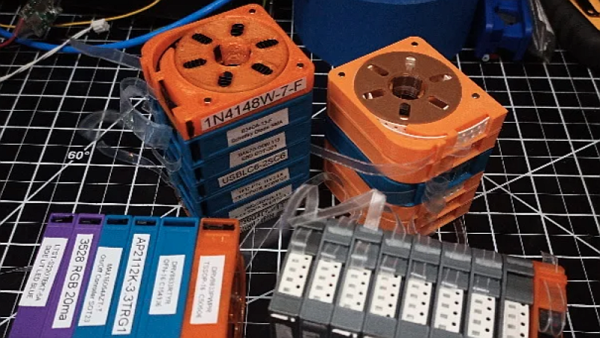
Chances are pretty good that you’ve got a box or a bin somewhere in your shop with coils of SMD component tapes in it. If you’re lucky, the coils are somewhat contained in their conductive Mylar bags; if you’re more like us, the tapes are flopping around loose in an attempt to seemingly tie themselves together. In either case, these 3D-printed SMD magazines will bring a little order to the chaos, and make board assembly a little bit easier.

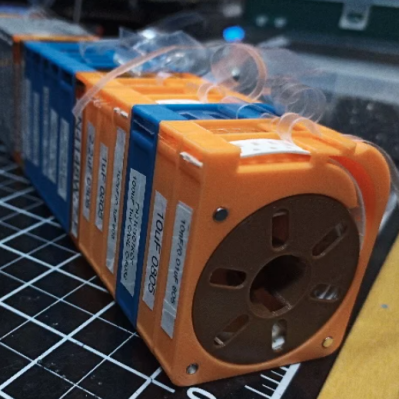
When we saw [Robin Reiter]’s build, we thought these would be cassettes for some sort of pick-and-place machine. But while they certainly look like they could be adapted to an automated PnP setup, [Robin]’s main goal was to provide organized storage for loose tapes. Each magazine has a circular reservoir to hold the coiled tape, with an exit slot at the front and a wedge that directs the cover tape in the opposite direction. This removes the cover tape to expose the components, clears it away from the pickup area, and as a bonus, allows the component tape to be advanced just by pulling back on the cover. Each magazine has a spring-loaded latch that clips onto a base that looks a bit like a DIN-rail; the weighted base holds several magazines and makes it easy to set up a manual pick-and-place session. The video below shows all the details.

For certain personality types, this really scratches an itch. We love the modular design, and the organization that these would bring to our shop would really help clean things up a bit. And if [Robin] were ever to take this design to the next level, adding something like this could be useful.

Continue reading “3D-Printed Magazines Tame The SMD Tape Beast”

A Guide To Shop Equipment Nobody Thinks About: Clean, Organized, And Efficient

When planning out a workspace at home, the job, or at a makerspace, we all tend to focus on the fun parts. Where the equipment will go, how you’ll power it, what kind of lights you’ll get, etc, etc. It’s easy to devote all your attention to these high-level concepts, which often means the little details end up getting addressed on the fly. If they get addressed at all.

But whether we want to admit it or not, an organized workspace tends to be more efficient. That’s why [Eric Weinhoffer] has put together a blog post that details all those mundane details that we tend to forget about. It’s not exactly exciting stuff, and contains precisely as much discussion about whiteboards as you probably expect. That said, it’s thorough and clearly comes from folks who’ve had more than a little experience with setting up an efficient shop.

So what’s the first thing most shops don’t have enough of? Labels. [Eric] says you should put labels on everything, parts bins, tools, machines, if it’s something you need to keep track of, then stick a label on it. This does mean you’ll likely have to buy a label maker, but hey, at least that means a new gadget to play with.

Of course, those self-stick labels don’t work on everything. That’s why [Eric] always has a few rolls of masking tape (such as the blue 3M tape you might be using on your 3D printer bed) and some quality markers on hand to make arbitrary labels. Apparently there’s even such a thing as dry erase tape, which lets you throw an impromptu writing surface anywhere you want.

[Eric] also suggests investing in some collapsible cardboard bins which can be broken down and stored flat when not in use. If you’ve got the kind of situation where you’ll always have more or less the same amount of stuff then plastic is probably your best bet, but in a more dynamic environment, being able to collapse the bins when they aren’t in use is a capability we never even realized we needed until now.

As you might imagine, the post also touches on the issues of keeping sufficient safety gear available. We’ve talked about this in the past, but it’s one of those things that really can’t be said too many times. Having a wall of meticulously labeled storage bins is great, but it’s going to be the last thing on your mind if you manage to get an eye full of superglue.

Tiny Forklift Makes Unusable Space Usable

Houses with crawlspaces are fairly common in some geographic regions. The crawlspace can make it easier to access things like plumbing and electrical wiring, and can even be used as storage in homes that don’t (or can’t) have a basement. Along with improved building ventilation, these some of the perks compared to homes built on a solid slab of concrete. These crawlspaces aren’t exactly easy to get around in, though, but [Dave] has an easier way to get stuff in and out of these useful, but small, spaces.

Enter the crawl space forklift. Made with largely off-the-shelf components, the robot includes a few standard motors and linear actuators to move around and operate the front fork. That’s all pretty standard, but this build really shines with its use of FPV camera, monitor, and transmitter that allow the pilot to navigate the robot in the small space using remote control. For those safety-conscious among us, there is also a fire extinguisher ball on board which self-activates in case the robot catches on fire under his house.

This is a great, high-quality build that shows how common parts can make something revolutionary with the right idea. Identifying a problem and then building a solution, while not forgetting to spring for some safety equipment, can really make a difference even with something as simple as unoccupied space in a home. They can tackle tasks around the home, too.

Continue reading “Tiny Forklift Makes Unusable Space Usable”