Old Wattmeter Uses Magnetics To Do The Math

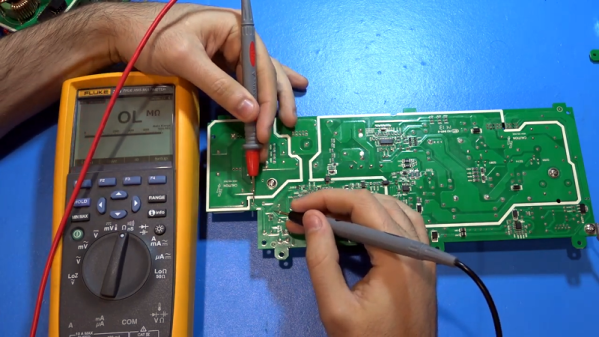
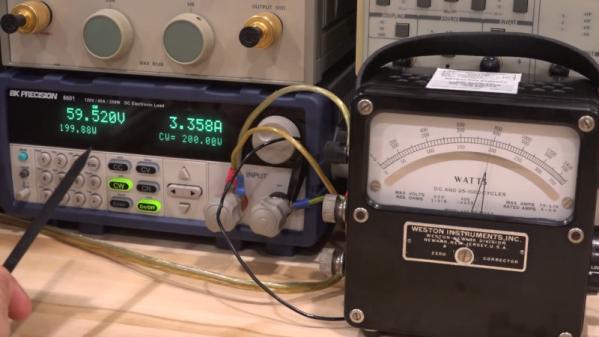
Measuring power transfer through a circuit seems a simple task. Measure the current and voltage, do a little math courtesy of [Joule] and [Ohm], and you’ve got your answer. But what if you want to design an instrument that does the math automatically? And what if you had to do this strictly electromechanically?

That’s the question [Shahriar] tackles in his teardown of an old lab-grade wattmeter. The video is somewhat of a departure for him, honestly; we’re used to seeing instruments come across his bench that would punch a seven-figure hole in one’s wallet if acquired new. These wattmeters are from Weston Instruments and are beautiful examples of sturdy, mid-century industrial design, and seem to have been in service until at least 2013. The heavy bakelite cases and sturdy binding posts for current and voltage inputs make it seem like the meters could laugh off a tumble to the floor.

But as [Shahriar] discovers upon teardown of a sacrificial meter, the electromechanical movement behind the instrument is quite delicate. The wattmeter uses a moving coil meter much like any other panel meter, but replaces the permanent magnet stator with a pair of coils. The voltage binding posts are connected to the fine wire of the moving coil through a series resistance, while the current is passed through the heavier windings of the stator coils. The two magnetic fields act together, multiplying the voltage by the current, and deflect a needle against a spring preload to indicate the power. It’s quite clever, and the inner workings are a joy to behold.

We just love looking inside old electronics, and moving coil meters especially. They’re great gadgets, and fun to repurpose, too.

Continue reading “Old Wattmeter Uses Magnetics To Do The Math”

1,000 Watt Power Supply Tear Down And Repair

[TheSignalPath] wanted to repair a broken Instek PSW80-40.5 because it has a lot of output for a programmable power supply — 1,080 watts, to be exact. This isn’t a cheap supply — it looks like it costs about $2,200 new. The unit wasn’t working and when he took it apart, he found a nasty surprise. There is a base PCB and three identical power supply modules, and virtually no access without disconnecting the boards. He continued the teardown, and you can see the results in the video below.

Each of the power supply modules are two separate PCBs and the design has to account for the high currents required. The power supply is a switching design with some filtering on the motherboard. One of the boards of the power supply module rectifies the incoming line voltage to a high DC voltage (about 400 volts). The second board then does DC to DC conversion to the desired output.

Continue reading “1,000 Watt Power Supply Tear Down And Repair”

Poké Ball Plus Teardown Reveals No Pikachu Inside

The latest entry in the fan favorite franchise Pokémon saw release earlier this month alongside a particularly interesting controller. Known as the Poké Ball Plus, this controller is able to control Pokémon games that are available on completely separate platforms, as well as transfer data between them. It rumbles, It talks, it lights up, it’s wireless, and [Spawn] uploaded a video that reveals what’s really inside.

Continue reading “Poké Ball Plus Teardown Reveals No Pikachu Inside”

Agilent LCR Meter Teardown

Since 1999, one of the more popular manufacturers of test equipment has been Agilent, the spun-off former instrument division of Hewlett-Packard. From simple multimeters to fully-equipped oscilloscopes, they have been covering every corner of this particular market. And, with the help of [Kerry Wong] and his teardown of an Agilent LCR meter, we can also see that they’ve been making consistent upgrades to their equipment as well.

The particular meter that [Kerry] took apart was an Agilent U1731B, a capable LCR (inductance, capacitance, resistance) meter. He had needed one for himself and noted that while they’re expensive when new, they can be found at a bargain used, but that means dealing with older versions of hardware. For example, his meter uses an 8-bit ADC while the more recent U1733 series uses a 24-bit ADC. The other quality of this meter that [Kerry] made special note of was how densely populated the circuit board is, presumably to save on the design of a VLSI circuit.

While we don’t claim to stump for Agilent in any way, it’s good to know that newer releases of their equipment actually have improved hardware and aren’t just rebadged or firmware-upgraded versions of old hardware with a bigger price tag attached. Also, there wasn’t really any goal that [Kerry] had in mind besides sheer curiosity and a willingness to dive deep into electronics details, as those familiar with his other projects know already.

Mac Mini Teardown Late 2018

What’s Inside That New Mac Mini Anyway?

It’s been four long years since Apple has refreshed their entry-level desktop line. Those that have been waiting for a redesign of the Mac Mini can now collectively exhale as the Late 2018 edition has officially been released. Thanks to [iFixit] we have a clearer view of what’s changed in the new model as they posted a complete teardown of the Mac Mini over on their website.

Mac Mini Teardown Late 2018 RAM Slots

One of the most welcomed changes is that the DDR4 RAM is actually user upgradeable this time around. Previously RAM was soldered directly to the motherboard, and there were no SO-DIMM slots to speak of. The 2018 Mac Mini’s RAM has also been doubled to 8GB compared to the 4GB in the 2014 model. Storage capacity may have taken a hit in the redesign, but the inclusion of a 128GB PCIe SSD in the base model fairs better than the 500GB HDD of old. The number of ports were flip-flopped between the two model generations with the 2018 Mini featuring four Thunderbolt ports along with two USB 3.0 ports. Though the biggest upgrade lies with the CPU. The base 2018 Mac Mini comes with a 3.6GHz quad-core Intel Core i3 as compared to the 2014’s 1.4GHz dual-core Intel Core i5.

Although Apple lacked “the courage” to drop the 3.5mm headphone jack this time around, they did retain the same footprint for Mac Mini redesign. It still provides HDMI as the default display out port, although the additional Thunderbolt ports provide additional options via an adapter. A quick overview of the spec differences between the 2018 and 2014 base Mac Mini models have been summarized below.

Model 2018 Mac Mini 2014 Mac Mini
CPU 3.6GHz quad-core Intel Core i3 1.4GHz dual-core Intel Core i5
Storage 128GB PCIe SSD 500GB HDD
RAM 8GB DDR4 @ 2666MHz 4GB DDR3 @ 1600MHz
Graphics Intel UHD 630 Intel HD 5000
Ports Thunderbolt 3 (x4), USB 3.0 (x2) Thunderbolt 2 (x2), USB 3.0 (x4)
Card Slot N/A SDXC
WiFi 802.11a/b/g/n/ac 802.11a/b/g/n/ac
Audio 3.5mm Headphone Jack 3.5mm Headphone Jack
Video HDMI HDMI
Price from $799 from $499

Source [MacWorld]

Fixing A Crazy Expensive Spectrum Analyser, With Solder

It used to be a spectrum analyzer was an exotic piece of gear. However, these days it is pretty common for a scope to have some ability to do the job — that is, plot amplitude versus frequency. However, a dedicated commercial product will usually have a lot more bandwidth and other features. [Signal Path] picked up an Anrtitsu 7.1 GHz portable spectrum analyzer. An expensive bit of kit — anywhere from around $4,000 to $8,000 on eBay — if it is working, but this one was not. It needed power, but it was also missing the internal flash card that the device uses to boot.

Being portable, there’s a lot of digital and RF electronics crammed into a very small space. The initial tear down didn’t look very interesting because it was mostly an RF shield. However, many tiny screws later, you can finally see the actual electronics.

Continue reading “Fixing A Crazy Expensive Spectrum Analyser, With Solder”

Teardown Of A (Relatively) Cheap Thermal Camera

The cost of tools and test equipment has largely been on the downward trend for years, making it now more affordable than ever to get into the hacking and making scene. This is particularly visible with something like the venerable oscilloscope: a piece of equipment that was near unobtainium for the home hacker a decade ago, you can now get digital pocket scope for as little as $20 USD. But there are still pieces of gear which haven’t quite hit the sort of prices we’d like to see.

A perfect example are thermal imaging cameras. The cheap ones are usually so low resolution they might as well just be thermometers, but the higher resolution ones can cost thousands. [Rob Scott] recently wrote in to tell us about a very promising middle ground, the HTI HT-A1. But he didn’t just point it out to us, he also tore it down and laid its internal’s bare for our entertainment. Now that’s our kind of introduction.

[Rob] walks us through the disassembly of the device, which is made unnecessarily difficult due to the fact that half the screws are hidden under a glued on screen bezel. That means a heat gun, a thin tool, and patience are in order if you want to get inside the device. It’s bad enough they use these kinds of construction techniques on modern smartphones, but at least they’re so thin that we can understand the reasoning. Why this chunky thing needs to resort to such measures is beyond us.

Eventually he cracks the HT-A1 open and is greeted with a single double-sided PCB. The top side is pretty much bare except for the buttons and the LCD display, and the flip side is largely just a breakout for a quad-core Allwinner A33 daughterboard. [Rob] theorizes this is to keep costs down by allowing reuse of the modular A33 board on other devices. Given the A33’s use in so many cheap tablets, it’s also possible HTI simply purchased these daughterboards as a drop-in component and designed their own board around it.

There’s not much else inside the HT-A1 beyond the rechargeable battery pack and thermal camera, both attached to the device’s rear panel. [Rob] noticed that the date on the thermal camera PCB is a full two years older than the date on the main PCB, leading one to wonder if HTI might have gotten a good deal on a bunch of these slightly outdated sensors and spun up a whole device around them.

The HT-A1 is high enough resolution that you can actually pick out individual components on a PCB, and at $400 USD is approaching a reasonable price point for the individual hacker. Which is not to say it’s cheap, but at least you get a useful tool for your money. We wouldn’t suggest you buy this device on a whim, but if you do a lot of diagnostic work, it might pay for itself after a couple repairs.

If that’s still a little too rich for your blood, we’ve covered a handful of DIY options which might better fit your budget.

Continue reading “Teardown Of A (Relatively) Cheap Thermal Camera”