Improving Active Loads

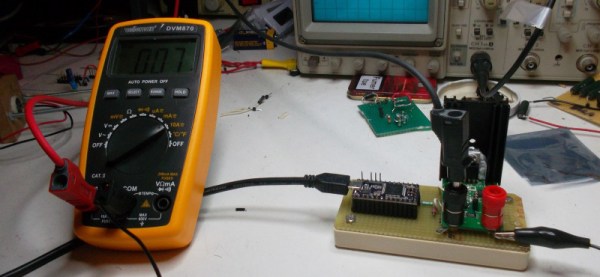
[Texane]’s job requires testing a few boards under a set of loads, and although the lab at work has some professional tools for this it seemed like a great opportunity to try out the Re:load 2. It’s a nifty little active load that’s available can of course be improved with an injection of solder and silicon.

While the Re:load 2 is a nice, simple device that can turn up to 12 Watts directly into heat, it’s not programmable. The ability to create and save load profiles would be a handy feature to have, so [Texane] took a Teensy 3.1 microcontroller and installed a resistor divider in front of the Re:load’s amplifier. A simple script running on a computer allows [Texane] to set the amount of current dumped and automate ramps and timers.

There is a more fundamental problem with the Re:load; the lowest possible current that can be dumped into a heat sink is 90mA. [Texane] replace the amplifier with a zero-drift amp that brought that 90mA figure down to 7mA.

Of course the Re:load and Teensy 3.1 are sold in the Hackaday store, but if you’re looking for a ready-built solution for a computer-controlled active load you can always check out the Re:load Pro, a fancy-smanchy model that has an LCD. The Pro costs more, and [Texane] just told you how to get the same features with the less expensive model we’re selling, though…

Play Robotic Bongos Using Your Household Plants

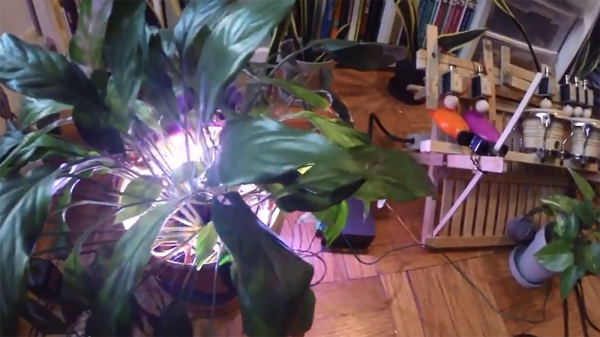
[Kirk Kaiser] isn’t afraid to admit his latest project a bit strange, being a plant-controlled set of robotic bongos. We don’t find it odd at all.  This is the kind of thing we love to see. His project’s origins began a month ago after taking a class at NYC Resistor about creating music from robotic instruments. Inspired to make his own, [Kirk] repurposed a neighbor’s old wooden dish rack to serve as a mount for solenoids that, when triggered, strike a couple of plastic cowbells or bongo drums.

A Raspberry Pi was originally used to interface the solenoids with a computer or MIDI keyboard, but after frying it, he went with a Teensy LC instead and never looked back. Taking advantage of the Teensy’s MIDI features, [Kirk] programmed a specific note to trigger each solenoid. When he realized that the Teensy also had capacitive touch sensors, he decided to get his plants in on the fun in a MaKey MaKey kind of way. Each plant is connected to the Teensy’s touchRead pins by stranded wire; the other end is stripped, covered with copper tape, and placed into the soil. When a plant’s capacitance surpasses a threshold, the respective MIDI note – and solenoid – is triggered. [Kirk] quickly discovered that hard-coding threshold values was not the best idea. Looking for large changes was a better method, as the capacitance was dramatically affected when the plant’s soil dried up. As [Kirk] stood back and admired his work, he realized there was one thing missing – lights! He hooked up an Arduino with a DMX shield and some LEDs that light up whenever a plant is touched.

We do feel a disclaimer is at hand for anyone interested in using this botanical technique: thorny varieties are ill-advised, unless you want to play a prank and make a cactus the only way to turn the bongos off!

Continue reading “Play Robotic Bongos Using Your Household Plants”

An RGB Word Clock, Courtesy Of WS2812s

A word clock – a clock that tells the time with illuminated letters, and not numbers – has become standard DIY electronics fare; if you have a soldering iron, it’s just what you should build. For [Chris]’ word clock build, he decided to build an RGB word clock.

A lot has changed since the great wordclock tsunami a few years back. Back then, we didn’t have a whole lot of ARM dev boards, and everyone’s grandmother wasn’t using WS2812 RGB LED strips to outshine the sun. [Chris] is making the best of what’s available to him and using a Teensy 3.1, the incredible OctoWS2812 library and DMA to drive a few dozen LEDs tucked behind a laser cut stencil of words.

The result is blinding, but the circuit is simple – just a level shifter and a big enough power supply to drive the LEDs. The mechanical portion of the build is a little trickier, with light inevitably leaking out of the enclosure and a few sheets of paper working just enough to diffuse the light. Still, it’s a great project and a great way to revisit a classic project.

Apple II Watch

Strapping An Apple II To Your Body

Now that the Apple wristwatch is on its way, some people are clamoring with excitement and anticipation. Rather than wait around for the commercial product, Instructables user [Aleator777] decided to build his own wearable Apple watch. His is a bit different though. Rather than look sleek with all kinds of modern features, he decided to build a watch based on the 37-year-old Apple II.

The most obvious thing you’ll notice about this creation is the case. It really does look like something that would have been created in the 70’s or 80’s. The rectangular shape combined with the faded beige plastic case really sells the vintage electronic look. It’s only missing wood paneling. The case also includes the old rainbow-colored Apple logo and a huge (by today’s standards) control knob on the side. The case was designed on a computer and 3D printed. The .stl files are available in the Instructable.

This watch runs on a Teensy 3.1, so it’s a bit faster than its 1977 counterpart. The screen is a 1.8″ TFT LCD display that appears to only be using the color green. This gives the vintage monochromatic look and really sells the 70’s vibe. There is also a SOMO II sound module and speaker to allow audio feedback. The watch does tell time but unfortunately does not run BASIC. The project is open source though, so if you’re up to the challenge then by all means add some more functionality.

As silly as this project is, it really helps to show how far technology has come since the Apple II. In 1977 a wristwatch like this one would have been the stuff of science fiction. In 2015 a single person can build this at their kitchen table using parts ordered from the Internet and a 3D printer. We can’t wait to see what kinds of things people will be making in another 35 years.

Continue reading “Strapping An Apple II To Your Body”

Use The Internet To Get Your Kadabra To Evolve

If you grew up playing Pokemon Red or Blue, you might have moved far away from your childhood friends by now. If you’re still playing Pokemon Red or Blue, you can now literally reconnect with these friends using [Pepijn]’s new and improved Game Boy link that lets players trade Pokemon over the internet.

Based on [Pepijn]’s previous work building an Arduino-based Pokemon storage system (which was inspired by a separate project that was able to spoof trades), the device allows a Game Boy (including Pocket, Color, and Advance versions) to connect to the Internet via a Teensy shield. The online waiting room software is called TCPoke which facilitates the Internetting of the Game Boys. From there, all you have to do is connect via the project’s wiki!

The TCPoke software is available on the project’s site. Also, be sure to check out the video below which shows a demonstration of how the software works. There is noticeable delay compared to a direct link between Game Boys, but it functions very well. We didn’t see this link system work for a battle, but it would be interesting to see if it is possible. If so, you might never have to go to a Pokemon League meeting again!

Continue reading “Use The Internet To Get Your Kadabra To Evolve”

3D Printed Mechanical keyboard

3D Printed Mechanical Keyboard

Tired of buying boring keyboards with almost no customization available? We’ve seen lots of keyboard hacks before, but if you want to take it a step further — why not make it from scratch and have it 3D printed?

Reddit user [Wildpanic] has just finished his first attempt at a 3D printed keyboard and he’s even shared the files to make it over at Thingiverse. The frame is entirely 3D printed, but he’s chosen to use pre-manufactured key switches, which is probably for the best. They are the Cherry MX Green variety, which have these little clips in the side which make them super easy to install — especially on a 3D printed frame.

He’s wired them all using 20ga copper wire (which might be a bit overkill) to a Teensy 2.0 microcontroller. The diodes he chosen to use are 1N4148 which he was able to get fairly inexpensively. Total cost is just a bit over $50. Not bad!

Oh and in case you’re wondering, he’s chosen the style of keyboard that makes use of 4 keys for the space bar — as made popular by the planck style custom keyboards — you know, for people who love symmetry.

For more awesome keyboard hacks, check out this roundup [Adam Fabio] put together in a Hacklet last year!

[via reddit]

Play Music With Your Painting Using Teensy

[sab-art], a collaboration between [Sophia Brueckner] and [Eric Rosenbaum], has created a touch-sensitive musical painting. Initially, basic acrylic paint is used for the majority of the canvas. Once that is dry, conductive paint is used to make the shapes that will be used for the capacitive touch sensing. As an added step to increase the robustness, nails are hammered through each painted shape and connected with wiring in the back of the painting. These wires are then connected to the inputs of a Teensy++ 2.0, using Arduino code based on MaKey MaKey to output MIDI. The MIDI is then sent to a Mac Mini which then synthesizes the sound using Ableton Live.  Any MIDI-processing software would work, though. For this particular painting, external speakers are used, but incorporating speakers into your own composition is certainly possible.

A nice aspect of this project is that it can be as simple or as complex as you choose. Multiple conductive shapes can be connected through the back to the same Teensy input so that they play the same sound. While [sab-art] went with a more abstract look, this can be used with any style. Imagine taking a painting of Dogs Playing Poker and having each dog bark in its respective breed’s manner when you touch it, or having spaceships make “pew pew” noises. For a truly meta moment, an interactive MIDI painting of a MIDI keyboard would be sublime. [sab-art] is refining the process with each new painting, so even more imaginative musical works of art are on the horizon. We can’t wait to see and hear them!

Continue reading “Play Music With Your Painting Using Teensy”