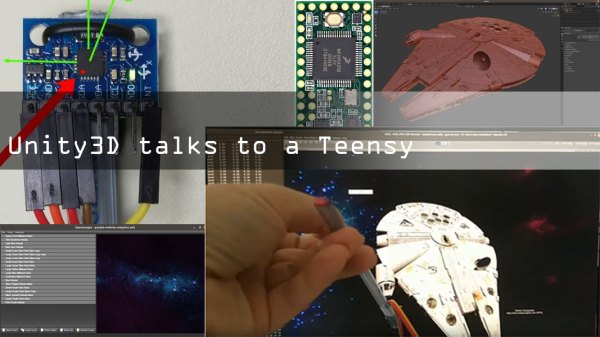
A SuperCap UPS

If you treat your Pi as a wearable or a tablet, you will already have a battery. If you treat your Pi as a desktop you will already have a plug-in power supply, but how about if you live where mains power is unreliable? Like [jwhart1], you may consider building an uninterruptible power supply into a USB cable. UPSs became a staple of office workers when one-too-many IT headaches were traced back to power outages. The idea is that a battery will keep your computer running while the power gets its legs back. In the case of a commercial UPS, most generate an AC waveform which your computer’s power supply converts it back to DC, but if you can create the right DC voltage right to the board, you skip the inverting and converting steps.

Cheap batteries develop a memory if they’re drained often, but if you have enough space consider supercapacitors which can take that abuse. They have a lower energy density rating than lithium batteries, but that should not be an issue for short power losses. According to [jwhart1], this quick-and-dirty approach will power a full-sized Pi, keyboard, and mouse for over a minute. If power is restored, you get to keep on trucking. If your power doesn’t come back, you have time to save your work and shut down. Spending an afternoon on a power cable could save a weekend’s worth of work, not a bad time-gamble.

We see what a supercap UPS looks like, but what about one built into a lightbulb or a feature-rich programmable UPS?

Control Your Web Browser Like It’s 1969

Imagine for a moment that you’ve been tasked with developing a device for interfacing with a global network of interconnected devices. Would you purposely design a spring-loaded dial that can do nothing but switch a single set of contacts on and off from 1 to 10 times? What kind of crazy world would we have to live in where something like that was the pinnacle of technology?

Obviously, such a world once existed, and now that we’ve rolled the calendar ahead a half-century or so, both our networks and our interfaces have gotten more complex, if arguably better. But [Jan Derogee] thinks a step backward is on order, and so he built this rotary phone web browser. The idea is simple: pick up the handset and dial the IP address of the server you want to connect to. DNS? Bah, who needs it?

Of course there is the teensy issue that most websites can’t be directly accessed via IP address anymore, but fear not – [Jan] has an incredibly obfuscated solution to that. It relies on the fact that many numbers sound like common phrases when sounded out in Chinese, so there end up being a lot of websites that have number-based URLs. He provides an example using the number 517, which sounds a bit like “I want to eat,” to access the Chinese website of McDonald’s. How the number seven sounding like both “eat” and “wife” is resolved is left as an exercise to the reader.

And here we thought [Jan]’s rotary number pad was of questionable value. Still, we appreciate this build, and putting old phones back into service in any capacity is always appreciated.

Continue reading “Control Your Web Browser Like It’s 1969”

Extracting Power From USB Type C

For the last decade or so, we’ve been powering and charging our portable devices with USB. It’s a system that works; you charge batteries with DC, and you don’t want to have a wall wart for every device, so just grab a USB hub and charge your phone and you headphones or what have you. Now, though, we have USB Type C, with Power Delivery. Theoretically, we can pull 100 W over a USB cable. What if we could tap into that with screw terminals?

That’s the idea behind [Jakob]’s entry to the Hackaday Prize. It’s a USB 3.1 Type C to Type A adapter, but it also has the neat little bonus of adding screw terminals. Think of it as jumper cables for your laptop or phone, but don’t actually do that.

[Jakob]’s board consists of a USB Type C receptacle on one end, and a Type A plug on the other, while in between those two sockets is an STM32G0 microcontroller that handles the power negotiation and PD protocol. This gives the USB Type C port dual role port (DRP) capability, so the power connection can go both ways. Add in a screw terminal, and you can theoretically get 20 V at 5 A through a pair of wires. Have fun with that.

Right now, [Jakob] has all the files in a Gitlab with the schematic and layout available here. It’s an interesting project that has tons of applications of USB hackery, and more than enough power to do some really fun stuff.

You Don’t Need That Bulky CRT Oscilloscope Anymore

While it might be nice to use a $4,000 oscilloscope in a lab at a university or well-funded corporate environment, a good portion of us won’t have access to that kind of equipment in our own home shops. There are a few ways of getting a working oscilloscope without breaking the bank, though. One option is to find old CRT-based unit for maybe $50 on craigslist which might still have 60% of its original 1970s-era equipment still operational. A more reliable, and similarly-priced, way of getting an oscilloscope is to just convert a device you already have.

The EspoTek Labrador is an open-source way of converting a Raspberry Pi, Android device, or even a regular run-of-the-mill computer into a working oscilloscope. It’s a small USB device with about a two square inch PCB footprint that includes some other features as well like a signal generator and logic analyzer. It’s based on an ATxmega which is your standard Arduino-style AVR microcontroller but geared for low power usage. It looks as though it is pretty simple to use as well, and the only requirements are that you can install the software needed for the device on whatever computing platform you decide to use.

While the Labrador is available for sale at their website, it is definitely a bonus when companies offer products like this but also release the hardware and software as open source. That’s certainly a good way to get our attention, at least. You can build your own if you’d like, but if you’d rather save the time you have pre-built options. And it doesn’t hurt that most of the reviews of this product seem to be very favorable (although we haven’t tried one out ourselves). If you’d prefer an option without a company backing it, though, we have you covered there too.

Drag And Drop Files On Select Arduino Boards

Historically, getting files on to a microcontroller device was a fraught process. You might have found yourself placing image data manually into arrays in code, or perhaps repeatedly swapping SD cards in and out. For select Arduino boards, that’s no longer a problem – thanks to the new TinyUSB library from Adafruit (Youtube link, embedded below).

The library is available on Github, and is compatible with SAMD21 and SAMD51 boards, as well as Nordic’s NRF52840. It allows the Arduino board to appear as a USB drive, and files can simply be dragged and dropped into place. The library can set up to use SPI flash, SD cards, or even internal chip memory as the storage medium.

Potential applications include images, audio files, fonts, or even configuration files. Future plans include porting the TinyUSB library to the ESP32-S2 as well. Being able to drag a settings file straight on to a board could make getting WiFi boards online much less of a hassle.

We’ve seen other nifty USB libraries before, VUSB is a great option if you need USB on your AVR microcontroller. Video after the break.

Continue reading “Drag And Drop Files On Select Arduino Boards”

Add USB-C To Your Laptop (Almost)

It’s a very brave person who takes a Dremel or similar to the case of their svelte new laptop in the quest for a new connector, it sounds as foolhardy as that hoax from a while back in which people tried to drill a 3.5mm jack into their new iPhones. But that’s what [BogdanTheGeek] has done, in adding a USB-C port to his Acer.

Of course, the port in question isn’t a fully functioning USB-C one, it’s a power supply jack, and it replaces the extremely unreliable barrel jack the machine was shipped with. He’s incorporated one of those little “ZYPDS” USB-C power delivery modules we’ve no-doubt all seen in the usual cheap electronic sources, and in a move of breathtaking audacity he’s cut away part of the Acer mainboard  to do so. He’s relying on the laptop’s ability to accept a range of voltages, and presumably trusting his steady hand with a rotary tool. Some Kapton tape and a bit of wire completes the work, and with a carefully reshaped hole in the outer case he’s good to go.

The result is beautifully done, and a casual observer would be hard pressed to know that it hadn’t always been a USB-C port. We’re sure there will come a moment at which someone will plug in a USB-C peripheral and expect it to work, it’s that good.

If you’d like to know a little bit more about USB-C, we’d like to direct you to our in-depth look at the subject.

Ask Hackaday: Is USB Robust Enough?

Earlier this month a single person pleaded guilty to taking down some computer labs at a college in New York. This was not done by hacking into them remotely, but by plugging a USB Killer in one machine at a time. This malicious act caused around $58,000 in damage to 66 machines, using a device designed to overload the data pins on the USB ports with high-voltage. Similar damage could have been done with a ball-peen hammer (albeit much less discreetly), and we’re not here to debate the merits of the USB Killer devices. If you destroy property you don’t own you should be held accountable.

But the event did bring an interesting question to mind. How robust are USB ports? The USB Killer — which we’ve covered off and on through the years —  is billed as a “surge testing” device and operates by injecting -200 volts DC on the data lines of the USB connection. Many USB ports are not protected against this and the result is permanent damage to the computer hardware. Is protection for these levels of abuse necessary or would it needlessly add cost to our machines?

A chip like the TPD4S014 has ESD protection on the data lines that is rated up to +/- 1500 volts, clamping to ground to dissipate the energy. It’s a solution that should protect against repeated spikes on the data lines, as well as short circuits on the power lines and over/undervoltage situations.

ADUM4160 Functional Diagram

The ADuM4160 is an interesting step up from this. It’s designed to provide isolation between a USB host and the device connected to it. Rather than relying on clamping, this chip implements isolation through air core transformers. Certainly this would be overkill to install in every product, but for those of use building and testing USB devices this would save you from “Oops, wrong USB cable” moments at the work bench.

Speaking of accidents at the bench, there is certainly a demand for USB isolation outside of what’s built into our computers. Earlier this year we saw a fantastic take on a properly-designed USB power strip. Among the goals were current limiting, undervoltage protection, and a proper power disconnect switch for each port. The very need to design your own reminds us that consumer manufacturers are often lazy in their USB design. “Use a USB hub” is bad advice for protection at the workbench since quality of design varies so wildly.

We would be interested in hearing from anyone who has insight on standards applying to equipment continuing to survive over current or over voltage events and remain functional. There are standards like UL-60950 that should apply to USB. But that standard includes language about failing safe for the operator, not necessarily remaining functional:

After abnormal operation or a single fault (see 1.4.14), the equipment shall remain safe for an OPERATOR in the meaning of this standard, but it is not required that the equipment should still be in full working order. It is permitted to use fusible links, THERMAL CUT-OUTS, overcurrent  protection devices and the like to provide adequate protection.

So, we’re here to ask you, the readers of Hackaday. Are our USB devices robust enough? Do you have a go-to USB protection chip, part, or other circuit you like to use? Have you ever accidentally killed a USB host device (if so, how)? Do you have special equipment that you depend on when developing projects involving USB? Let us know what you think in the comments below.