Mouse Whisperer Keeps You Working, Even When You Need A Break

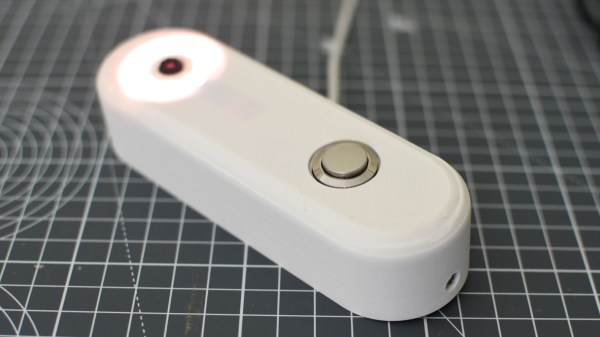
When life hands you lemons, you make lemonade, right? What about when life hands you annoyingly intrusive work-from-home policies that require you to physically stay at your computer even though you really, REALLY need to go to the bathroom, but can’t be trusted to act like a responsible adult who won’t get diverted by TV or the fridge on the way back? In that case, you build something like the Mouse Whisperer — because malicious compliance is the best kind of compliance.

To be fair, [andrey.malyshenko] does list other plausible use cases for what amounts to an automatic mouse wiggler. Like many of us, [andrey] isn’t a fan of logging back in from screen locks, and recognizes that not absolutely every minute of work requires staring at one’s screen. There’s also the need for bio-breaks, of course, and the Mouse Whisperer is designed to accommodate these use cases and more.

The design is quite compact, occupying barely more space than a wireless mouse dongle. Plugged into a USB port, the ATtiny85 mostly sits idle, waiting to detect the touch of a finger on an exposed pad via a TTP223. The dongle then goes into a routine that traces lazy circles with the mouse pointer, plus flashes an RGB LEB on the board, because blinkenlights are cool. The mouse wiggling continues until you come back from your Very Important Business and touch the pad again.

Now, if anyone is actually monitoring you remotely, the circling mouse pointer is going to look a wee bit sus. Fear not, though — the code uses a *.h file to define the circle, so other patterns should be possible. Either way, the Mouse Whisperer is a nice solution, and it’s considerably more compact and integrated than some of the alternatives we’ve seen.

Old-School Video Switching Levels Up With Modern USB Control

Video effects and mixing are done digitally today, but it wasn’t always so. When analog ruled the video world, a big switch panel was key to effective results.

VIdeo like this was the result of combining different analog feeds with different effects. The better the hardware, the more was possible.

Devices like [Glen]’s Grass Valley Series 300 Crosspoint Switch Panel were an important part of that world. With tools like that, a human operator could set up a composited preview feed in true WYSIWYG style, and switch to live on cue. All done with relatively simple CMOS ICs and buttons. Lots and lots of buttons.

[Glen] reverse engineers the panel to show how it works, and most of the heavy lifting is done by the MC14051B analog multiplexer/demultiplexer, and the MC14532B 8-bit priority encoder. Once that’s figured out, the door is open to modernizing things a little by using a microcontroller to drive the device, turning it into a USB peripheral.

With a little design work, [Glen] builds a PCB around the EFM8UB2 8-bit microcontroller to act as a USB peripheral and control the switch panel, taking care of things like key scanning and lamp control. The last step: a GUI application for monitoring and controlling the panel over USB.

This isn’t [Glen]’s first time interfacing to vintage video mixing and switching, and as many of us know it’s sometimes tricky work to interface to existing hardware. We covered his earlier video switcher project using hardware that was not nearly as easy to work with as this one.

Throwback: USB Hotplate Used 30 Whole Ports

Once upon a time, USB was still hip, cool, and easy to understand. You could get up to 500 mA out of a port, which wasn’t much, but some companies produced USB cup warmers anyway which were a bit of a joke. However, one enterprising hacker took things further back in 2004, whipping up a potent USB hot plate powered by a cavalcade of ports.

Delicious.

The project was spawned after a USB cup warmer sadly failed to cook a decent fried egg. To rectify this, a souped-up version was built. The cup warmer was stripped of its original hardware, and fitted with six 2-ohm resistors instead. At 5 volts, each would draw 2.5 amps and the total power draw would be on the order of 75 watts. Each resistor would thus need five USB ports to power it to stay under the 500 mA limit, for a total of 30 USB ports in total. Six PCI-to-USB cards were installed in a motherboard for this purpose, providing the requisite ports.  A 500 watt power supply meant the computer had plenty of juice to run the hot plate.

Cooking proved successful, generating a decent amount of heat to brown up some beef. Served with some white rice, it proved an adequate meal, though apparently with a noted taste of electronic components.

This wouldn’t be such a challenge today. USB-C is capable of delivering 100 watts through a single port at 20 volts and 5 amps. However, there’s something joyous and charming about cooking on a ridiculous hotplate running off 30 USB 1.1 ports. The ingenuity is to be applauded, and it is truly a project of its time.

Interfacing An Old Engine Cowl Flaps Indicator To USB

[Glen Akins] had a WW2-era aircraft engine cowl flap indicator lying around (as you do) and thought it would make a jolly fine USB-attached indicator. The model in question is a General Electric model 8DJ4PBV DC Selsyn, which was intended for four-engined aircraft. For those not familiar with the purpose [Glen] explains in his detailed writeup, that piston-engine aircraft of that era were air-cooled, and during conditions of maximum engine power — such as during take-off — flaps on the side of the engine cowling could be opened to admit additional cooling airflow. These indicator dials were connected to a sender unit on each of the flap actuators, providing the pilots an indication of the flaps’ positions. Continue reading “Interfacing An Old Engine Cowl Flaps Indicator To USB”

DIY USB Charging The Right Way

Since the widespread adoption of USB 1.1 in the 90s, USB has become the de facto standard for connecting most peripherals to our everyday computers. The latest revision of the technology has been USB 4, which pushes the data rate capabilities to 40 Gbit/s. This amount of throughput is mindblowing compared to the USB 1.x speeds which were three to four orders of magnitude slower in comparison. But data speeds haven’t been the only thing changing with the USB specifications. The amount of power handling they can do has increased by orders of magnitude as well, as this DIY USB charger demonstrates by delivering around 200 W to multiple devices at once.

The build comes to us from [tobychui] who not only needed USB rapid charging for his devices while on-the-go but also wanted to build the rapid charger himself and for the charger to come in a small form factor while still using silicon components instead of more modern gallium nitride solutions. The solution he came up with was to use a 24 V DC power supply coupled with two regulator modules meant for solar panel installations to deliver a staggering amount of power to several devices at once. The charger is still relatively small, and cost around $30 US dollars to make.

Part of what makes builds like this possible is the USB Power Delivery (PD) standard, which has enabled all kinds of electronics to switch to USB for their power needs rather than getting their power from dedicated, proprietary, and/or low-quality power bricks or wall warts. In fact, you can even use this technology to do things like charge lithium batteries.

Continue reading “DIY USB Charging The Right Way”

Three Computers, One Keyboard With USB Triplexer

Many of us will have the problem of several computers on the same desk, and to avoid clutter we’ll use a KVM switch to share the peripherals. [The Turbanned Engineer] has an interesting solution to this problem in the form of a USB triplexer. It’s a device that routes USB data lines depending upon which of its connections is powered up.

The circuit is simple enough: a CMOS analogue multiplexer does the routing, and a set of opto-couplers do the selecting based on the power inputs. A set of USB A sockets connect to the computer, and a USB B socket connects to the peripheral.

We’re not entirely sure whether an analogue multiplexer chip would be good for the higher-speed USB data rates, but since keyboards and mice talk at the slowest data rates, we think he’ll get away with it. Either way making a USB switch however basic with such mundane components has something of the hack about it. What he does with the display we’re not so sure about, but at least his keyboard and mouse woes are dealt with.

Other similar switches we’ve featured have been somewhat more basic.

An Open-Source HDMI Capture Card

[YuzukiHD] has provided files for anyone that wishes to build their own HDMI capture card at home. The design is known as the Yuzuki Loop Out HDMI Capture Card PRO, or YuzukiLOHCC PRO for short.

The build is based on the MS2130, a HD video and audio capture chip that’s compatible with USB 3.2 Gen 1. We’re pretty sure that’s now called USB 3.2 Gen 1×1, and that standard is capable of transfers at up to 5 Gbps. Thus, the chip can support HDMI at up to 4K resolution at 60 Hz depending on the exact signals being passed down the line. It’s compatible with YUV422 & MJPEG modes and can be used with software like OBS Studio and FFmpeg. The board itself is relatively simple. It features an HDMI In port, an HDMI Out port, and a USB-C port for hooking up to a computer for capture.

HDMI capture cards can be expensive and fussy things, so you may find it pays to roll your own. Plus, being open sourced under the CERN Open Hardware License V2 means that you can make changes to suit your own use case if you so desire.

We’ve seen some other hilarious video capture tricks over the years, such as a convoluted rig that uses a SNES to turn a Game Boy Camera into a usable webcam. If you’ve got any such madcap hacks brewing up in your lab, be sure to let us know!