3D Printed Butterfly Valve Helps Automate Fume Extraction

It’s not something we always think about, but there’s plenty of hazardous fumes in the average workshop that can be deleterious to human health. Whether its soldering, lasercutting, or 3D printing, all of these processes release nasty chemicals into the air that are best filtered for health reasons. To help build out a working filtration system, [Fab] needed some valves, so set about printing some of his own.

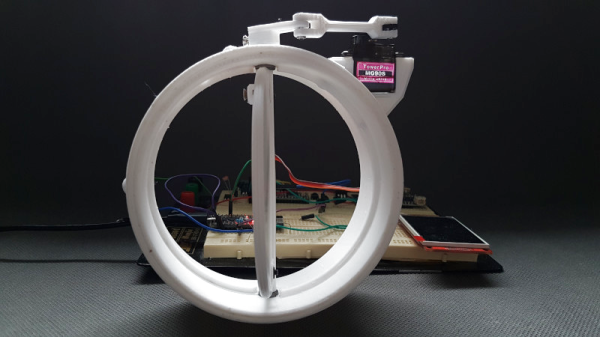
[Fab] went with a simple butterfly valve design, similar to the throttle valve in most gasoline-powered cars. The butterfly vane rotates to vary the flow, turned by a small SG90 servo. A Wemos D1 Mini is used to run a pair of the valves, which are paired with a Y-adapter to connect both a soldering station and 3D printer to the fume extraction system. As a nice touch, a WiFi-enabled outlet is hooked up to the soldering iron which notifies the D1 Mini when it’s switched on, flipping the valve open to automatically start fume extraction.

It’s a tidy system that will enable [Fab] to breath easy in the workshop for years to come. Files are available for those wishing to print a set of butterfly valves for themselves. We’ve seen some other smart fume extractors before, too. Video after the break.

Continue reading “3D Printed Butterfly Valve Helps Automate Fume Extraction”

Steam Engine Replica From LEGO

If engineering choices a hundred years ago had been only slightly different, we could have ended up in a world full of steam engines rather than internal combustion engines. For now, though, steam engines are limited to a few niche applications and, of course, models built by enthusiasts. This one for example is built entirely in LEGO as a scale replica of a steam engine originally produced in 1907.

The model is based on a 2500 horsepower triple-expansion four-cylinder engine that was actually in use during the first half of the 20th century. Since the model is built using nothing but LEGO (and a few rubber bands) it operates using a vacuum rather than with working steam, but the principle is essentially the same. It also includes Corliss valves, a technology from c.1850 that used rotating valves and improved steam engine efficiency dramatically for the time.

This build is an impressive recreation of the original machine, and can even run at extremely slow speeds thanks to a working valve on the top,  allowing its operation to be viewed in detail. Maximum speed is about 80 rpm, very close to the original machine’s 68 rpm operational speed. If you’d prefer your steam engines to have real-world applications, though, make sure to check out this steam-powered lawnmower.

Thanks to [Hari] for the tip!

Continue reading “Steam Engine Replica From LEGO”

Hypercar Valve Technology On A Harbour Freight Engine

The inlet and exhaust valve timing of a piston engine plays a large role in engine performance. Many modern automotive engines have some sort of variable valve timing, but the valves are still mechanically coupled together and to the crankshaft. This means that there is always a degree of performance compromise for various operating conditions. [Wesley Kagan] took inspiration from Koenigsegg’s camless Freevalve technology, and converted a Harbour Freight engine to camless technology for individual valve control.

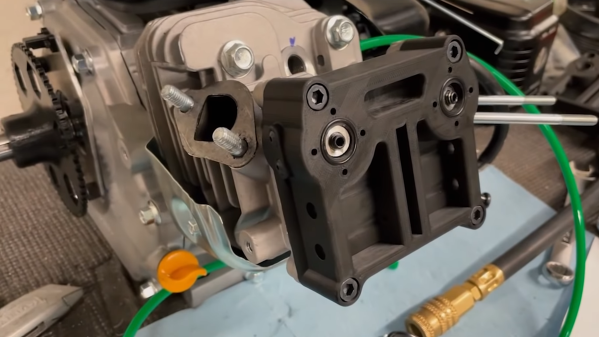
By eliminating the traditional camshaft and giving each valve its actuator, it is possible to tune valve timing for any specific operating condition or even for each cylinder. A cheap single-cylinder engine is a perfect testbed for the garage hacker. [Wesley] removed the rocker arms and pushrods, and replaced the stock rocker cover with a 3D printed rocker cover which contains two small pneumatic pistons that push against the spring-loaded valve stems. These pistons are controlled by high-speed pneumatic solenoid valves. A reference timing signal is still required from the crankshaft, so [Wesley] built a timing system with a 3D printed timing wheel containing a bunch of embedded magnets and being sensed by a stationary Hall effect sensor. An Arduino is used to read the timing wheel position and output the control signals to the solenoid valves. With a rough timing program he was able to get the engine running, although it wouldn’t accelerate.

In the second video after the break, he makes a digital copy of the engine’s existing camshaft. Using two potentiometers in a 3D printed bracket, he measured push rod motion for a complete engine cycle. He still plans to add position sensing for each of the valves, and after a bit more work on the single-cylinder motor he plans to convert a full-size car, which we are looking forward to.

People have been tinkering with cars in their garage for as long as cars have existed. [Lewin Day] has been doing a series on how to get into tinkering with cars yourself. With all the electronics in modern automobiles, messing around with their software has become a growing part of this age-old pastime. Continue reading “Hypercar Valve Technology On A Harbour Freight Engine”

Vacuum Tube Logic Hack Chat

Join us on Wednesday, December 9th at noon Pacific for the Vacuum Tube Logic Hack Chat with David Lovett!

For most of us, circuits based on vacuum tubes are remnants of a technological history that is rapidly fading from our collective memory. To be sure, there are still applications for thermionic emission, especially in power electronics and specialized switching applications. But by and large, progress has left vacuum tubes in a cloud of silicon dust, leaving mainly audiophiles and antique radio enthusiasts to figure out the hows and whys of plates and grids and filaments.

But vacuum tubes aren’t just for the analog world. Some folks like making tubes do tricks they haven’t had to do in a long, long time, at least since the birth of the computer age. Vacuum tube digital electronics seems like a contradiction in terms, but David Lovett, aka Usagi Electric on YouTube, has fallen for it in a big way. His channel is dedicated to working through the analog building blocks of digital logic circuits using tubes almost exclusively. He has come up with unique circuits that don’t require the high bias voltages typically needed, making the circuits easy to work with using equipment likely to be found in any solid-state experimenter’s lab.

David will drop by the Hack Chat to share his enthusiasm for vacuum tube logic and his tips for exploring the sometimes strange world of flying electrons. Join us as we discuss how to set up your own vacuum tube experiments, learn what thermionic emission can teach us about solid-state electronics, and maybe even get a glimpse of what lies ahead in his lab.

join-hack-chatOur Hack Chats are live community events in the Hackaday.io Hack Chat group messaging. This week we’ll be sitting down on Wednesday, December 9 at 12:00 PM Pacific time. If time zones have you tied up, we have a handy time zone converter.

Click that speech bubble to the right, and you’ll be taken directly to the Hack Chat group on Hackaday.io. You don’t have to wait until Wednesday; join whenever you want and you can see what the community is talking about.

Continue reading “Vacuum Tube Logic Hack Chat”

Reverse Engineering A Module From A Vacuum Tube Computer

It’s best to admit upfront that vacuum tubes can be baffling to some of the younger generation of engineers. Yes, we get how electron flow from cathode to anode can be controlled with a grid, and how that can be used to amplify and control current. But there are still some things that just don’t always to click when looking at a schematic for a tube circuit. Maybe we just grew up at the wrong time.

Someone who’s clearly not old enough to have ridden the first wave of electronics but still seems to have mastered the concepts of thermionic emission is [Usagi Electric], who has been doing some great work on reverse engineering modules from old vacuum tube computers. The video below focuses on a two-tube pluggable module from an IBM 650, a machine that dates clear back to 1954. The eBay find was nothing more than two tube sockets and a pair of resistors joined to a plug by a hoop of metal. With almost nothing to go on, [Usagi] was still able to figure out what tubes would have gone in the sockets — the nine-pin socket was a big clue — and determine that the module was likely a dual NAND gate. To test his theory, [Usagi] took some liberties with the original voltages used by IBM and built a breakout PCB. It’s an interesting mix of technologies, but he was able to walk through the truth table and confirm that his module is a dual NAND gate.

The video is a bit long but it’s chock full of tidbits that really help clear up how tubes work. Along with some help from this article about how triodes work, this will put you on the path to thermionic enlightenment.

Continue reading “Reverse Engineering A Module From A Vacuum Tube Computer”

That Elusive Valve Amp Sound, For Not A Lot! (There Has To Be A Catch)

It was with considerable interest last month that I set out to track down where in the world there are still factories making tubes. My research found them in Slovakia, Russia, and China, and it’s fairly certain I didn’t find all the manufacturers by any means. There appeared to be a whole class of mundane tubes still in production that weren’t to be found on their glossy websites. A glance at any outlet through which Chinese modules can be bought will find this type of tube in small audio amplifier projects, and some of them can be astoundingly cheap. When faced with cheap electronics of course I’m tempted to buy some, so I parted with about £10 ($12.50) and bought myself a kit for a two-tube device described as a stereo preamplifier and headphone amplifier.

An Unusual Tube Choice For Audio

What I received for my tenner was a press-seal bag with a PCB and a pile of components, and not much else. No instructions, which would have been worrisome were the board not clearly marked with the value of each component. The circuit was on the vendor’s website and is so commonly used for these sort of kits that it can be found all over the web — a very conventional twin common-cathode amplifier using a pair of 6J1 miniature pentodes, and powered through a +25 V and -25 V supply derived from a 12 VAC input via a voltage multiplier and regulator circuit. It has a volume potentiometer, two sets of phono sockets for input and output, and the slightly naff addition of a blue LED beneath each tube socket to impart a blue glow. I think I’ll pass on that component.

The 6J1 seems to be ubiquitous throughout the Chinese kits, which is surprising when you understand that it’s not an audio tube at all. Instead it’s a small-signal VHF amplifier, a rough equivalent of the European EF95, and would be much more at home in an FM radio receiver or turret TV tuner from the 1950s. I can only assume that somewhere in China there’s a tube factory tooled up for radio tube production that is targeting this market, because another tube you will see in audio power amplifier kits is the FU32 or QQV03-20 in European parlance, a large power beam tetrode that might have been found in a 1950s military radio transmitter. Still just as if you were to use an RF transistor in an audio circuit it would give good account of itself, so it is with an RF tube. There is no reason a 6J1 won’t do an acceptable job in a circuit such as this one.

Continue reading “That Elusive Valve Amp Sound, For Not A Lot! (There Has To Be A Catch)”

Arduino Reduces Heating Costs

While almost everyone has a heater of some sort in their home, it’s fairly unlikely that the heat provided by a central heating system such as a furnace is distributed in an efficient way. There’s little reason to heat bedrooms during the day, or a kitchen during the night, but heating systems tend to heat whole living space regardless of the time of day or the amount of use. You can solve this problem, like most problems, with an Arduino.

[Karl]’s build uses a series of radiator valves to control when each room gets heat from a boiler. The valves, with a temperature monitor at each valve, are tied into a central Arduino Mega using alarm wiring. By knowing the time of day and the desired temperature in each room, the Arduino can control when heat is applied to each room and when it is shut off, presumably making the entire system much more efficient. It also has control over the circulating pump and some of the other boiler equipment.

Presumably this type of system could be adapted to a system which uses a furnace and an air handler as well, although it is not quite as straightforward to close vents off using a central unit like this as it is to work with a boiler like [Karl] has. With careful design, though, it could be done. Besides replacing thermostats, we can’t say we’ve ever seen this done before.

Thanks to [SMS] for the tip!