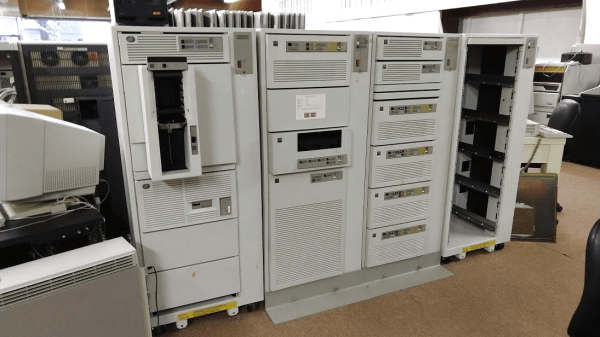
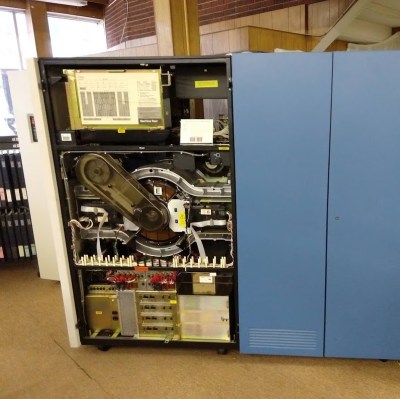
Scratch Built Media Player Channels 1980s Design

No, you aren’t looking at a 30 year old Teac graphic equalizer that somebody modified. The MWA-002 Network Music Player created by [GuzziGuy] is built entirely from new components, and easily ranks up there with some of the most gorgeous pieces of homebrew audio gear we’ve ever seen. Combining modular hardware with modern manufacturing techniques, this 1980s inspired build is a testament to how far we’ve come in terms of what’s possible for the dedicated hacker and maker.

The enclosure, though it looks all the world like a repurposed piece of vintage hardware, was built with the help of a CNC router. It’s constructed from pieces of solid oak, plywood, and veneered MDF that have all been meticulously routed out and cut. Even the front panel text was engraved with the CNC and then filled in with black paint to make the letters pop.

Internally, the MWA-002 is powered by a Raspberry Pi 3 running Mopidy to play both local tracks and streaming audio. Not satisfied with the Pi’s built-in capabilities, [GuzziGuy] is using a Behringer UCA202 to produce CD-quality audio, which is then fed into a TPA3116 amplifier. In turn, the output from the amplifier is terminated in a set of female jacks on the player. Just like the stereo equipment of yore, this player is designed to be connected to a larger audio system and doesn’t have any internal speakers.

The primary display is a 256×64 Futaba GP1212A02A FVD which has that era-appropriate glow while still delivering modern features. [GuzziGuy] says it was more difficult to interface with this I2C display than the LCDs he used in the past due to the lack of available libraries, but we think the final product is proof it was worth the effort. He bought both the VFD spectrum analyzer and LED VU meter as turn-key modules, but the center equalizer controls are completely custom; with dual MCP3008 ADCs to read the state of the sliders and the Linux Audio Developer’s Simple Plugin API (LADSPA) to tweak the Pi’s audio output accordingly.

We’re no strangers to beautiful pieces of audio gear here at Hackaday, but generally speaking, most projects involve modernizing or augmenting an existing device. While those projects are to be admired, the engineering that goes into creating something of this caliber from modular components and raw building materials is really an accomplishment on a whole different level.

Bit Preserve: A Sanctuary For Modern Captures Of Vintage Schematics

Vintage parts may be documented, but that doesn’t mean they’re particularly useful or accessible. If the phrase “eyestrain from unsearchable, badly-scanned PDF datasheets” makes your lower eyelid twitch in sympathy, read on.

While [Bald Engineer] was researching how he might make a portable Apple II, he was delighted to find that the vintage components he needed to examine were documented. However, he became frustrated with the seemingly endless number of poor quality PDF scans and the inability to search effectively. He decided to re-create the entire Apple IIgs schematic in KiCad, and in the process the Bit Preserve project was born. The goal is to act as a safe haven for modern and editable versions of vintage electronic schematics. The GitHub repository can be found here.

[Bald Engineer] talks a bit about his Apple II project, as well as the ideas behind the Bit Preserve project in his KiCon 2019 talk “Preserving History with KiCad”. KiCon was wild, and we have loads of photos of the projects and details so be sure to check it out.

Vintage Monoscope Tubes Generate Classic TV Test Patterns Once Again

Night creatures and insomniacs of a bygone era may fondly recall a TV test pattern appearing once [Jack Parr] or [Steve Allen] had had their say and the local TV station’s regular broadcast day had concluded. It was affectionately known as the Indian Head test pattern, for the stylized Native American, resplendent in a feathered headdress, that featured prominently in the graphic.

Unknown to most viewers was exactly how that test pattern and others like it were generated. But thanks to [Rich “The Lab Guy” Diehl] and his monoscope restoration project, we can all share in the retro details. It turns out that while some test patterns were merely a studio camera trained on a printed card, most were generated by a special tube called a monoscope. It functioned in basically the same manner as a studio camera, but rather than scanning the incident light of a scene with an electron beam, the image was permanently etched into a thin aluminum plate. [Rich] laid hands on two vintage monoscope tubes, one containing the Indian Head test pattern, and set about building a device to use them. “The Chief” can hold either tube in a Faraday cage of thin, flexible PCB material and 3D-printed parts, with supporting electronics like the power supply and video amplifiers in an aluminum chassis below.

It’s a nice piece of work and a great lesson in how it used to be done, and the lithophane of the Indian head is a nice touch. Hats off to [The Lab Guy] for build quality and great documentation, including a detailed video series that starts with the video below. If you need a little more background on how video came to be, [Philo Farnsworth]’s story is a good place to start.

Continue reading “Vintage Monoscope Tubes Generate Classic TV Test Patterns Once Again”

Fallout Inspired Display Is Ready For The Apocalypse

We’ve seen more projects based on books, TV shows, movies, and video games than we could ever hope to count. Hackers and makers derive inspiration from what they see around them, and it turns out there’s considerable overlap between the folks who sit in their labs building stuff all day and the ones who spend their free time playing games or watching movies. Big surprise, right? But among them, few can match the influence of the Fallout franchise.

As the latest entry in a long line of incredible Fallout-inspired builds, we present the Octoglow VFD by [Michał Słomkowski]. While this build isn’t trying to replicate anything directly from the games, it captures all the hallmarks that make up the game’s distinctive post-apocalyptic chic : antiquated vintage components, exposed internals, and above all, a dirty, industrial look. It’s supposed to look like somebody built the stuff out of parts they found in the trash, primarily because that’s exactly what they would’ve needed to do.

So what is it? Well, that’s a little hard to nail down. Frankly we’d say it’s a little more like art than anything, but it does have some useful functions. Currently it shows the time, date, weather information, and various RSS feeds on its dual vacuum fluorescent displays. There’s also a real-life Geiger-Müller counter onboard, because what says Fallout more than a little radiation?

The build itself is absolutely fascinating, and [Michał] leaves no stone unturned in his comprehensive write-up. Every module of the Octoglow has its own page on his site, and each one is bristling with hardware details, schematics, and firmware documentation. Reading along you’ll run into all sorts of interesting side notes: like how he reverse engineered a wireless temperature sensor with his sound card, or devised his own ten-pin bus to interconnect all the modules.

If the Octoglow doesn’t quite scratch that Vault-Tec itch, there’s plenty more where that came from. How about this replica of the wall terminals from Fallout 4, or this radiation monitor perfect for roaming the wastelands? Don’t forget to bring along this 3D printed Thirst Zapper for protection.

Video Doorbell Focuses On Quality, Aesthetic

One of the most popular futurist tropes of the 20th century was the video intercom. Once this technology was ready, it would clearly become a mainstay of modern living overnight. Our lived reality is however somewhat different. For [MisterM], that simply wouldn’t do, so he set about producing a retro-themed video doorbell that is sure to be the envy of the neighbourhood.

Not one to settle for second best, [MisterM] wanted to focus on quality in video and sound. A Microsoft LifeCam 3000HD handles video and audio capture, with a Raspberry Pi 3B+ providing plenty of grunt to run the show. The Pimoroni pHAT BEAT add-on provides audio output. It’s all integrated into a 1980s vintage intercom, which is painted a deep shade of maroon for an extra classy look. Further parts are integrated into a classic Sony tape deck, with LEDs shining out from under the cassette door for added visual appeal.

The doorbell works by making calls to Google Duo, which allows the user to answer the door from anywhere in the house, or indeed – anywhere with an Internet connection! [MisterM] reports this has already proved useful for communicating with couriers delivering packages to the house. There’s also a standard wireless doorbell and chime integrated into the unit which alerts those within the house in the usual way.

It’s a project that is both highly functional and looks particularly swish. Integrating new brains into old-school enclosures is a great way to give your project a cool look. These aircraft surplus clocks are a great example. Video after the break.

Continue reading “Video Doorbell Focuses On Quality, Aesthetic”

History of Sony 1970s

Retrotechtacular: History Of Sony Mini Doc Bursts With 1970s Style

The 1970s, it was a time when cameras needed film, phones had cords, and televisions masqueraded as furniture. A time where hi-fi systems were judged by the volume knob feel, and thanks to YouTube user [nefesh22] we have a behind-the-scenes glimpse of what the era was like from the Sony corporate perspective in this mini documentary of the company’s history below. The film was originally created for internal use at Sony’s US manufacturing facilities in San Diego, however, now it now can be watched by anyone with an internet connection.

Sony CRT Testing Rig 1970s

Sony’s corporate ethos of allowing its engineers to drive business innovation is on full display here. For instance how in 1950 Sony introduced the first magnetic tape recorder, the G-Type, in Japan and followed that up with the first portable television, the TV8-301, a decade later. Throughout the 1970s Sony became an innovator in the video space. In fact, the Sony Trinitron brand of color TVs garnered so much notoriety in the television industry that the company was awarded an Emmy in 1973. Though the most telling feature is the documentary’s focus on the 3/4-inch U-Matic videocassette format, a precursor to VHS and Sony’s own Betamax videotapes. Highlighting the “superiority” of those VTR systems of the day really does date the film as those hulking decks failed to penetrate the market beyond early adopters and media companies.

It’s interesting to see how hands-on quality assurance testing used to be. Whether it’s glancing at NPN transistors under a microscope, dialing in the focus on a Super 8 camera, or a quick wave of the degaussing wand before a tube leaves the line, each of the QA tasks were carried out by individual employees rather than the automated methods of today. On an unrelated note, the brief overview of the Sony’s on-site “fiefdom” for its young workforce is a reminder that some ideas may be better left in the past… Google’s Mountain View campus anyone? If anything is to be gleaned from this retrotechtacular retrospective is that we could all use a little more wood-grain in our electronics these days.

Continue reading “Retrotechtacular: History Of Sony Mini Doc Bursts With 1970s Style”

“Vintage” Radio Gets A Modern Makeover

Taking an old piece of gear and cramming it full of modern hardware is a very popular project. In fact, it’s one of the most common things we see here at Hackaday, especially in the Raspberry Pi era. The appeal is obvious: somebody has already done the hard work of designing and building an attractive enclosure, all you need to do is shoehorn your own gear into it. That being said, we know some of our beloved readers get upset when a vintage piece of gear gets sacrificed in the name of progress.

Thankfully, you can put your pitchforks down for this one. The vintage radio [Freshanator] cannibalized to build this Bluetooth speaker is actually a replica made to invoke the classic “cathedral” look. Granted it may still have been older than most of the people reading this right now, but at least it wasn’t actually from the 1930’s.

To start the process, [Freshanator] created a 3D model of the inside of the radio so all the components could be laid out virtually before anything was cut or fabricated. This included the design for the speaker box, which was ultimately 3D printed and then coated with a spray-on “liquid rubber” to seal it up. The upfront effort and time to design like this might be high, but it’s an excellent way to help ensure you don’t run into some roadblock halfway through the build.

Driving the speakers is a TPA3116-based amplifier board with integrated Bluetooth receiver, which has all of its buttons broken out to the front for easy access. [Freshanator] even went the extra mile and designed some labels for the front panel buttons to be made on a vinyl cutter. Unfortunately the cutter lacked the precision to make them small enough to actually go on the buttons, so they ended up getting placed above or next to them as space allowed.

The build was wrapped up with a fan installed at the peak of the front speaker grille to keep things cool. Oh, and there are lights. Because there’s always lights. In this case, some blue LEDs and strategically placed EL wire give the whole build an otherworldly glow.

If you’re interested in a having a frustrating quasi-conversation with your vintage looking audio equipment, you could always cram an Echo Dot in there instead. Though if you go that route, you can just 3D print a classic styled enclosure without incurring the wrath of the purists.