Taking Apart A Vintage Oscilloscope

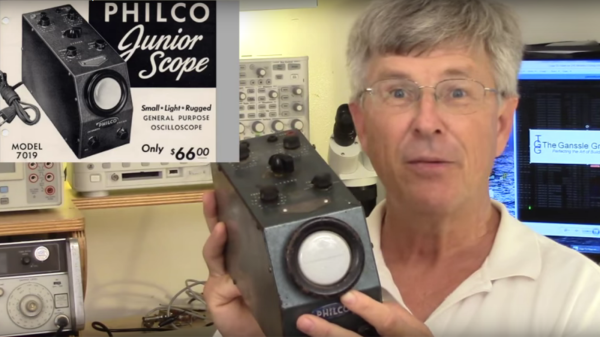
After getting a power supply and a multimeter, the next piece of gear a hacker would want to add to their bench is the oscilloscope. Nowadays, even the cheapest ones cost a few hundred dollars yet pack in the features. At the other end of the scale, if you can pony up close to a  million dollars, you can help yourself to an oscilloscope capable of 100 GHz bandwidth and 240 GS/s sampling rate. With that perspective, it becomes interesting to take a look at this video (embedded below), where [Jack Ganssle] shows us the Philco 7019 Junior Scope which was introduced way back in 1946. It seems the Philco 7019 model was an identical re-badged version of the Waterman Model S-10-A PocketScope.

[Jack] is familiar to all of us as an embedded systems engineer, but in this video he does a teardown of this vintage analog model. He starts off by walking us through the various controls, of which there are not a lot, in this “portable” instrument. At around the 3:40 mark in the video, he’ll make you wince as he uses a screwdriver and hammer combo to smash another ’40’s vintage CRT just so he can show us it’s innards — the electron beam source and the horizontal and vertical deflection plates. The circuit is about as bare-bones as it can get. Besides the CRT, there are just three vacuum tubes. One is the rectifier for the power supply, a second one is used for the vertical amplifier while the third one is the free running horizontal sweep oscillator. There is no triggering option — you just adjust the sweep frequency via a potentiometer as best you can. It does have internal, external and line frequency function selection, but it still requires manual adjustment of the sweep oscillator. There’s no blanking signal either, so the return sweep is always clearly visible. This is evident from the horizontal burn mark on the phosphor of the CRT after decades of use. It’s amusing to see that the vertical position could be adjusted by moving a magnet attached to the side cover.

The Oscilloscope Museum website hosts the Instruction Manual for this model, as well as a sales brochure which makes for very interesting reading after viewing [Jack]’s video.

Thanks, [Itay], for the tip.

Continue reading “Taking Apart A Vintage Oscilloscope”

B Battery Takes A 9V Cell

Old American radios (and we mean really old ones) took several kinds of batteries. The A battery powered the filaments (generally 1.5V at a high current draw). The B battery powered the plate (much lower current, but a higher voltage–typically 90V). In Britain these were the LT (low tension) and HT (high tension) batteries. If you want to rebuild and operate old radios, you have to come up with a way to generate that B voltage.

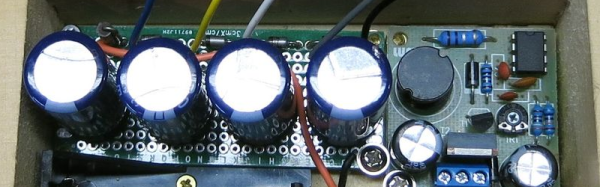
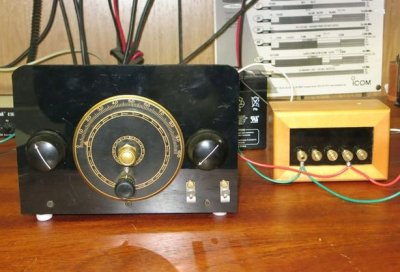
Most people opt to use an AC supply. You can daisy-chain a bunch of 9V batteries, but that really ruins the asthetics of the radio. [VA3NGC] had a better idea: he built a reproduction B battery from a wooden box, some brass hardware, a nixie tube power supply, and a 9V battery (which remains hidden). There’s also a handful of zener diodes, resistors, and capacitors to allow different taps depending on the voltage required.

b-battery-in-useThe project looks great. The wooden box apparently was a recycle item and the brass hardware makes it look like it belongs with the old radios it powers. This is a good example of how there’s more to vintage restoration than just the electronics. Sure, the function is important, but to really enjoy the old gear, the presentation is important, too.

Not all tube radios took 90V B+, but since this battery has taps, that isn’t a problem. The old Radio Shack P-Box kit took 22.5V. Of course, if you are going to build your own battery, maybe you ought to build your own triodes, too.

Retrotechtacular: The Aerolux Light Corporation

The humble incandescent lightbulb is an invention just about anyone born in the 20th Century is more than familiar with. But it’s not the be all and end all of lighting technology – there are neon lights, compact fluorescent bulbs, and even LEDs are finally being adopted for interior lighting. But with the endless march forward, there are vintage throwbacks to the past – how many hipster cafes have you been to lately with great big industrial-looking filament bulbs hanging from the ceiling?

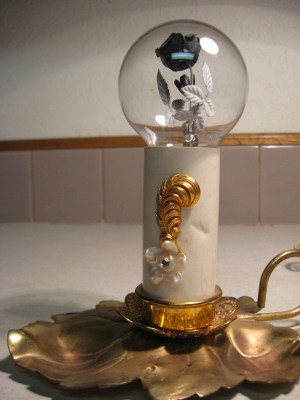
Even when switched off, they have a striking appearance.

However, that’s not all history has to give us. These gas discharge bulbs from yesteryear are absolute works of art.

The bulbs contain delicate floral sculptures in metal, coated with phosphor, and the bulbs are filled with neon or argon gas. Applying mains voltage to the electrodes inside the bulb causes the phospor to fluoresce, creating a glowing flower that is hauntingly beautiful.

These bulbs were manufactured by the Aerolux Light Company, from the 1930s to the 1970s. Once upon a time, they could be had for as little as 20 cents a bulb – nowadays you’re likely to pay over $50 on eBay or Etsy. The bulbs work by the glow discharge effect, not at all dissimilar to garden variety neon lamps.

While it’s not easy, it is possible to make your own vacuum tubes. Maybe it’s time to order some phospor powder and a tank of neon and get to work? Be sure to document your attempt on Hackaday.io.

Thanks to [Itay Ramot] for the tip!


Vintage 16mm Film Editor Is Now Retro Arcade

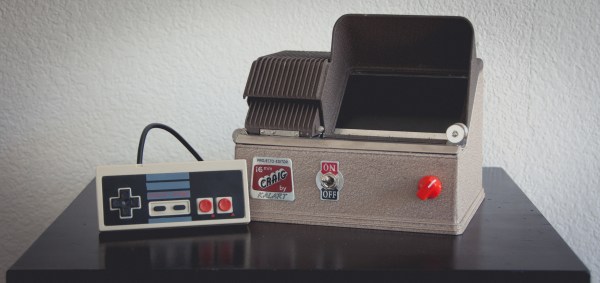
When [Douglas Welcome] found a disposed Kalart Craig 16 mm Projecto-Editor on the curb, he knew it was destined for retro-greatness. This vintage looking device was once used to view and cut 16 mm film strips, and still in mint condition, it was just too cool to pass up. With help of a similarly historic Raspberry Pi 1 Model B, and a little LCD screen, [Douglas] now turned the little box into an awesome retro arcade game console

Continue reading “Vintage 16mm Film Editor Is Now Retro Arcade”

Retrofitting A Vintage Intercom To Run Amazon Alexa

The Amazon Echo is a pretty cool piece of tech: it lets you ask questions, queue up music, find out the weather, and more, without having to do anything but talk. But, the device itself is a bit pricey, and looks a little boring. What if you could have all the features of the Echo, but in a cool retro case and at a cheaper price?

Well, you can, and that’s exactly what [nick.r.brewer] did, using a ’50s intercom and a Raspberry Pi. He picked the vintage intercom up at an antique store for $20, and the Raspberry Pi Zero is less than $10. So, for about $30 (and some parts most of us have lying around) he was able to build a cool looking device with all of the capabilities of the Amazon Echo.

The hardware portion of the build was pretty straightforward, with the Raspberry Pi, a sound card, WiFi dongle, USB hub, and microphone all fitting nicely inside the case of the intercom. The software side of things is a little more tricky, but with a device like this it runs well with Amazon’s Alexa SDK. Of course, if you want to add more hardware features, that’s possible too.

Continue reading “Retrofitting A Vintage Intercom To Run Amazon Alexa”

Building A Satellite-Tracking System With Cold War Tech

The things Hackaday readers come up with and post over on Hackaday.io never cease to amaze us. If you’ve never checked it out, be careful — you can easily spend hours (or weeks) of your life just skimming through the projects that have been logged there. Many of the builds use modern development tools like Arduino and Raspberry Pi, but every so often we come across a project that takes a more difficult road.

That’s the case with [Keplermatik’s] Cold War-era satellite-tracking project, also aptly named Keplermatik. This a build that’s still in progress, which just means you’ve got the privilege of following along as it progresses! What makes this project so special? Aside from the fact that it’s purpose is to track satellites, we think the sole use of vintage tech is a very cool and very ambitious goal.

IV-22 VFD displays will be used for the "Soviet" side of the console
IV-22 VFD displays will be used for the “Soviet” side of the console

[Keplermatik] plans to split the satellite-tracking console into two sides: an American-tech side for tracking the satellite’s position, and a Soviet-tech side for tuning the radio and positioning the antenna. The idea is that he’ll get to use vintage technology from both sides of the Iron Curtain. That should lead to some very interesting lessons about how these kinds of systems were designed by each side during the Cold War.

The build is still in its adolescence, but is definitely worth following along with. But, if you’re craving more Soviet tech and need it right now, be sure to check out this post on Russian Cold War vacuum tubes.


Unusual 72-Bulb Display Mechanism Found In Vintage Clock

It’s hard to beat a vintage clock for something that you can hack, and that your significant other might actually let you display in your home. It’s practical and it’s art all at the same time! But, finding that perfect vintage clock for restoration can be a bit tricky. A crowd favorite is to choose something with intricate mechanisms and gears — the motion of a mechanical display is just so fascinating.

bulb-display-group-v01

[Gavin] managed to find a clock that is every bit as interesting without any moving parts. The clock uses a unique system of bulbs and screen masks to project each digit of the time onto glass, which creates a pretty cool look you’re not likely to see on other devices. As cheap as LCD and 7-segment displays are these days, it’s hard to imagine a time when an intricate solution like this — using 72 light bulbs — was considered practical.

Of course, what isn’t practical is replacing 72 incandescent bulbs, just to have them start the process of burning out all over again. [Gavin’s] solution to this problem was to replace the incandescent bulbs with LEDs. After getting the color temperature right (to replicate the vintage warm glow), he was able to use a jig system to get the LEDs positioned correctly to project the digits properly.

This certainly isn’t the first time we’ve seen a unique clock design, but there is something intriguing about seeing a design like this that never quite caught on. It’s a little bit of technological history that even your significant other will think is cool.