Prioritising Mechanical Multiplexer

When automating almost any moderately complex mechanical task, the actuators and drive electronics can get expensive quickly. Rather than using an actuator for every motion, mechanical multiplexing might be an option. [James Bruton] has considered using it in some of his many robotics projects, so he built a prioritizing mechanical multiplexer to demonstrate the concept.

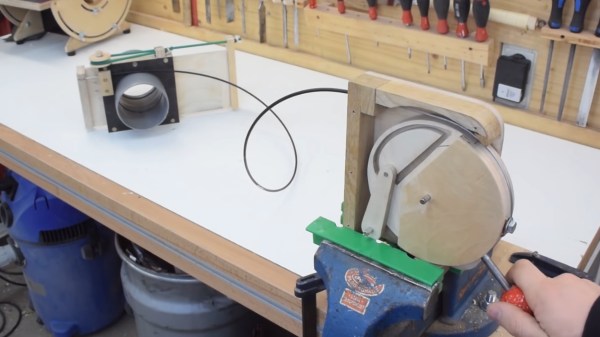
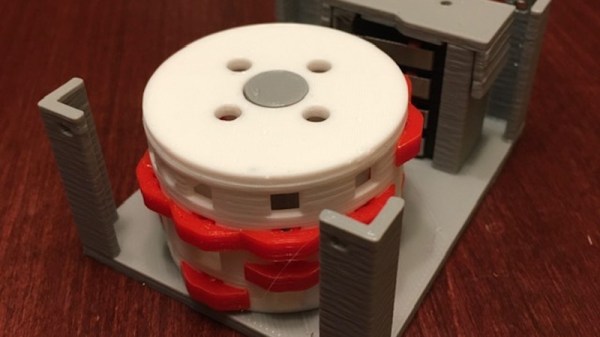
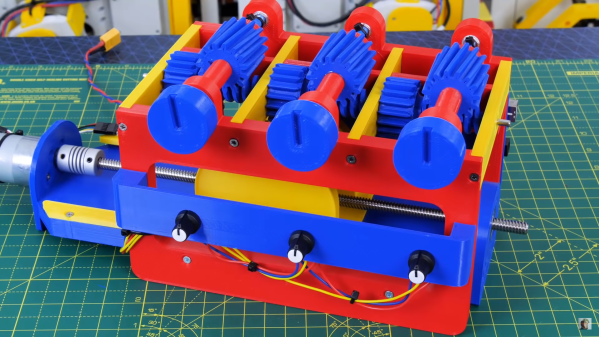
The basic idea is to have a single actuator and dynamically switch between different outputs. For his demonstration, [James] used a motor mounted on a moving platform actuated by a lead screw that can engage a number of different output gears. Each output turns a dial, and the goal is to match the position of the dial to the position of a potentiometer. The “prioritizing” part comes in where a number of outputs need to be adjusted, and the system must choose which to do first. This quickly turns into a task scheduling problem, since there are a number of factors that can be used to determine the priority. See the video after the break to see different algorithms in action.

Instead of moving the actuator, all the outputs can connect to a single main shaft via clutches as required. Possible use cases for mechanical multiplexers include dispensing machines and production line automation. Apparently, the Armatron robotic arm sold by Radioshack in the ’80s used a similar system, controlling all its functions with a single motor.

[James] knows or two about robotics, having built many of them over the last few years. Just take a look at OpenDog and his Start Wars robots. Continue reading “Prioritising Mechanical Multiplexer”

Logitech Joystick Gets A Mechanical Sidekick

The mechanical keyboard rabbit hole is a deep one, and can swallow up as much money and time as you want to spend. If you’ve become spoiled on the touch and responsiveness of a Cherry MX or other mechanical switch, you might even start putting them on other user interfaces as well, such as this Logitech joystick that now sports a few very usable mechanical keys for the touch-conscious among us.

The Logitech Extreme 3D Pro that [ErkHal] and friend [HeKeKe] modified to accept the mechanical keys originally had a set of input buttons on the side, but these were unreliable and error-prone with a very long, inconsistent push. Soldering some mechanical switches directly on the existing board was a nice improvement, but the pair decided that they could do even better and rolled out an entire custom PCB to mount the keys more ergonomically. The switches are Kailh Choc V2 Browns and seem to have done a great job of improving the responsiveness of the joystick’s side buttons. If you want to spin up your own version, they’ve made the PCBs available on their GitHub page.

While [ErkHal] notes the switches aren’t the best and were only used since they were available, they certainly appear to work much better than what the joystick shipped with originally. In fact, we recently saw similar switches used to make a custom mechanical keyboard made for the PinePhone.

A Microwave Repair Even Mechanical Keyboard Fans Will Love

Microwave oven design and manufacturing have been optimized to the point where the once-expensive appliances are now nearly disposable. Despite the economics, though, some people can’t resist fixing stuff, especially when you get a chance to do it in style. Thus we present this microwave repair with its wholly unnecessary yet fabulous adornments.

The beginning of the end for [dekuNukem]’s dirt cheap second-hand microwave started where many of the appliances begin to fail first — the membrane keyboard. Unable to press the buttons reliably anymore, [dekuNukem] worked out the original keypad’s matrix wiring arrangement and whipped up a little keypad from some pushbutton switches and a scrap of perfboard. Wired into the main PCB, it was an effective and cheap solution, if a bit on the artless side.

To perk things up a bit, [dekuNukem] turned to duckyPad, a hot-swappable macropad with mechanical switches and, of course, RGB LEDs. Things got interesting from here; since duckyPad outputs serial data, an adapater was needed inside the microwave. An STM32 microcontroller and a pair of ADG714 analog switches did the trick, with power pulled from the original PCB.

The finished repair is pretty flashy, and [dekuNukem] now has the only microwave in the world with a clicky keypad. And what’s more, it works.

Continue reading “A Microwave Repair Even Mechanical Keyboard Fans Will Love”

Time Enough At Last: Reviving An Heirloom Typewriter

You may find yourself living in interesting times. The world we knew two months ago is gone, and there is time enough at last, to finally go through those projects we’ve been putting off for one reason or another. Today, I wanted to explore and possibly repair an old unidentified typewriter that belonged to my late aunt for many decades.

A small disclaimer though, I am not an avid typewriter collector or connoisseur. I enjoy looking at them and using them, but by no stretch of the imagination I want to claim to be an expert in their history or inner workings — I’m a hacker after all. What follows is a layman’s adventure into her first typewriter repair, an exciting tale that explores typewriter anatomy and troubleshooting. Let’s dig in.

Continue reading “Time Enough At Last: Reviving An Heirloom Typewriter”

Dissecting A Mechanical Voltage Regulator

When the fuel gauge of his 1975 Triumph Spitfire started going off the scale, the collected knowledge of the Internet indicated that [smellsofbikes] needed to replace a faulty voltage regulator behind the dash. For most people, that would be the end of the story. But he, like everyone who’s reading this right now, really wanted to see what the inside of a 45 year old voltage regulator looked like.

After prying open the metal case, he discovered that not only is the regulator mechanical in nature, but there’s even a tiny screw that allows you to adjust the output voltage. Luckily for us, not only is [smellsofbikes] curious enough to open it up, but he’s also got the tools and knowledge to explain how it works in the video after the break.

Put simply, the heart of the regulator is a bimetallic strip with a coil of wire wrapped around it. When power from the battery is passed through the coil it acts as a heater, which makes the strip move up and break the connection to the adjustable contact. With the connection broken and the heating coil off the strip rapidly cools, and in doing so returns to its original position and reconnects the heater; thus starting the process over again.

These rapid voltage pulses average out to around 10 VDC, though [smellsofbikes] notes that you can’t actually measure the output voltage of the regulator with a meter because it moves around too much to get any sort of accurate reading. He also mentions a unique quirk of this technology: due to the force of gravity acting on the bimetallic strip, the output of the regulator will actually change depending on its mounting orientation.

On the oscilloscope, [smellsofbikes] is able to show us what the output actually looks like. As you might expect, it looks like a mess to 21st century eyes. But these were simpler times, and it should go without saying there aren’t any sensitive electronics in a sports car from 1975. Interestingly, he says he’s now replaced the mechanical assembly with a modern regulator chip. Here’s hoping we’re around long enough to see if he gets another 50 years out of it.

Continue reading “Dissecting A Mechanical Voltage Regulator”

Cable Operated Blast Door Needs No Power

Every well-equipped wood shop has a dust collection system, with blast gates at every tool to direct the suction power where you need it. If these gates are hard to reach they can be real pain to operate. [Cosmas Bauer] had this problem with his table saw, and created a convenient cable-operated mechanism.

The dust chute on table saw is on the back end, meaning he needs to walk around it to open it, and then walk back to the front to operate the machine. As we all know, laziness increased efficiency can be an excellent reason for projects. Electronics or pneumatics might get the job done, but [Cosmas] realised that a mechanical system might be simpler and more reliable.  Being a woodworker, he built most of the system out of wood.

The blast door itself is held in the closed position by a piece of elastic tubing. To pull it open, he attached a bicycle cable to the blast door, with the other side attached to a latching mechanism that is the star of the show. It’s a rotating disc, with the end of the cable and operating handle attached on the outer edge. A slot track is cut in the disc, in which a pin on the end of a short arm slides. It has a few sharp corners in the track, which forces the pin to only go around in one direction, and to latch in two possible positions when released. Check out the video after the break to see it in action.

Continue reading “Cable Operated Blast Door Needs No Power”

Simple “Computer” From The ’60s Now 3D Printed

Now is an amazing time to be involved in the hobby electronics scene. There are robots to build, cheap microcontrollers which are easy to program, and computers themselves are able to be found for very low prices. That wasn’t the case in the 1960s though, where anyone interested in “electronics” might have had a few books about ham radios or some basic circuits. If you were lucky though, you may have found a book from 1968 that outlined the construction of a digital computer made out of paperclips that [Mike Gardi] is hoping to replicate.

One of the first components that the book outlines is building an encoder, which can convert a decimal number to binary. In the original book the switches were made from paper clips and common household parts, but [Mike] is using a more reliable switch and some 3D prints to build his. The key of the build is the encoder wheel and pegs, which act as the “converter” between decimal and binary and actually performs the switching.

It’s a fairly straightforward build, but by working through the rest of the book the next steps are to build two binary encoders and hook all of them up to an ALU which will give him most of a working computer from long lost 1960s lore. He’s been featured recently for building other computers from this era as well.

Thanks to [DancesWithRobots] for the tip!